Blue and White Crochet Christmas Tree Ornaments – Free Crochet Pattern
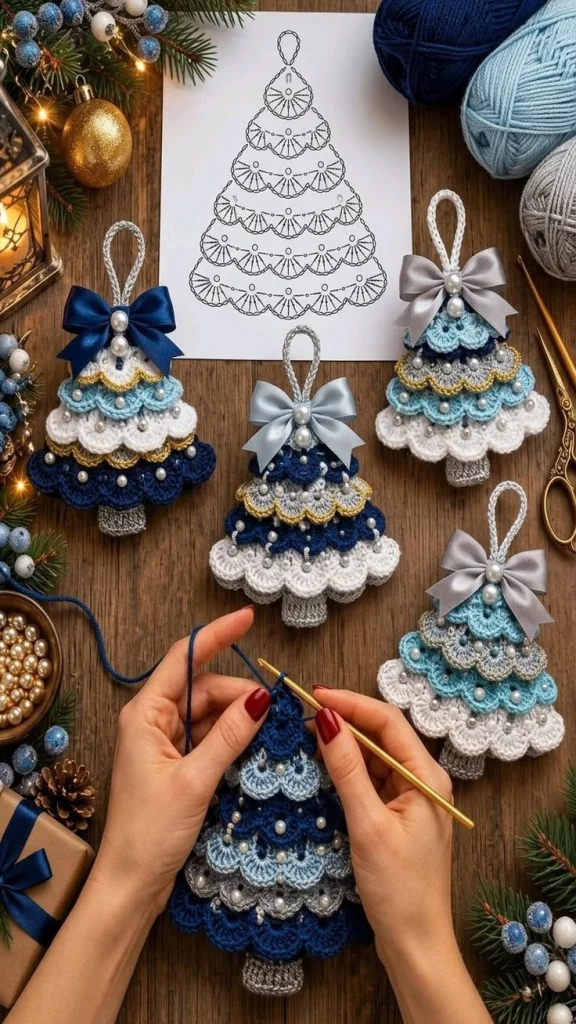
Add a touch of handmade elegance to your holiday decorations with these beautiful blue and white crochet Christmas tree ornaments. Featuring delicate scalloped branches, layered crochet textures, pearl embellishments, shimmering gold details, and satin bows, these miniature Christmas trees are perfect for decorating your home or giving as thoughtful handmade gifts.
The design combines rich navy blue, icy blue, soft silver-gray, and snowy white yarn to create a sophisticated winter-inspired color palette. Each tree features overlapping fan-shaped crochet layers, a small textured trunk, a hanging loop, and a decorative bow at the top.
This free crochet pattern will guide you through making the tree foundation, crocheting the scalloped branches, assembling the layers, adding the trunk, and finishing your ornaments with beautiful decorative details.
Pattern Information
- Skill Level: Intermediate
- Finished Size: Approximately 13–16 cm tall and 9–11 cm wide, excluding the hanging loop
- Construction: Flat crochet tree with layered scalloped sections
- Yarn Weight: Sport or DK-weight yarn (Category 2–3)
- Hook Size: 3 mm or 3.5 mm
- Terminology: US crochet terms
- Estimated Time: 2–4 hours per ornament
- Colors: Navy blue, ice blue, white, silver-gray, and metallic gold
Design Note: This original pattern is inspired by the ornaments shown in the reference image. It uses stacked crochet shell layers to recreate their tiered appearance. The exact ornament dimensions and scallop placement may vary depending on yarn, tension, and embellishments.
Materials Needed
- DK-weight navy-blue yarn
- DK-weight icy-blue yarn
- DK-weight white yarn
- DK-weight silver-gray yarn
- Small amount of metallic gold embroidery thread
- 3 mm or 3.5 mm crochet hook
- Yarn needle
- Scissors
- Stitch markers
- White or ivory pearl beads, approximately 4–6 mm
- Navy-blue and silver satin ribbon, approximately 2–3 cm wide
- Matching sewing thread and needle
- Optional fabric stiffener
- Optional felt backing
- Small amount of fiberfill for the trunk, if desired
Safety Note: Small beads and decorative attachments can pose a choking hazard. Keep embellished ornaments away from young children and pets.
Crochet Abbreviations
- ch: Chain
- sc: Single crochet
- hdc: Half double crochet
- dc: Double crochet
- tr: Treble crochet
- sl st: Slip stitch
- st: Stitch
- sts: Stitches
- sp: Space
- FO: Fasten off
- RS: Right side
- WS: Wrong side
Part 1: Crochet the Tree Foundation
The foundation provides a triangular base for attaching the decorative scalloped layers.
Use navy-blue or silver-gray yarn and a 3.5 mm crochet hook.
Row 1
Ch 3.
Work 2 sc in the second chain from the hook.
Work 1 sc in the next chain.
Turn. (3 sc)
Row 2
Ch 1, turn.
Work 2 sc in the first stitch.
Sc in the next stitch.
Work 2 sc in the last stitch. (5 sc)
Row 3
Ch 1, turn.
Work 2 sc in the first stitch.
Sc in each stitch until the final stitch.
Work 2 sc in the last stitch. (7 sc)
Rows 4–12
Repeat Row 3, increasing by one stitch at each end of every row.
After Row 12, you should have 25 stitches.
Continue working additional rows if you want a larger tree.
FO, leaving a long tail for assembly.
The finished foundation should resemble a small crochet triangle.
Part 2: Crochet the Scalloped Branch Layers
The decorative scalloped layers are the main feature of these Christmas tree ornaments.
Each layer is made separately and attached to the triangular foundation, with the smaller layers positioned above the larger ones.
For one ornament, make four scalloped layers.
Layer 1: Small Top Branch
Use icy-blue yarn.
Ch 13.
Row 1
Sc in the second chain from the hook and across. (12 sc)
Turn.
Row 2
Ch 1, sc in the first stitch.
*Skip 2 stitches, work 5 dc in the next stitch, skip 2 stitches, sc in the next stitch.*
Repeat once more across.
FO.
This creates two rounded scallops.
Layer 2: Upper Middle Branch
Use white or silver-gray yarn.
Ch 19.
Row 1
Sc in the second chain from the hook and across. (18 sc)
Turn.
Row 2
Ch 1, sc in the first stitch.
*Skip 2 stitches, work 5 dc in the next stitch, skip 2 stitches, sc in the next stitch.*
Repeat three times across.
FO.
This produces three scalloped sections.
Layer 3: Lower Middle Branch
Use navy-blue or icy-blue yarn.
Ch 25.
Row 1
Sc in the second chain from the hook and across. (24 sc)
Turn.
Row 2
Ch 1, sc in the first stitch.
*Skip 2 stitches, work 5 dc in the next stitch, skip 2 stitches, sc in the next stitch.*
Repeat four times across.
FO.
This creates four decorative scallops.
Layer 4: Large Bottom Branch
Use white, navy blue, or pale blue yarn.
Ch 31.
Row 1
Sc in the second chain from the hook and across. (30 sc)
Turn.
Row 2
Ch 1, sc in the first stitch.
*Skip 2 stitches, work 5 dc in the next stitch, skip 2 stitches, sc in the next stitch.*
Repeat five times across.
FO.
The bottom layer should have five rounded scallops.
Tip: If your shell edges curl, use a slightly larger hook for the decorative layers. The scallops should remain soft and gently curved.
Part 3: Add Decorative Gold Edging
Gold trim adds a luxurious finishing touch to the blue and white ornaments.
Step 1
Thread metallic gold embroidery yarn onto a yarn needle.
Step 2
Begin at one side of a scalloped layer.
Step 3
Work small decorative running stitches along the curved edge of each scallop.
Step 4
Keep the gold stitches evenly spaced.
Step 5
Continue along the entire scalloped edge.
Step 6
Secure the thread on the wrong side.
Repeat on selected layers to create a subtle shimmering effect.
For a more delicate appearance, add gold edging only to the white and silver-gray layers.
Part 4: Assemble the Christmas Tree Layers
Place the triangular foundation on a flat surface with the right side facing upward.
Step 1
Position the largest scalloped layer near the bottom of the triangle.
Step 2
Secure the straight upper edge of the layer to the foundation using matching yarn.
Step 3
Leave the scalloped edge unattached so it can hang freely.
Step 4
Position the next smaller layer approximately 2–3 cm above the bottom layer.
Step 5
Allow the new scallops to overlap the previous layer slightly.
Step 6
Sew the upper edge securely to the foundation.
Step 7
Repeat with the remaining layers, working toward the top.
Step 8
Attach the smallest scalloped layer near the top of the tree.
Step 9
Adjust the overlapping sections until the ornament has a balanced triangular silhouette.
Step 10
Weave in the yarn ends.
The finished tree should have soft, overlapping scalloped branches resembling a miniature decorated Christmas tree.
Part 5: Crochet the Miniature Tree Trunk
Use silver-gray yarn and a 3 mm crochet hook.
Row 1
Ch 9.
Sc in the second chain from the hook and across. (8 sc)
Turn.
Rows 2–5
Ch 1, turn, sc in each stitch across.
FO, leaving a long sewing tail.
Assembly
Fold the rectangular trunk piece in half if you want extra thickness.
Sew the sides together neatly.
Position the trunk behind the center of the bottom scalloped layer.
Attach it securely to the foundation.
Leave approximately 2–3 cm visible below the branches.
Part 6: Add the Pearl Bead Decorations
Pearl beads give the ornaments their elegant, festive appearance.
Step 1
Choose small white or ivory pearl beads.
Step 2
Thread a fine sewing needle with strong matching thread.
Step 3
Position the pearls along the scalloped branch edges.
Step 4
Sew each bead securely through the crochet fabric.
Step 5
Continue adding pearls across the layers.
Step 6
Keep the spacing balanced rather than overcrowding the design.
Step 7
Secure all knots on the wrong side of the ornament.
For a refined appearance, use approximately 12–20 pearl beads per ornament, depending on its size.
Part 7: Create the Decorative Satin Bow
The satin bow adds a beautiful finishing touch to the top of the Christmas tree.
Step 1
Cut approximately 20–25 cm of satin ribbon.
Step 2
Fold the ribbon into two equal loops.
Step 3
Cross the loops and tie them into a bow.
Step 4
Adjust the loops until both sides are symmetrical.
Step 5
Trim the ribbon ends diagonally.
Step 6
Use a needle and thread to secure the bow at the top of the crochet tree.
Step 7
Sew one or two pearl beads in the center of the bow.
Use navy-blue satin ribbon for the darker ornaments and silver ribbon for the lighter ornaments.
Part 8: Crochet the Hanging Loop
Use silver-gray or white yarn.
Step 1
Ch 35.
Step 2
Sl st in the second chain from the hook and in each remaining chain.
Step 3
FO, leaving long yarn tails.
Step 4
Fold the crocheted cord into a loop.
Step 5
Attach both ends securely to the back of the tree’s top point.
Step 6
Reinforce the attachment with several stitches.
Step 7
Weave in the remaining ends.
The hanging loop should be approximately 5–7 cm tall.
Part 9: Optional Felt Backing
For a cleaner and more structured finish, add a felt backing.
Step 1
Place the finished ornament on a piece of felt.
Step 2
Trace the triangular shape, excluding the loose scalloped edges.
Step 3
Cut the felt slightly smaller than the crochet foundation.
Step 4
Position the felt against the wrong side of the ornament.
Step 5
Sew the felt in place using small, discreet stitches.
Step 6
Make sure the hanging loop and trunk remain securely attached.
The backing helps the ornament maintain its shape when hanging on a Christmas tree.
Part 10: Make Four Matching Color Variations
Create a coordinated set using four different color arrangements.
Variation 1: Navy Winter Elegance
- Top layer: White
- Second layer: Icy blue
- Third layer: White
- Bottom layer: Navy blue
- Bow: Navy satin
- Details: Gold edging and white pearls
Variation 2: Silver Frost
- Top layer: Icy blue
- Second layer: Navy blue
- Third layer: Silver-gray
- Bottom layer: White
- Bow: Silver satin
- Details: Pearl beads and fine gold trim
Variation 3: Midnight Blue
- Top layer: Navy blue
- Second layer: Silver-gray
- Third layer: Navy blue
- Bottom layer: White
- Bow: Silver satin
- Details: White pearls
Variation 4: Icy Blue Christmas
- Top layer: Icy blue
- Second layer: Silver-gray
- Third layer: Icy blue
- Bottom layer: White
- Bow: Silver satin
- Details: Pearl beads and delicate metallic edging
Part 11: Final Finishing
- Check that all scalloped layers are securely attached.
- Make sure the trunk is centered.
- Inspect each pearl bead attachment.
- Adjust the satin bow.
- Trim any loose yarn ends.
- Gently shape the scalloped branches.
- Apply a small amount of fabric stiffener if desired.
- Allow the ornament to dry completely.
- Check that the hanging loop is strong enough.
- Hang the finished ornament on your Christmas tree.
Creative Ways to Use These Crochet Christmas Trees
Christmas Tree Decorations
Hang the miniature trees among silver, white, and blue Christmas ornaments for a coordinated winter-inspired look.
Handmade Gift Toppers
Attach a crochet tree to wrapped presents using satin ribbon. The recipient can keep the ornament as a special handmade decoration.
Christmas Garland
Make several ornaments and attach them to a long crochet cord to create a decorative garland for a mantel or staircase.
Holiday Table Decorations
Place a miniature tree beside each table setting or use it as a decorative napkin accent.
Window Decorations
Hang the ornaments at different heights in front of a window for a delicate winter display.
Handmade Christmas Gifts
Create a matching set of four ornaments and package them in a gift box with tissue paper and ribbon.
Helpful Crochet Tips
- Use the same yarn weight for every scalloped layer.
- Keep your tension consistent.
- Choose a smaller hook if you want tighter, more defined stitches.
- Block the scalloped pieces before assembly if necessary.
- Attach the layers from bottom to top.
- Allow each layer to overlap the one below it.
- Use matching yarn when sewing the layers together.
- Keep the pearl decorations evenly distributed.
- Use strong sewing thread for beads and bows.
- Avoid adding too many heavy embellishments.
- Reinforce the hanging loop securely.
- Use felt backing for extra stability.
- Experiment with different color combinations.
- Make a sample ornament before producing a complete set.
- Store the ornaments flat to protect the scalloped branches.
Frequently Asked Questions
Are these crochet Christmas tree ornaments beginner-friendly?
They are best suited to intermediate crocheters because they involve shaping, shell stitches, layering, and decorative assembly. However, beginners who are comfortable with double crochet and basic sewing techniques can also try this project.
How long does it take to crochet one ornament?
Most crocheters can complete one ornament in approximately 2–4 hours, depending on their experience and the amount of decoration added.
Can I make the ornaments larger?
Yes. Use thicker yarn and a larger hook, or increase the foundation size and add more scalloped layers.
Can I use cotton yarn?
Yes. Cotton yarn is an excellent choice because it provides clear stitch definition and helps the ornaments maintain their shape.
Can I make the trees without pearl beads?
Absolutely. The ornaments will still look beautiful with only crochet scallops and satin bows. You can also replace pearls with embroidered dots.
Do I need fabric stiffener?
No. Fabric stiffener is optional. If you use firm cotton yarn and add a felt backing, the ornaments may hold their shape without additional stiffening.
Can I make these ornaments in traditional Christmas colors?
Yes. Red, forest green, cream, and gold would create a classic Christmas appearance. You can also use blush pink, champagne, or pastel shades for a softer holiday theme.
Can I sell finished ornaments made from this pattern?
Yes. You may sell handmade finished ornaments created using this original pattern. Credit to the pattern designer is appreciated.
Care and Storage Instructions
- Spot-clean gently with a damp cloth.
- Avoid soaking ornaments decorated with satin ribbon or pearl beads.
- Do not use bleach.
- Reshape the scalloped layers after cleaning.
- Allow the ornaments to air-dry completely.
- Store them flat in a dry box.
- Place tissue paper between ornaments to protect the decorations.
- Avoid placing heavy objects on top of the crochet trees.
- Keep away from open flames and direct heat.
Final Thoughts
These blue and white crochet Christmas tree ornaments are a charming way to bring handmade beauty into your holiday decorations. Their layered scalloped branches, elegant winter colors, pearl embellishments, and satin bows create a sophisticated design that looks lovely on a Christmas tree, gift package, or festive garland.
Whether you make one ornament or an entire matching collection, this crochet project is a wonderful opportunity to experiment with colors, textures, and decorative details.
Love this Christmas crochet idea? Save this free crochet Christmas tree ornament pattern to Pinterest and share it with your crochet-loving friends for more handmade holiday inspiration!