Autumn Crochet Pinecone Door Hanging Pattern
Beginner Friendly
Perfect for those just starting their crochet journey, with clear instructions and simple techniques
Single-Day Project
A satisfying project you can complete in a single afternoon or evening.
Handmade Gift
A beautiful keepsake — free forever. Read online or print at home.
About This Autumn Crochet Pinecone Door Hanging Pattern
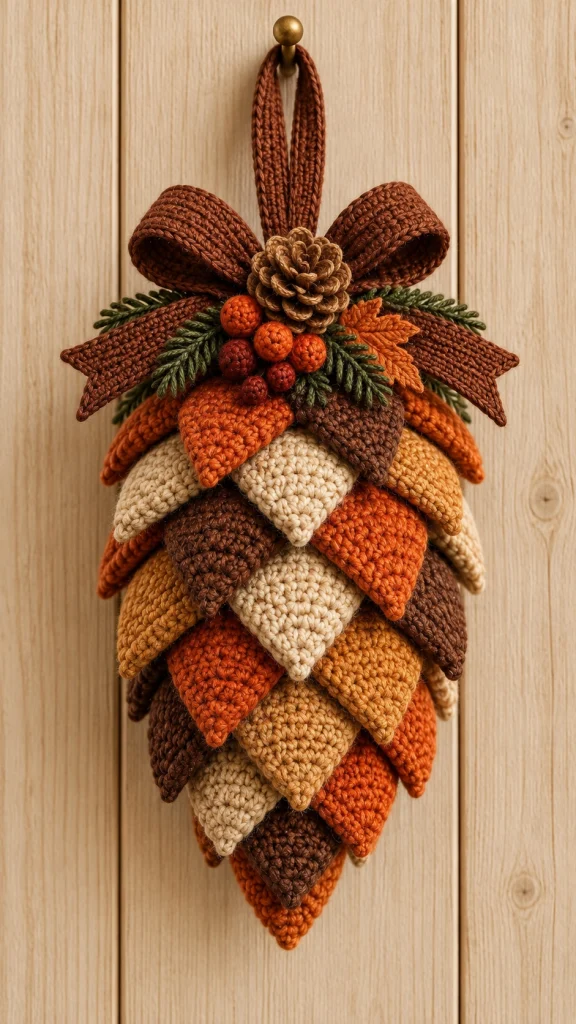
This crochet pinecone pattern creates a large dimensional autumn door hanging inspired by a woodland pinecone. Instead of using one flat crochet panel, the decoration is built from many individual pointed crochet scales layered over one another to create the beautiful overlapping pinecone texture.
The palette combines burnt orange, chocolate brown, warm cream and golden caramel. A large chocolate-brown crochet bow sits at the top, surrounded by a dimensional pinecone, crochet berries, evergreen-style foliage and an autumn leaf.
The finished piece is especially beautiful on a wooden front door, entryway wall or inside a cozy autumn home.
Materials
- Chocolate brown yarn 150–180 g
- Burnt orange yarn 120–150 g
- Warm cream yarn 80–100 g
- Golden caramel / mustard yarn 70–90 g
- Dark rust yarn 20–30 g
- Dark olive green yarn 30–40 g
- 4.0–4.5 mm crochet hook 1
- Fiberfill small amount
- Yarn needle 1
- Stitch markers 4
- Scissors 1 pair
- Optional felt or canvas backing 1 piece
- Optional floral wire for foliage small amount
Abbreviations – US Terms
chchainsl stslip stitchscsingle crochethdchalf double crochetdcdouble crochettrtreble crochetincincreasedecdecreaseMRmagic ringFOfasten offFinished Size
Approximately 48–55 cm / 19–22 in long from the top of the hanging loop to the bottom point.
Pinecone body: approximately 27–32 cm / 10.5–12.5 in long.
Widest part of pinecone: approximately 22–25 cm / 8.5–10 in.
Finished bow: approximately 30–34 cm / 12–13.5 in wide.
Part 1 – Make the Pinecone Backing
Using chocolate brown yarn:
Ch 5.
Row 1
Sc in second ch from hook and across. (4)
Row 2
Ch 1, turn. Inc, sc 2, inc. (6)
Row 3
Ch 1, turn. Inc, sc 4, inc. (8)
Row 4
Ch 1, turn. Inc, sc 6, inc. (10)
Rows 5–10
Continue increasing once at each end of every second row until the backing reaches approximately 22–24 stitches across.
Middle Section
Work straight in sc for approximately 14–18 rows.
Lower Section
Decrease once at both ends of every second row until only 4 stitches remain.
FO.
You should now have an elongated oval/teardrop shape with a pointed bottom.
Part 2 – Large Pinecone Scale
The upper and middle rows use mostly large scales.
Ch 9.
Starting in second ch from hook:
sl st, sc, hdc, dc, dc, hdc, sc, sl st.
Continue along the opposite side of the foundation chain:
sl st, sc, hdc, dc, dc, hdc, sc, sl st.
Work 3 sc around the upper end to create a rounded base.
FO leaving a long sewing tail.
The finished scale should resemble a plump pointed teardrop.
Part 3 – Medium Pinecone Scale
Ch 8.
Starting in second ch:
sl st, sc, hdc, dc, hdc, sc, sl st.
Repeat along the opposite side.
Work 3 sc around the upper end.
FO leaving a sewing tail.
Part 4 – Small Pinecone Scale
Ch 7.
Starting in second ch:
sl st, sc, hdc, dc, hdc, sl st.
Repeat along the opposite side.
FO leaving a sewing tail.
Use these smaller scales near the bottom tip and upper edge.
Part 5 – Make the Colored Scales
Make approximately:
- 12–14 burnt orange scales
- 9–11 chocolate brown scales
- 8–10 warm cream scales
- 7–9 golden caramel scales
You will need approximately 38–44 scales total, depending on your yarn, hook and desired fullness.
Mix large and medium scales through the upper and center sections.
Reserve several smaller scales for the tapered bottom.
Part 6 – Arrange the First Scale Row
Begin at the bottom point of the backing.
Place one burnt-orange scale vertically with its point facing downward.
Sew only the rounded upper portion to the backing.
Leave approximately two-thirds of the scale unattached.
This becomes the bottom point of the pinecone.
Part 7 – Second Scale Row
Position two scales above the first one.
Overlap their lower tips over the upper portion of the bottom scale.
Use contrasting colors—for example:
chocolate brown + burnt orange.
Sew only across the upper edge of each scale.
Part 8 – Continue Layering
Continue upward in staggered rows.
A useful arrangement is:
Row 1: 1 scale
Row 2: 2 scales
Row 3: 3 scales
Row 4: 4 scales
Row 5: 5 scales
Row 6: 5 scales
Row 7: 5 scales
Row 8: 4 scales
Row 9: 4 scales
Row 10: 3 scales
Adjust the exact number according to the width of your backing.
Part 9 – Shape the Pinecone Texture
After every two or three rows, hold the piece vertically.
Gently curve the free points of the scales outward with your fingers.
The upper scales may sit slightly flatter.
The middle scales should have the most dimension.
The lower scales should gradually taper toward the center point.
Part 10 – Large Crochet Bow
Using chocolate brown yarn:
First Bow Loop
Ch 36.
Join carefully into a ring without twisting.
Rounds 1–7: sc around.
FO.
Flatten the ring so it forms a wide loop.
Second Bow Loop
Repeat exactly.
Pinch both loops at their inner ends.
Part 11 – Bow Tails
Make two.
Ch 28.
Starting in second ch from hook, sc across.
Work another 5–6 rows in sc.
For the pointed end, decrease at both ends over the final 3 rows.
FO.
Position the tails diagonally downward behind the bow loops.
Part 12 – Bow Center
Ch 9.
Sc in second ch from hook and across.
Work approximately 8–10 rows.
Wrap the rectangle tightly around the center of the bow.
Sew securely at the back.
The finished bow should remain thick and dimensional rather than flat.
Part 13 – Crochet Decorative Pinecone
Using medium brown yarn:
R1: 6 sc in MR. (6)
R2: inc around. (12)
R3: [sc, inc] ×6. (18)
R4–7: sc around. (18)
R8: [sc, dec] ×6. (12)
Add a small amount of stuffing.
R9: dec around. (6)
FO.
For the layered pinecone effect, surface crochet small loops around the stuffed form:
*sl st into body, ch 4, sl st into next stitch* around.
Repeat in staggered rows until most of the surface is covered.
Part 14 – Crochet Berries
Make approximately 7–9 berries using burnt orange and dark rust yarn.
R1: 6 sc in MR. (6)
R2: inc around. (12)
R3: sc around. (12)
R4: dec around. (6)
Add a tiny amount of stuffing.
FO and close the opening.
Make some berries slightly smaller by skipping Round 3.
Part 15 – Evergreen Sprigs
Using dark olive yarn:
Ch 24.
Working back along the chain:
*sl st in next ch, ch 5, sl st back down the ch-5, sl st in next foundation ch.*
Repeat along both sides of the foundation chain.
This creates a narrow evergreen-style branch.
Make approximately 4–6 sprigs.
Part 16 – Autumn Leaf
Using burnt orange yarn:
Ch 12.
Starting in second ch:
sl st, sc, hdc, dc, tr, tr, dc, hdc, sc, sl st.
Work around the opposite side.
Add small picots along the edge to create a more pointed autumn-leaf silhouette.
Surface crochet a chain-stitch vein through the center.
Part 17 – Assemble the Top Cluster
Position the large brown bow at the top of the pinecone body.
Place the bow tails behind the loops.
Add the dimensional crochet pinecone directly in the center.
Arrange evergreen sprigs underneath and around it.
Cluster the orange and rust berries beneath the center pinecone.
Add the autumn leaf slightly to one side.
Sew every element securely through the backing.
Part 18 – Hanging Loop
Using chocolate brown yarn:
Ch 45–55, depending on the desired loop length.
Starting in second ch from hook, sl st or sc across.
For a thicker loop, make a second row of sc.
Fold into a loop.
Sew both ends firmly to the upper back of the decoration behind the bow.
Reinforce several times because this loop supports the full weight of the hanging.
Part 19 – Optional Backing
Place the finished pinecone over felt or sturdy fabric.
Trace around the main pinecone silhouette.
Cut the backing slightly smaller than the crochet piece.
Hand sew it to the reverse side using matching thread.
This hides the assembly stitches and helps the decoration hang neatly against a door.
Final Shaping
Lay the decoration flat.
Shape every pinecone scale individually.
Lift the pointed ends slightly so the rows remain visibly layered.
Open the bow loops with your fingers.
Arrange the tails diagonally.
Spread the evergreen sprigs around the central pinecone.
Position the berries at different heights instead of placing them in one straight row.
Lightly steam from a distance if necessary, but do not flatten the dimensional scales.
Color Variations
Reference Autumn: burnt orange + chocolate + cream + caramel + olive.
Deep Fall: burgundy + rust + mustard + dark brown.
Neutral Farmhouse: cream + beige + taupe + chocolate.
Woodland: forest green + brown + rust + golden mustard.
Thanksgiving: pumpkin orange + cream + cinnamon + olive.
Christmas Pinecone: deep green + burgundy + cream + gold.
Ways to Customize It
- Add small crochet acorns around the top cluster.
- Replace the berries with tiny pumpkins.
- Add wooden beads to the hanging loop.
- Use metallic yarn around the bow edges.
- Add a small wooden “Welcome” tag.
- Make a smaller version for cabinet doors.
- Use only neutral cream and brown for farmhouse décor.
- Add tiny bells for a Christmas version.
- Make matching mini pinecones for a garland.
- Add more greenery for a fuller woodland appearance.
Care Instructions
Spot clean whenever possible.
If washing is necessary, hand wash gently in cool water.
Do not twist or wring.
Press between clean towels to remove excess water.
Reshape every scale while damp.
Lay completely flat to dry.
Store flat in a box to prevent the bow and scales from becoming crushed.
Frequently Asked Questions
No. The dimensional appearance comes from individual crochet scales that are sewn onto a shaped backing in overlapping rows.
Sew only across the upper section of each scale. Leave the pointed lower portion unattached so it can lift naturally away from the backing.
Yes. Use lighter yarn, a smaller hook and fewer rows of scales. Keep the same staggered layering technique.
It is best for a covered porch or indoor door. Regular yarn can absorb moisture and fade when exposed continuously to rain and direct sunlight.
Add a felt, canvas or plastic-mesh backing behind the crochet base before attaching the final decorative elements.
Yes. The layered construction works especially well with scrap yarn. For a cohesive autumn look, keep the colors within a warm palette such as rust, caramel, cream, brown and muted gold.
The finished Autumn Crochet Pinecone Door Hanging Pattern

