Autumn Flower Crochet Placemat Pattern
Beginner Friendly
Perfect for those just starting their crochet journey, with clear instructions and simple techniques
Single-Day Project
A satisfying project you can complete in a single afternoon or evening.
Handmade Gift
A beautiful keepsake — free forever. Read online or print at home.
About This Autumn Flower Crochet Placemat Pattern
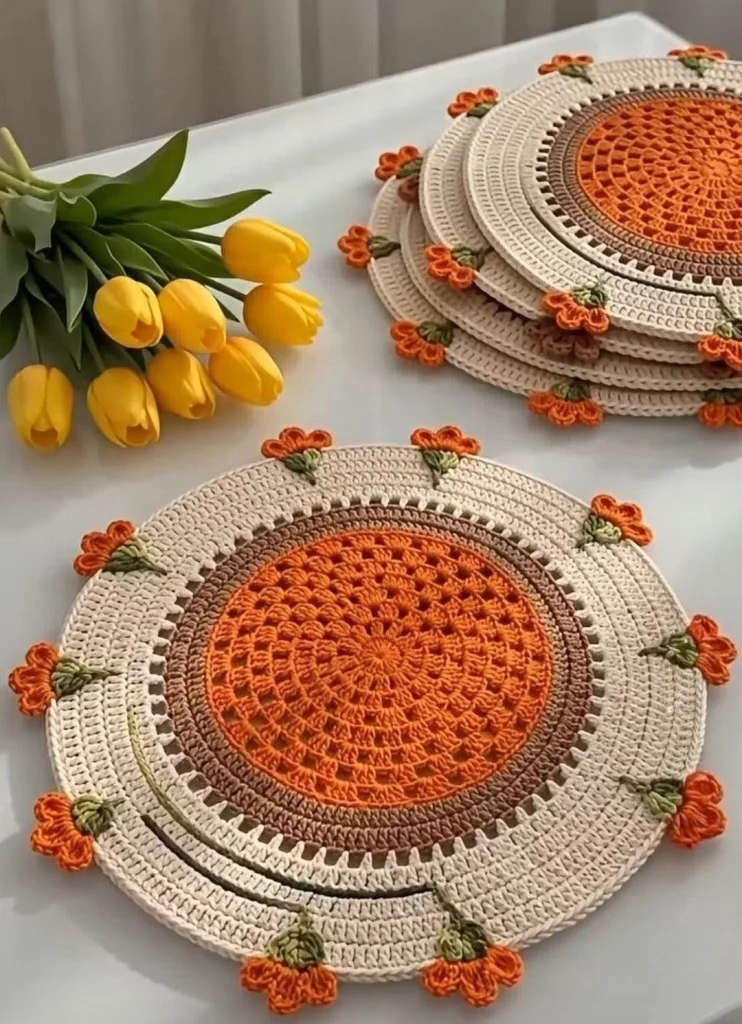
Bring warm fall color to your table with this crochet autumn placemat pattern. The design combines a burnt-orange openwork center, narrow warm-brown accent rounds, a wide creamy border and tiny dimensional orange flowers with olive-green leaves around the outside.
The finished mat has a delicate vintage-table-linen look while still feeling cozy and seasonal. Make one as a centerpiece mat or crochet a matching set for an autumn breakfast table, Thanksgiving dinner or everyday fall decor.
Materials
- DK or light worsted cotton yarn – burnt orange 70–90 g
- DK or light worsted cotton yarn – cream / natural 90–120 g
- DK or light worsted cotton yarn – warm brown 25–35 g
- DK cotton yarn – olive green 10–15 g
- 3.5 mm crochet hook 1
- Yarn needle 1
- Scissors 1 pair
- Stitch markers optional
Abbreviations – US Terms
MRmagic ringchchainsl stslip stitchscsingle crochethdchalf double crochetdcdouble crochettrtreble crochetspspacest(s)stitch(es)FOfasten offFinished Size
Approximately 38–42 cm / 15–16.5 in in diameter after blocking.
The exact size will depend on your yarn, hook and tension.
For a coordinated table setting, make 4, 6 or 8 identical placemats.
Gauge
Gauge is not critical for this decorative project.
The most important requirement is that the mat remains flat after every round. If the center begins to cup, add slightly more increases. If it begins to ripple, reduce the number of increases.
Part 1 – Burnt Orange Center
With burnt-orange yarn, make a MR.
Round 1
Ch 3, counting as the first dc.
Work 11 dc into the ring.
Pull the ring closed.
Join with sl st to the top of beginning ch-3.
12 dc total.
Round 2
Ch 3.
Work 1 dc in the same stitch.
Work 2 dc in every stitch around.
Join with sl st.
24 dc.
Round 3
Ch 3.
Work 2 dc in the next stitch.
Repeat:
[1 dc in next st, 2 dc in next st] around.
Join with sl st.
36 dc.
Round 4 – Begin the Openwork
Ch 4. This counts as 1 dc + ch 1.
Skip the next stitch.
Dc in next stitch, ch 1, skip next stitch.
Repeat [dc, ch 1, skip 1] around.
Join with sl st to the third chain of beginning ch-4.
Round 5
Sl st into the first ch-1 space.
Ch 3, dc in the same space, ch 1.
In each ch-1 space around work:
2 dc, ch 1.
Join with sl st.
Round 6 – Open Fan Round
Sl st into the first ch-1 space.
Ch 3, 2 dc in same space, ch 1.
Repeat around:
[3 dc in next ch-1 sp, ch 1].
Join with sl st.
Round 7
Ch 4.
Dc into the center dc of the next 3-dc group.
Ch 1.
Repeat around, creating an evenly spaced mesh.
Join with sl st.
Round 8 – Expanding Lace
Sl st into first ch-1 space.
Ch 3, dc in same space, ch 2.
Repeat:
[2 dc in next ch-1 sp, ch 2] around.
Join with sl st.
Round 9
Sl st into first ch-2 space.
Ch 3, 2 dc in same space, ch 2.
Repeat:
[3 dc in next ch-2 sp, ch 2] around.
Join with sl st.
Round 10 – Final Orange Round
Ch 3.
Dc in each dc and work 2 dc into each ch-2 space.
Increase evenly as necessary to keep the circle perfectly flat.
Join with sl st and FO orange.
Part 2 – Brown Accent Rings
Join warm-brown yarn in any stitch.
Round 11
Ch 1.
Sc evenly around, increasing approximately every 10–12 stitches if needed.
Join with sl st.
Round 12
Ch 3.
Dc in each stitch around.
Increase evenly enough to keep the work flat.
Join with sl st.
Round 13
Ch 1.
Sc in each stitch around.
Join with sl st and FO brown.
Part 3 – Cream Openwork Transition
Join cream yarn.
Round 14
Ch 4, skip 1 stitch.
Dc in next stitch, ch 1, skip 1.
Repeat around.
Join with sl st.
Round 15
Sl st into first ch-1 space.
Ch 3, dc in same space.
Work 2 dc into every ch-1 space around.
Join with sl st.
Part 4 – Wide Cream Border
Round 16
Ch 3.
Dc in every stitch around.
Increase evenly approximately 10–12 times around.
Join with sl st.
Round 17
Ch 3.
Dc in every stitch around, increasing evenly where required.
Join with sl st.
Round 18
Repeat Round 17.
Round 19
Ch 1.
Sc in every stitch around.
Join with sl st.
Round 20 – Decorative Eyelet Round
Ch 4.
Skip 1 stitch.
Dc in next stitch.
Repeat:
[ch 1, skip 1, dc in next st] around.
Join with sl st.
Rounds 21–23 – Outer Cream Section
Round 21: Ch 3 and work dc evenly around, placing 1 dc in each dc and 1 dc in each ch-1 space.
Round 22: Ch 3, dc around with evenly spaced increases.
Round 23: Ch 1, sc in every stitch around.
Join and FO cream.
Part 5 – Thin Olive Detail
Join olive-green yarn.
Ch 1.
Sl st loosely or sc in every stitch around the outer cream section.
Join with sl st and FO.
This narrow line gives the border a subtle connection to the green leaves used around the edge.
Part 6 – Crochet the Small Orange Flowers
Make approximately 10–12 flowers, depending on your final stitch count and preferred spacing.
With orange yarn, make a MR.
Into the ring work:
[sl st, ch 3, 2 dc, ch 3, sl st].
Repeat this sequence 3 times for a small three-petal flower.
For a fuller flower, repeat 4 times.
Pull the MR closed.
FO, leaving a long tail for attaching.
Part 7 – Crochet the Green Leaves
Make one small leaf section for every flower.
With olive-green yarn:
Ch 5.
Starting in the 2nd ch from hook work:
sl st, sc, hdc, dc.
Ch 1.
Work down the opposite side of the foundation chain:
dc, hdc, sc, sl st.
FO, leaving a tail.
For the paired-leaf appearance, make a second leaf and sew the two bases together at a slight angle.
Part 8 – Attach Flowers Around the Border
Lay the finished placemat flat.
Position the orange flowers evenly around the outer circumference.
Place a small green leaf or leaf pair directly beneath each flower.
Before sewing, check that the spacing is visually balanced.
Using the yarn tails, securely sew the leaves to the cream border first.
Then sew each orange flower over the top of its leaf base.
Allow the petals to remain slightly raised rather than sewing every edge flat.
Optional Scalloped Outer Edge
If you prefer a softer outer silhouette, join cream yarn between two flower motifs.
Work:
sl st in next st, skip 1, 5 dc in next st, skip 1, sl st in next st.
Repeat between the floral sections.
Keep the scallops shallow so the flowers remain the dominant edging detail.
Blocking
- Weave in all loose ends.
- Wet the placemat lightly with cool water.
- Gently press out excess water without twisting.
- Place the mat on a blocking surface.
- Measure from the center outward in several directions to keep the circle symmetrical.
- Pin the outer edge evenly.
- Shape each flower and leaf with your fingers.
- Allow the mat to dry completely before removing the pins.
Color Variations
Classic Autumn: burnt orange, chocolate brown, natural cream and olive green.
Pumpkin Spice: pumpkin orange, cinnamon brown, oatmeal and sage.
Vintage Floral: dusty rose, taupe, ivory and muted green.
Christmas: deep red center, forest green accents, cream border and red flowers.
Spring: peach center, beige accent, ivory border and sage leaves.
Neutral Farmhouse: caramel, mocha, warm white and eucalyptus green.
Care Instructions
For cotton yarn, hand wash or machine wash on a gentle cycle using cool water.
Reshape the placemat while damp and lay flat to dry.
Avoid high heat, especially around the dimensional flowers.
If necessary, lightly steam the main body from a distance while protecting the raised floral details.
Frequently Asked Questions
Yes. Add additional cream dc rounds before attaching the flowers. Continue increasing evenly so the circle remains flat.
Yes. Stop after the orange center and one or two border rounds to create smaller coordinating coasters.
Absolutely. The circular orange, brown and cream design works as a simple autumn placemat even without the dimensional floral edge.
The round probably needs additional increases. Add a few evenly spaced increases in the next round and check the piece again on a flat surface.
Too many increases can create rippling. Work the next round with fewer increases and block the finished piece carefully.
A set of four or six works well for most tables. You can also make one larger matching mat to use beneath a vase, serving bowl or autumn centerpiece.
The finished Autumn Flower Crochet Placemat Pattern

