Autumn Flower Granny Square Crochet Bedspread Pattern
Beginner Friendly
Perfect for those just starting their crochet journey, with clear instructions and simple techniques
Single-Day Project
A satisfying project you can complete in a single afternoon or evening.
Handmade Gift
A beautiful keepsake — free forever. Read online or print at home.
About This Autumn Flower Granny Square Crochet Bedspread Pattern
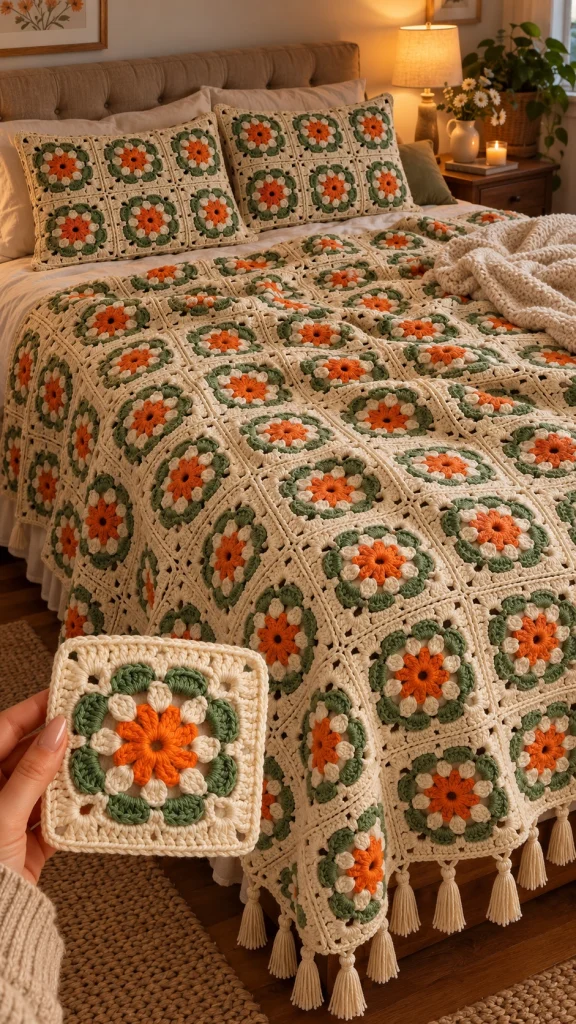
This crochet granny square bedspread pattern creates a warm, handmade floral blanket inspired by cozy autumn bedrooms and traditional heirloom crochet.
Each square features a dimensional burnt-orange flower surrounded by small cream petals, soft sage-green leaves and a warm ivory granny-square border. Join the motifs into a full bedspread, then add a delicate openwork border and optional cream tassels. The same squares can also be used to make the matching pillow covers.
Materials
- Worsted / Medium #4 cotton or cotton-blend yarn in warm ivory 2200-2800 g
- Burnt orange yarn 500-650 g
- Sage green yarn 550-700 g
- 4.5 mm crochet hook 1
- 4 mm crochet hook optional for tighter motifs
- Yarn needle 1
- Scissors 1 pair
- Stitch markers optional
- Blocking mats and pins recommended
Abbreviations
MRmagic ringchchainsl stslip stitchscsingle crochethdchalf double crochetdcdouble crochettrtreble crochetspspaceststitchstsstitchesFOfasten offFinished Measurements
- Individual square: approximately 14 × 14 cm / 5.5 × 5.5 in
- Throw: approximately 140 × 180 cm / 55 × 71 in
- Double bed: approximately 180 × 210 cm / 71 × 83 in
- Queen bed: approximately 200 × 220 cm / 79 × 87 in
- Matching pillow: approximately 45 × 65 cm / 18 × 26 in
Color Placement
- Center flower: burnt orange
- Small petal round: warm ivory
- Leaf round: muted sage green
- Square background: warm ivory
- Joining: warm ivory
- Border: warm ivory
- Tassels: warm ivory
Granny Square – Orange Flower Center
Using burnt orange yarn, make a MR.
R1: ch 1, work 12 sc into MR. Pull ring closed and join with sl st. (12 sts)
R2: *ch 3, 2 dc in same st, ch 3, sl st in same st, sl st in next st*. Repeat around to form 6 orange petals.
FO and weave in the orange yarn ends.
Small Cream Petals
Join warm ivory yarn between two orange petals.
R3: *ch 3, 2 dc in same space, ch 3, sl st into next space between orange petals*.
Repeat around to create 6 small cream petals positioned between the orange petals.
FO.
Sage Green Leaf Round
Join sage green yarn behind one cream petal.
R4: *ch 4, 2 tr in same space, ch 2, 2 tr in same space, ch 4, sl st into next space*.
Repeat around.
The green stitches should sit behind the cream petals and create a leafy frame around the flower.
Turning the Flower into a Square
Switch to warm ivory.
R5: Join yarn in a green ch-space. Ch 3.
Work:
*3 dc, ch 1* in the smaller spaces.
At four evenly spaced points around the motif work:
3 dc, ch 2, 3 dc
to establish the four corners.
Join with sl st.
Square Border Round
R6: sl st into next space, ch 3, 2 dc in same space.
Work 3 dc in every ch-1 space.
In each corner ch-2 space work:
3 dc, ch 2, 3 dc.
Join with sl st.
Final Square Round
R7: ch 1, sc in every stitch around.
In each corner space work:
sc, ch 2, sc.
Join and FO.
Weave in all ends before blocking.
Blocking the Squares
- Lightly dampen each finished motif.
- Pin it to approximately 14 × 14 cm.
- Keep all four corners square.
- Arrange the raised petals with your fingers.
- Allow the motif to dry completely.
How Many Squares?
The exact number depends on your finished motif size and desired blanket dimensions.
- Baby blanket: approximately 48-60 squares
- Throw: approximately 120-140 squares
- Double bed: approximately 168-195 squares
- Queen bedspread: approximately 210-240 squares
Lay the blocked motifs across the mattress before joining to check the final width and drop.
Joining the Granny Squares
Arrange all motifs with the flowers facing upward.
Using warm ivory yarn, place two squares with wrong sides together.
Insert hook through corresponding edge stitches of both motifs.
Work sl st loosely across.
Add the remaining squares one at a time to create long horizontal rows.
Then join the completed rows vertically.
Alternative Flat Join
For less visible seams, place two squares with right sides together.
Using a yarn needle and ivory yarn, whip stitch through corresponding back loops.
Open the joined motifs and gently flatten the seam with your fingers.
This method creates a softer, flatter bedspread.
Blanket Border – Round 1
Join ivory yarn at any corner.
R1: ch 1 and sc evenly around the entire bedspread.
Work 3 sc into each outer corner.
When crocheting across motif joins, avoid adding too many stitches or the edge may ripple.
Openwork Border – Round 2
R2: ch 4, sk 1 st, dc in next st.
Repeat:
*ch 1, sk 1, dc in next st*
around the blanket.
At each corner work:
dc, ch 2, dc.
Openwork Border – Round 3
R3: ch 1, sc in each dc and 1 sc into every ch-1 space.
At each corner ch-2 space work 3 sc.
Join.
Decorative Border – Round 4
R4: *sc in next 3 sts, ch 3, sk 1 st*.
Repeat around.
Adjust slightly near each corner if necessary so the border lies completely flat.
Final Border Round
R5: sc evenly around.
Work 3 sc into each corner.
Join, FO and weave in the yarn end.
Cream Tassels
Cut approximately 20 strands of ivory yarn, each measuring 18-20 cm.
Fold the strands in half.
Use an additional strand to tie tightly approximately 1.5 cm below the fold.
Wrap several times and knot securely.
Trim the bottom evenly.
Finished tassel length should be approximately 7-8 cm.
Attaching the Tassels
Attach tassels evenly around the lower and side edges of the bedspread.
For the look shown in the inspiration, place approximately one tassel at each granny-square division.
You can add tassels to all four sides or leave the head of the blanket plain.
Matching Pillow Cover
Make enough floral squares to cover the front of your pillow insert.
For a rectangular pillow approximately 45 × 65 cm, begin with a layout of approximately 3 × 5 motifs, adjusting according to your blocked square size.
Join the squares using the same ivory joining method as the blanket.
Pillow Back
For a simple crochet back, use warm ivory yarn.
Ch to the width of the completed pillow front.
R1: hdc in second ch from hook and across.
R2 onward: ch 1, turn, hdc across.
Continue until the panel matches the height of the floral front.
Assembling the Pillow
- Place the floral front and plain back together with wrong sides facing.
- Join three sides using sc.
- Insert the pillow form.
- Close the final side with sc or add buttons for a removable cover.
- Work one decorative ivory border around the completed pillow.
Optional Envelope Pillow Back
Instead of one solid back panel, crochet two overlapping rectangles.
Make the first approximately two-thirds of the pillow height.
Make the second the same size.
Overlap them by approximately 10-12 cm and join them around the outer edges.
This allows the pillow insert to be removed for washing.
Finishing the Bedspread
- Check every joining seam.
- Weave in all remaining yarn tails securely.
- Lightly wet-block or steam-block the entire blanket.
- Straighten the outer edges.
- Shape each raised flower with your fingers.
- Arrange the tassels evenly.
- Allow the bedspread to dry completely before placing it on the bed.
Frequently Asked Questions
An adventurous beginner can make the individual motifs, but the full bedspread is better suited to someone comfortable with granny squares, color changes, joining and working large projects.
Yes. Simply make fewer squares. The same motif can be used for a baby blanket, sofa throw, lap blanket, bed runner or full bedspread.
Yes. Burgundy creates a richer autumn look, dusty rose makes the design softer, while red and deep green can transform the same motif into a Christmas-inspired bedspread.
No. The blanket can be finished after the final crochet border. Tassels simply add the decorative handmade finish shown in the inspiration.
A washable cotton blend works especially well because it provides clear stitch definition while remaining softer and lighter than very dense pure cotton.
Yes. The same floral motif can be used for cushion covers, tote bags, table runners, cardigans, wall hangings or smaller seasonal blankets.
The finished Autumn Flower Granny Square Crochet Bedspread Pattern

