Autumn Granny Square Crochet Hobo Bag Pattern
Beginner Friendly
Perfect for those just starting their crochet journey, with clear instructions and simple techniques
Single-Day Project
A satisfying project you can complete in a single afternoon or evening.
Handmade Gift
A beautiful keepsake — free forever. Read online or print at home.
About This Autumn Granny Square Crochet Hobo Bag Pattern
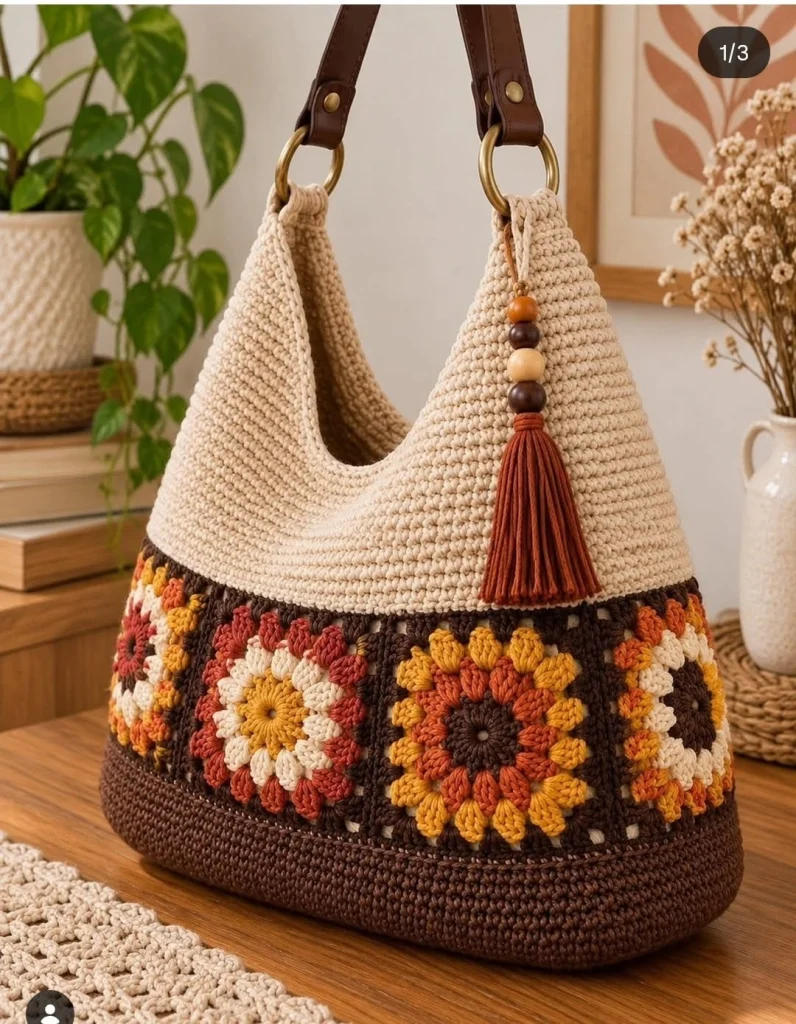
This granny square crochet hobo bag combines a soft cream crochet body with warm floral granny squares in chocolate brown, rust, mustard and ivory. A sturdy dark brown base gives the bag structure, while the relaxed curved opening creates the beautiful slouchy hobo shape.
The floral band is the star of the design. Each square uses the same warm autumn palette but a slightly different color order, giving the finished bag a rich handmade patchwork look without making it feel too busy.
Materials
- Worsted weight #4 cotton or cotton-blend yarn – cream 350–450 g
- Worsted weight #4 yarn – dark chocolate brown 250–300 g
- Worsted weight #4 yarn – burnt orange/rust 100–150 g
- Worsted weight #4 yarn – mustard gold 100–150 g
- 4.5 mm crochet hook 1
- Large metal bag rings 2
- Brown leather or faux-leather handles 2
- Wooden beads in warm brown shades 4–5
- Rust-colored tassel 1
- Yarn needle 1
- Scissors 1 pair
- Optional fabric lining approx. 50 × 80 cm
- Optional magnetic snap 1
Abbreviations – US Terms
MRmagic ringchchainsl stslip stitchscsingle crochethdchalf double crochetdcdouble crochetspspaceststitchFOfasten offFinished Size
Approximately 40 cm / 16 in wide × 34 cm / 13.5 in high, excluding the handles.
The finished size can vary depending on your yarn, hook size and tension.
Gauge
Approximately 16 sc × 18 rows = 10 cm / 4 in.
Exact gauge is not essential, but a firm fabric is important. If your stitches feel loose, move down half a hook size.
Floral Granny Square
Make approximately 8 floral squares for the decorative band around the bag.
Round 1 – Center
With dark brown or mustard, make a MR.
Ch 3 and work 11 dc into the ring.
Pull the ring closed and join with sl st.
Fasten off.
Round 2 – First Petals
Join rust, mustard or cream in any stitch.
Ch 2.
Work 2 dc in the same stitch.
Continue around, creating a raised petal cluster in each stitch.
Join and fasten off.
Round 3 – Second Floral Layer
Join your next contrasting color between two petal groups.
Work clusters evenly around the flower.
Alternate the warm colors so each motif looks slightly different.
Round 4 – Turn the Flower into a Square
Join dark chocolate brown.
Work 3 dc into the spaces between the flower clusters.
At four evenly spaced points work:
3 dc, ch 2, 3 dc.
Continue around and join with sl st.
Round 5 – Final Brown Round
Continue in dark brown.
Work 3 dc into each space.
In every corner ch-2 space work:
3 dc, ch 2, 3 dc.
Fasten off.
Block the Granny Squares
- Lightly dampen each square.
- Pin each motif into an even square shape.
- Make sure all squares finish at approximately the same size.
- Allow them to dry completely before joining.
Join the Floral Band
Arrange the squares in a continuous strip.
Using dark brown yarn, place two squares right sides together.
Slip stitch or whip stitch through the corresponding edge stitches.
Repeat until all squares form one long strip.
Join the first and last square together to create a complete ring.
Dark Brown Bag Base
The bag is worked from an oval base upward.
Foundation
With dark brown yarn, ch 41.
Round 1
Sc in second ch from hook and across.
Work 5 sc into the final chain.
Continue along the opposite side of the foundation chain.
Work 4 sc into the final chain at the opposite end.
Join with sl st.
Round 2
Ch 1.
Sc around, increasing evenly around both curved ends of the oval.
Rounds 3–6
Continue increasing only around the curved ends until the base measures approximately 36–38 cm / 14–15 in long.
Build the Brown Lower Section
Once the oval base reaches the desired size, stop increasing.
Work one round of sc in the back loops only. This creates a neat fold between the base and sides.
Continue working sc in continuous rounds for approximately 7–8 cm / 3 in.
The fabric should form a sturdy dark brown band around the bottom of the bag.
Attach the Granny Square Band
Place the joined floral ring around the top of the brown base.
Match the side seams carefully.
Using dark brown yarn, sc through both layers around the entire bag.
Check frequently that the granny square band is not stretching or gathering.
Cream Upper Body
Join cream yarn along the top edge of the granny square band.
Work one round of sc evenly around.
Continue working sc in rounds without increases for approximately 12–14 cm / 5–5.5 in.
This creates the smooth cream section above the flowers.
Create the Hobo Shape
The opening should curve gently downward in the center while remaining higher at both sides.
Mark the center front, center back and both side points.
Begin decreasing gradually around the center front and center back.
Work approximately:
sc across, sc2tog near center, sc across remaining stitches.
Repeat corresponding decreases on the back.
Continue for several rounds until the opening develops a soft V-shaped curve.
Form the Side Tabs
Once the center opening is shaped, stop working around the entire bag.
Work back and forth over approximately 10–12 stitches at one side.
Continue for 6–8 rows.
Repeat on the opposite side.
Fold each tab around a metal ring and securely stitch it back onto itself.
Attach the Handles
Attach one end of each brown leather or faux-leather handle to the metal rings.
Make sure both handles are positioned evenly.
If your handles do not include snap closures, sew them securely around the rings using strong waxed thread.
Crochet Handle Alternative
If you prefer an entirely handmade crochet bag, replace the leather handles with crocheted straps.
Ch enough stitches for a strap approximately 55–60 cm / 22–24 in long.
Work 5–6 rows of sc.
Fasten off and make a second identical strap.
Attach each strap securely to the metal rings.
Optional Drawstring Detail
For an additional decorative finish, crochet a cream cord.
Ch approximately 80–90 cm.
Sl st back through every chain.
Thread the cord through several stitches near the center opening.
Tie into a loose bow.
Make the Tassel Charm
Cut approximately 30–40 strands of rust-colored yarn, each about 22 cm / 9 in long.
Fold the strands in half.
Tie securely near the folded end.
Wrap another piece of yarn several times around the upper section to form the tassel head.
Trim the ends evenly.
Thread several wooden beads onto a strong crochet cord above the tassel.
Attach the charm to one metal handle ring.
Optional Fabric Lining
- Place the finished bag flat on your lining fabric.
- Trace around the body, adding approximately 1.5 cm / ⅝ in seam allowance.
- Cut two lining pieces.
- Sew the sides and bottom together.
- Fold the upper raw edge inward.
- Insert the lining into the crochet bag.
- Hand stitch it just below the top edge.
Optional Magnetic Closure
Install a magnetic snap in the lining before sewing the lining into the bag.
Position the snap at the center of the front and back approximately 2–3 cm / 1 in below the opening.
Finishing
- Weave in all remaining yarn ends.
- Check every granny-square seam.
- Reinforce the handle tabs if necessary.
- Shape the bag gently with your hands.
- Lightly steam block the crochet sections without touching the yarn directly with the iron.
- Attach the bead-and-tassel charm.
Color Palette
For the warm autumn look shown in this design, use:
- Cream – upper body and flower accents
- Chocolate brown – base and granny-square borders
- Burnt orange – floral petals
- Rust – flower accents and tassel
- Mustard gold – flower centers and petals
How to Resize the Bag
For a smaller handbag, use fewer granny squares and make a shorter oval base.
For an oversized tote, add additional squares and increase the oval base until its circumference matches the completed granny-square band.
The most important measurement is that the top circumference of the brown base matches the bottom circumference of the floral band.
Frequently Asked Questions
It is best for an adventurous beginner or intermediate crocheter. You should already be comfortable working in rounds, making granny squares, changing colors and joining crochet pieces.
Yes. The leather-style handles are optional. Firm crocheted straps made with several rows of single crochet work beautifully too.
A lining is optional, but it is recommended for an everyday bag. It adds structure and prevents small items from poking through the crochet fabric.
Absolutely. Keep one common border color around every square and change the flower colors to suit your style. Olive, burgundy, terracotta and cream would also create a beautiful fall palette.
Use cotton or another low-stretch yarn, crochet the base firmly, reinforce the handle tabs and add a fabric lining. These details make a significant difference when the bag is carrying weight.
Yes. Cut a piece of plastic canvas slightly smaller than the finished oval base and place it between the crochet base and fabric lining.
The finished Autumn Granny Square Crochet Hobo Bag Pattern

