Autumn Maple Leaf Crochet Centerpiece Pattern
Beginner Friendly
Perfect for those just starting their crochet journey, with clear instructions and simple techniques
Single-Day Project
A satisfying project you can complete in a single afternoon or evening.
Handmade Gift
A beautiful keepsake — free forever. Read online or print at home.
About This Autumn Maple Leaf Crochet Centerpiece Pattern
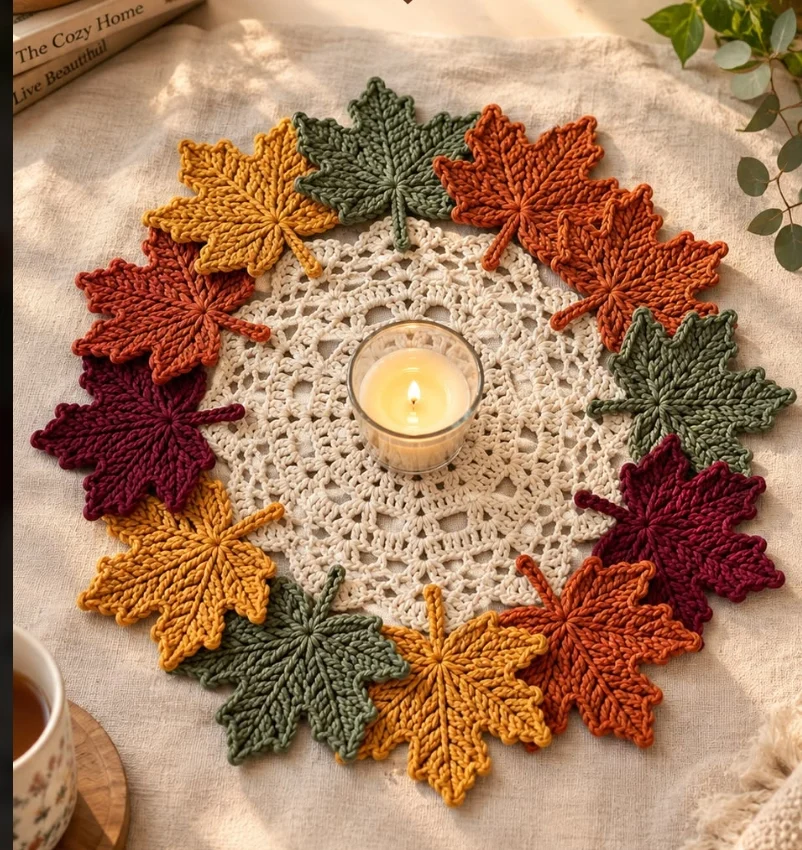
This autumn maple leaf crochet centerpiece pattern combines a delicate cream crochet lace center with a beautiful ring of dimensional maple leaves in rich fall colors.
Mustard yellow, burnt orange, deep burgundy and muted sage green create the warm autumn palette, while the openwork cream center keeps the design light and elegant. Place a candle in the middle for a cozy fall table display, or use the finished piece on a coffee table, sideboard or entryway table.
The maple leaves are crocheted separately and arranged around the finished lace circle, which makes it easy to customize the colors and placement.
Materials
- DK cotton yarn – warm cream 70–90 g
- DK cotton yarn – mustard yellow 25–35 g
- DK cotton yarn – burnt orange 25–35 g
- DK cotton yarn – deep burgundy 20–30 g
- DK cotton yarn – sage / olive green 25–35 g
- 3.5–4.0 mm crochet hook 1
- Yarn needle 1
- Scissors 1 pair
- Stitch markers optional
Abbreviations – US Terms
MRmagic ringchchainsl stslip stitchscsingle crochethdchalf double crochetdcdouble crochettrtreble crochetdtrdouble treble crochetpicotch 3, sl st into first chst(s)stitch(es)spspaceFOfasten offFinished Size
Approximately 45–50 cm / 18–20 in diameter from the tip of one maple leaf to the opposite leaf.
The cream lace center measures approximately 28–32 cm / 11–12.5 in across before the leaves are attached.
Construction Overview
- Crochet the round cream lace centerpiece.
- Block the center completely flat.
- Crochet approximately 12 maple leaves in four autumn colors.
- Add a narrow stem and surface-crochet vein to each leaf.
- Arrange the leaves around the outer edge.
- Sew the leaf bases securely to the cream centerpiece.
- Block and shape the completed piece.
Part 1 – Cream Lace Center
Round 1
Using cream yarn, make a MR.
Ch 3, then work 15 dc into the ring.
Join with sl st to top of beginning ch-3.
16 dc.
Round 2
Ch 4.
Repeat around:
[dc in next st, ch 1]
Join with sl st into the third chain of beginning ch-4.
Round 3
Sl st into first ch-1 space.
Ch 3, 2 dc in same space, ch 2.
Repeat around:
[3 dc in next ch-1 sp, ch 2]
Join with sl st.
Part 2 – Build the Openwork Lace
Round 4
Sl st to first ch-2 space.
Ch 5.
Sc in next ch-2 space.
Repeat:
[ch 5, sc in next ch-2 sp]
around.
Round 5
Sl st into first ch-5 loop.
Work:
sc, ch 3, 3 dc, ch 3, sc
into each ch-5 loop.
Repeat around.
Round 6
Sl st to the center of the first shell.
Repeat around:
[ch 6, sc into center of next shell]
Join with sl st.
Part 3 – Large Lace Fans
Round 7
Into each ch-6 space work:
sc, hdc, 3 dc, hdc, sc.
Round 8
Sl st to the center dc of first fan.
Repeat:
[ch 7, sc into center dc of next fan]
around.
Round 9
Into each ch-7 loop work:
sc, hdc, dc, 3 tr, dc, hdc, sc.
Repeat around.
Part 4 – Final Cream Lace Rounds
Round 10
Work behind the previous fans.
Repeat around:
[ch 8, sc between the next two fans]
Round 11
Into each ch-8 loop work:
sc, hdc, 2 dc, 3 tr, 2 dc, hdc, sc.
Round 12
Work evenly around the entire outer edge:
[sc in next 3 sts, ch 3, skip 1 st]
Adjust slightly where necessary so the final round lies completely flat.
Join and FO.
Part 5 – Crochet Maple Leaf
Make approximately 12 leaves.
A balanced color arrangement can be:
- 3 mustard yellow leaves
- 3 burnt orange leaves
- 3 sage / olive green leaves
- 3 burgundy leaves
Each leaf is worked from the center outward to create the characteristic pointed maple shape.
Leaf Center
Ch 10.
Starting in second ch from hook, work:
sl st, sc, hdc, dc, tr, tr, dc, hdc, sc.
Do not fasten off.
Part 6 – First Side of Maple Leaf
Working around the side of the center section:
Ch 5.
Starting in second ch from hook:
sl st, sc, hdc, dc.
Sl st back into the center section.
This creates the first small point.
Next:
Ch 7.
Starting in second ch:
sl st, sc, hdc, dc, tr, dtr.
Sl st into the center.
This creates the large side lobe.
Next:
Ch 5.
Work:
sl st, sc, hdc, dc.
Sl st into the center.
Part 7 – Top Point
At the top of the leaf:
Ch 9.
Starting in second ch from hook, work:
sl st, sc, hdc, dc, tr, dtr, tr, dc.
Sl st securely into the center.
This creates the long central maple point.
Part 8 – Second Side of Maple Leaf
Mirror the first side.
Make one ch-5 small point.
Make one ch-7 large side point.
Make one final ch-5 small point.
Sl st at the base.
The leaf should now have a recognizable maple silhouette with a tall center point and symmetrical side lobes.
Part 9 – Define the Leaf Edges
Work one round of sc around the entire leaf.
At the tip of each major point work:
sc, picot, sc
into the tip stitch.
Between the points, use slip stitches or sc to create slightly deeper valleys.
This contrast between pointed tips and narrow valleys gives the leaf its crisp maple shape.
Part 10 – Crochet the Stem
At the bottom center of the leaf:
Ch 8–10.
Starting in second ch from hook, sl st back along every chain.
Sl st into the leaf base.
FO leaving a long sewing tail.
The stem should extend slightly inward over the cream lace when the leaf is attached.
Part 11 – Add the Raised Leaf Vein
Join matching yarn at the base of the leaf.
Surface crochet a line of slip stitches from the stem through the center and toward the tip.
For the side veins, embroider short diagonal lines extending from the center vein toward the main leaf points.
Keep the surface stitches slightly raised.
This detail gives the maple leaves the textured, dimensional appearance of the inspiration.
Part 12 – Arrange the Leaves
Place the blocked cream centerpiece on a flat surface.
Arrange the 12 maple leaves around the outer edge before sewing anything.
Alternate the colors rather than grouping identical shades together.
A beautiful sequence is:
mustard → sage → burnt orange → burgundy → mustard → sage → orange → burgundy, continuing around the circle.
Allow neighboring leaves to overlap slightly.
The pointed ends should face outward while the stems point toward the center.
Part 13 – Attach the Leaves
Use the long yarn tails and a yarn needle.
Begin by sewing the base of each leaf securely to the outer cream round.
Add several small stitches along the lower center vein.
Leave most of the outer points unattached.
This allows the edges to lift naturally and gives the centerpiece its dimensional appearance.
Repeat for all leaves.
Part 14 – Secure the Stems
Lay each stem toward the center of the cream lace.
Sew approximately the first half of the stem to the lace.
Leave the final section slightly raised if you want a more dimensional botanical appearance.
Weave all yarn ends securely into the back of the work.
Part 15 – Final Blocking
Lightly dampen the finished centerpiece.
Lay it flat on a blocking mat or thick towel.
Pin the cream lace center into a perfect circle.
Shape every maple leaf individually.
Pull the central point gently outward.
Spread the side lobes and define the valleys between them.
Allow neighboring leaves to overlap naturally.
Leave completely flat until dry.
Color Palette
Classic Autumn: mustard, rust orange, burgundy and olive green.
Soft Fall: caramel, dusty orange, sage, cream and muted wine.
Thanksgiving: pumpkin orange, golden yellow, dark brown and forest green.
Modern Neutral: beige, terracotta, mocha and eucalyptus green.
Woodland: moss green, burnt sienna, ochre and deep brown.
Elegant Autumn: ivory, wine red, antique gold and dark sage.
Ways to Customize It
- Use only three leaf colors for a calmer palette.
- Add tiny crochet acorns between some of the leaves.
- Add small orange or burgundy crochet berries.
- Make the cream center larger for a dining-table centerpiece.
- Use fewer leaves for a lighter, more minimal design.
- Add a thin brown border around the cream lace.
- Use variegated autumn yarn for naturally changing leaf colors.
- Create matching maple-leaf coasters.
- Use individual leaves as fall garland decorations.
- Make smaller leaves for napkin rings.
Using It With a Candle
The finished centerpiece looks beautiful with a candle placed in the middle, but always use a glass candle holder or flameless LED candle.
Keep open flame well away from yarn and raised crochet leaves.
For everyday decor, an LED candle gives the same warm autumn effect without exposing the crochet to flame or melted wax.
Care Instructions
Hand wash gently in cool water.
Use a mild detergent.
Do not twist or wring.
Press excess water gently between towels.
Lay completely flat to dry.
Reshape every maple leaf while damp.
Do not tumble dry.
Store flat between seasons whenever possible.
Frequently Asked Questions
Approximately 10–12 medium leaves create a full border around a 28–32 cm cream lace center. You can add more leaves if you prefer a denser wreath-like appearance.
Yes. This design works beautifully with rust, mustard, olive, burgundy, brown, terracotta and cream. You can also make each leaf a different autumn shade.
A small amount of curling is normal before blocking. If they curl strongly, your tension may be too tight. Use a slightly larger hook and block each leaf carefully.
Yes. The maple leaves can also be used individually as coasters, garlands, appliqués, gift decorations or fall table accents.
Yes. Crochet the maple leaves separately and join their bases together to create an open autumn leaf wreath.
The lace center uses standard crochet stitches, but shaping the maple leaves requires some experience with different stitch heights and working around shaped sections. It is best suited to confident beginners or intermediate crocheters.
Yes. Add additional lace rounds before attaching the leaves, then crochet extra maple leaves so the border remains full and balanced.
A flameless candle, small vase, decorative pumpkin arrangement or autumn bowl works beautifully. If using a real candle, always place it inside a stable heat-resistant holder and keep the flame away from the yarn.
The finished Autumn Maple Leaf Crochet Centerpiece Pattern

