Light-Up Crochet Christmas Baubles – Free Crochet Pattern
Bring a magical handmade glow to your holiday decorations with these beautiful light-up crochet Christmas baubles. Featuring airy crochet latticework, festive decorative bands, soft warm lighting, and elegant dangling tassels, these ornaments create a cozy Christmas atmosphere in any room.
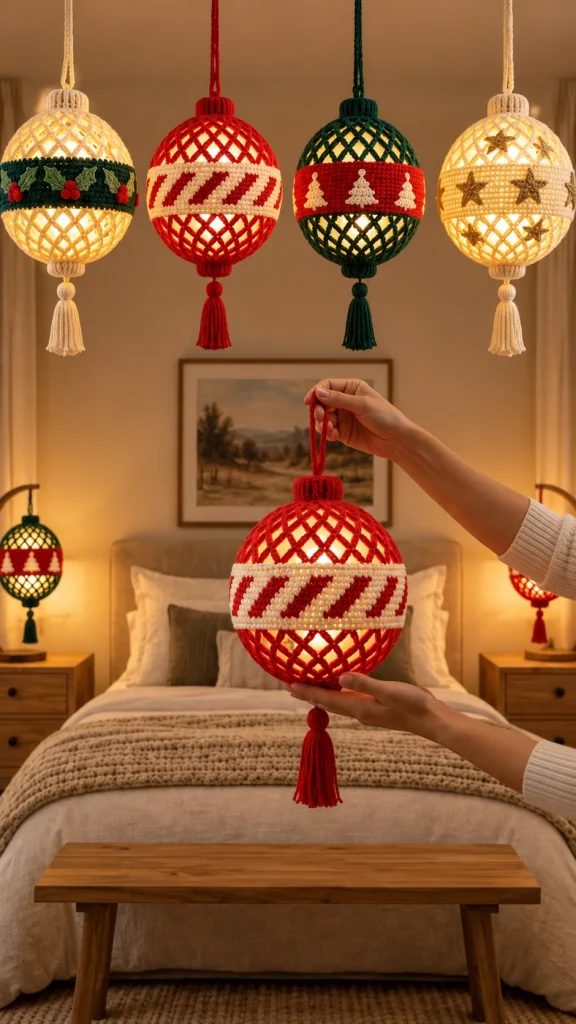
This design includes four festive color variations: an ivory bauble with holly decorations, a red-and-white candy cane bauble, a forest green bauble with tiny Christmas trees, and an elegant cream bauble decorated with golden stars.
Perfect for Christmas trees, bedroom decorations, festive windows, and holiday displays, these crochet lantern ornaments combine traditional handmade charm with beautiful illuminated details.
In this free crochet pattern, you will learn how to create the spherical lattice structure, decorative center band, hanging loop, tassel, and safe LED lighting arrangement.
Pattern Note: This is an original crochet interpretation inspired by the reference image. The exact construction and stitch counts cannot be confirmed from the photograph. The instructions below create a similar decorative result.
Pattern Information
- Skill Level: Intermediate
- Finished Diameter: Approximately 15–18 cm (6–7 inches)
- Finished Height: Approximately 25–30 cm including tassel and hanging loop
- Yarn Weight: DK or light worsted cotton yarn
- Hook Size: 3.5 mm
- Terminology: US crochet terms
- Construction: Two crocheted lattice hemispheres joined around a removable spherical support
- Lighting: Battery-operated, low-heat LED lights only
- Estimated Time: 4–6 hours per ornament
Materials Needed
- Ivory cotton yarn
- Christmas red cotton yarn
- Forest green cotton yarn
- White cotton yarn
- Gold or mustard yellow cotton yarn
- Small amounts of dark green and bright red yarn for embellishments
- 3.5 mm crochet hook
- Yarn needle
- Scissors
- Stitch markers
- Removable spherical ornament support, approximately 15 cm in diameter
- Battery-operated warm white LED light module suitable for decorative ornaments
- Small wooden beads, optional
- Cardboard for making tassels
- Measuring tape
Important Safety Note: Use only battery-operated, low-heat LED lights intended for decorative use. Never use incandescent bulbs, mains-powered lamp sockets, candles, or exposed electrical wiring inside crochet ornaments. Keep the battery compartment accessible and follow the light manufacturer’s instructions.
Crochet Abbreviations
- MR: Magic ring
- ch: Chain
- sc: Single crochet
- hdc: Half double crochet
- dc: Double crochet
- sl st: Slip stitch
- inc: Increase
- st: Stitch
- sp: Space
- FO: Fasten off
Part 1: Crochet the Open Lattice Bauble
The open lattice design allows warm LED light to shine through the ornament, creating the glowing diamond pattern visible in the reference image.
Each bauble is made using two matching crochet hemispheres. The hemispheres are joined around a lightweight spherical support to preserve the round shape.
First Hemisphere
Use your chosen main color and a 3.5 mm crochet hook.
Round 1: Make a magic ring. Ch 3 (counts as first dc), work 11 dc into the ring. Join with a sl st. (12 dc)
Round 2: Ch 5 (counts as 1 dc and ch 2). Dc in the next stitch, ch 2. Repeat around. Join to the third chain of the beginning ch 5. (12 ch-2 spaces)
Round 3: Sl st into the first ch-2 space. Ch 5, dc in the same space, ch 2. Work (dc, ch 2, dc, ch 2) in each remaining ch-2 space. Join. (24 ch-2 spaces)
Round 4: Sl st into the first ch-2 space. Ch 5, dc in the next ch-2 space, ch 2. Repeat around and join. (24 ch-2 spaces)
Round 5: Repeat Round 4.
Round 6: Repeat Round 4.
Round 7: Repeat Round 4.
Round 8: Ch 1, work 2 sc into each ch-2 space around. Join. (48 sc)
FO and leave a long yarn tail.
The hemisphere should have an airy, flexible mesh structure. Check the fit against your spherical support before making the second half.
Second Hemisphere
Repeat Rounds 1–8 to create a matching hemisphere.
Make sure both pieces have the same number of stitches along their outer edges.
Part 2: Join the Crochet Hemispheres
Step 1
Place the two crochet hemispheres around the lightweight spherical ornament support.
Step 2
Align the outer edges carefully.
Step 3
Using the main yarn color, join the edges with single crochet stitches, working through corresponding stitches from both pieces.
Step 4
Leave a small accessible opening if needed for inserting or removing the LED light module.
Step 5
Finish the seam neatly and weave in the yarn ends.
Tip: Choose a support with a removable opening so the LED module and batteries can be accessed without cutting or damaging the crochet.
Part 3: Crochet the Decorative Center Band
The wide center band gives each ornament its festive personality. The reference design features four different styles, each with a unique Christmas motif.
Basic Center Band
Using the appropriate yarn color, ch 13.
Row 1: Sc in the second chain from the hook and in each remaining chain. (12 sc)
Row 2: Ch 1, turn, sc across. (12 sc)
Repeat Row 2 until the strip fits snugly around the widest circumference of the bauble.
FO, leaving a long sewing tail.
Wrap the band around the center of the ornament and sew the short ends together.
Secure the band to the latticework with small hidden stitches so it does not slide.
Part 4: Red and White Candy Cane Bauble
This classic Christmas ornament combines a bright red lattice body with a white center band featuring diagonal red candy cane stripes.
Colors
- Red for the lattice body
- White for the center band
- Red for the diagonal stripe embroidery
- Red for the hanging loop and tassel
Create the Candy Cane Stripes
After crocheting the white band, thread a yarn needle with red yarn.
Embroider diagonal red stripes across the band using long diagonal stitches.
Keep each stripe approximately 1–1.5 cm wide.
Leave equal spaces between the stripes to create the traditional candy cane appearance.
Secure the yarn ends on the back of the band.
Part 5: Forest Green Christmas Tree Bauble
The green ornament features a rich forest green lattice body and a bright red center band decorated with tiny white Christmas trees.
Colors
- Forest green for the lattice body
- Christmas red for the center band
- White or cream for the miniature trees
- Dark green for the hanging loop and tassel
Crochet the Mini Christmas Trees
Using white yarn and a 3 mm crochet hook:
Row 1: Ch 2, work 2 sc in the second chain from the hook. (2)
Row 2: Ch 1, turn, inc in each stitch. (4)
Row 3: Ch 1, turn, sc across. (4)
Row 4: Ch 1, turn, inc, 2 sc, inc. (6)
Row 5: Ch 1, turn, sc across. (6)
Row 6: Ch 1, turn, inc, 4 sc, inc. (8)
FO and leave a sewing tail.
Make 3–5 miniature trees, depending on the circumference of the band.
Sew the trees evenly across the red band.
Add a small straight stitch beneath each tree to create its trunk.
Part 6: Ivory Holly Berry Bauble
This elegant ornament features an ivory lattice body with a dark green center band decorated with small holly leaves and red berries.
Colors
- Ivory for the lattice body
- Dark green for the center band
- Bright green for the holly leaves
- Red for the berries
- Ivory for the hanging loop and tassel
Crochet the Holly Leaves
Using green yarn and a 3 mm hook:
Ch 9.
Sc in the second chain from the hook.
Hdc in the next chain.
Dc in the next 4 chains.
Hdc in the next chain.
Work 3 sc in the final chain.
Continue along the opposite side of the foundation chain.
Repeat the stitch sequence in reverse.
Join with a sl st.
For pointed holly edges, work small ch-2 picots along the outer edge.
FO and leave a sewing tail.
Crochet the Holly Berries
Using red yarn:
Round 1: 6 sc in MR. (6)
Round 2: Sc around. (6)
FO and close the opening.
Make small groups of three berries.
Assembly
Sew pairs of holly leaves onto the dark green band.
Place three red berries between each pair of leaves.
Repeat the motif around the ornament.
Part 7: Cream and Gold Star Bauble
This sophisticated ornament features a cream lattice body with a matching center band decorated with small golden stars.
Colors
- Warm ivory for the lattice body
- Cream for the center band
- Gold or mustard yellow for the stars
- Ivory for the hanging loop and tassel
Crochet the Mini Stars
Using gold yarn and a 3 mm hook:
Round 1: Make a magic ring and work 10 sc into the ring. Join. (10)
Round 2: Repeat the following sequence five times:
Ch 3, sc in the second chain from the hook, hdc in the next chain, skip one stitch of the center ring, sl st in the next stitch.
FO and leave a sewing tail.
Make approximately 5–7 stars.
Sew the stars evenly across the cream center band.
For extra sparkle, use metallic gold embroidery thread to add small decorative details.
Part 8: Crochet the Hanging Loop
Each bauble features a simple matching hanging cord.
Step 1
Using the main ornament color, ch 45–55.
Step 2
Sl st into the second chain from the hook and across the remaining chains.
Step 3
FO, leaving a long sewing tail.
Step 4
Fold the cord into a loop.
Step 5
Attach both ends securely to the top of the bauble, anchoring them through the reinforced ornament support rather than relying only on the mesh stitches.
Step 6
Wrap a small amount of matching yarn around the attachment point to create a neat decorative finish.
Part 9: Make the Decorative Tassel
The long tassel gives the ornament a beautiful traditional finishing touch.
Step 1
Cut approximately 25–35 strands of yarn, each measuring 18–20 cm.
Step 2
Fold the strands in half.
Step 3
Tie a separate strand tightly around the folded center.
Step 4
Wrap another strand around the tassel approximately 1.5 cm below the top.
Step 5
Secure the wrap with a knot and hide the ends inside the tassel.
Step 6
Trim the tassel ends evenly.
Step 7
Attach the tassel to the bottom of the ornament.
Step 8
Add a small matching wooden or crocheted bead above the tassel if desired.
Part 10: Add the Warm LED Lighting
The soft golden illumination transforms the crochet baubles into festive hanging lanterns.
Step 1
Choose a battery-operated LED module designed for decorative ornaments.
Step 2
Check that the light remains cool during operation and is compatible with the ornament support.
Step 3
Place the LED module inside the spherical support according to the manufacturer’s instructions.
Step 4
Make sure the battery compartment and switch remain accessible.
Step 5
Turn on the LED light and check the illumination through the lattice stitches.
Step 6
Adjust the position of the light so the ornament glows evenly.
Step 7
Secure the module only as directed by its manufacturer. Do not attach batteries or exposed wiring directly to yarn.
Safety Reminder: Never use real candles or heat-producing bulbs. Switch off the lights when unattended, and remove batteries before long-term storage.
Part 11: Final Assembly
Step 1
Check that both crochet hemispheres are joined securely.
Step 2
Adjust the center band so it sits evenly around the widest part of the bauble.
Step 3
Make sure the decorative motifs face outward.
Step 4
Secure the hanging loop to the top support.
Step 5
Attach the tassel to the bottom.
Step 6
Check the LED light module and battery access.
Step 7
Weave in any loose yarn ends.
Step 8
Gently reshape the crochet lattice around the spherical support.
Step 9
Hang the bauble from a secure hook and confirm that it is balanced.
Step 10
Turn on the LED light and enjoy your finished handmade Christmas ornament.
Christmas Color Variations
Classic Candy Cane
Red and white with diagonal striped details.
Traditional Christmas
Forest green, deep red, and ivory with tiny Christmas trees.
Vintage Holly
Warm cream, dark green, and cranberry red with holly leaves.
Elegant Gold
Ivory, champagne, and metallic gold with delicate stars.
Winter Wonderland
White, silver, and icy blue with embroidered snowflakes.
Rustic Farmhouse
Oatmeal, beige, warm brown, and muted forest green.
Scandinavian Christmas
Natural white, burgundy, and dark pine green.
Pastel Christmas
Blush pink, sage green, cream, and soft gold.
Creative Ways to Display Your Crochet Christmas Baubles
- Hang several baubles above a bedroom window.
- Create a festive arrangement above a bed, safely away from bedding and heat sources.
- Decorate a Christmas tree with smaller versions.
- Hang them from a mantel display.
- Use them as decorative accents in a holiday entryway.
- Create a set of four coordinated ornaments.
- Hang them from a decorative wooden branch.
- Display them near a holiday wreath.
- Make matching ornaments for a handmade Christmas gift set.
- Use unlit versions for a traditional Christmas garland.
Helpful Crochet Tips
- Use cotton yarn for clear lattice stitch definition.
- Maintain consistent tension throughout the mesh rounds.
- Check the size of the spherical support before finishing the hemispheres.
- Make both hemispheres with the same stitch count.
- Keep the lattice stitches open enough for light to pass through.
- Use a removable support for easier cleaning and storage.
- Make the decorative center band slightly snug.
- Embroider motifs before attaching the band.
- Keep the hanging loop securely reinforced.
- Use lightweight tassels to avoid pulling the ornament downward.
- Choose warm white LED lights for a cozy golden glow.
- Keep batteries accessible.
- Never place the ornament near open flames.
- Check the hanging hook before displaying.
- Make all four color variations for a coordinated Christmas collection.
Frequently Asked Questions
Are these crochet Christmas baubles suitable for beginners?
This pattern is best for intermediate crocheters who are comfortable working in rounds, making chain spaces, joining crochet pieces, and sewing decorative motifs.
Can I make the baubles without lights?
Yes. The ornaments look beautiful without illumination and can be displayed as traditional crochet Christmas decorations.
How do the baubles keep their round shape?
A lightweight spherical ornament support holds the crochet lattice in shape while keeping the decoration removable and reusable.
Can I use fairy lights inside the baubles?
Only use battery-operated, low-heat LED lights specifically suitable for enclosed decorative ornaments, following the manufacturer’s safety instructions.
Can I make smaller Christmas ornaments?
Yes. Use thinner yarn, a smaller crochet hook, and a smaller spherical support. Adjust the number of lattice rounds to fit.
Can I use acrylic yarn?
Yes, although cotton yarn is generally firmer and provides better stitch definition. Keep all yarn away from heat-producing light sources.
Can I wash the finished baubles?
Remove the LED module and spherical support first. Hand wash the crochet covering gently according to the yarn care instructions, then dry completely before reassembly.
Can I sell finished ornaments made from this pattern?
Yes. You may sell handmade ornaments created using this pattern. Credit to the pattern designer is appreciated.
Can I hang these outdoors?
These ornaments are best suited to indoor use. Outdoor displays require lighting and electrical components specifically rated for outdoor conditions.
What type of lighting creates the warm golden effect?
A warm white battery-operated LED module can create a soft golden glow through the open crochet lattice.
Care and Storage Instructions
- Remove the LED module before cleaning.
- Remove batteries before storage.
- Dust the crochet surface gently.
- Spot clean when necessary.
- Hand wash removable crochet coverings only when appropriate for the yarn.
- Dry completely before reinstalling the light module.
- Keep ornaments away from open flames.
- Avoid crushing the lattice structure.
- Store ornaments in individual protective boxes.
- Keep decorative tassels straight during storage.
- Protect metallic embroidery from snagging.
- Store in a cool, dry location.
Final Thoughts
These light-up crochet Christmas baubles are a wonderful way to combine handmade crochet artistry with the warm magic of Christmas lighting. Their airy lattice structure, festive embroidered bands, elegant tassels, and glowing interiors make them beautiful seasonal decorations.
Whether you choose classic red and white candy cane stripes, charming holly leaves, miniature Christmas trees, or delicate golden stars, each ornament brings its own personality to your holiday décor.
Make a matching set of four for a beautiful coordinated display, or experiment with your favorite Christmas colors to create a completely personalized collection.
Love this festive crochet project? Save this free light-up crochet Christmas bauble pattern to Pinterest and share it with your crochet friends for more beautiful handmade holiday inspiration!