Christmas Crochet Stocking with Green Bow – Free Crochet Pattern
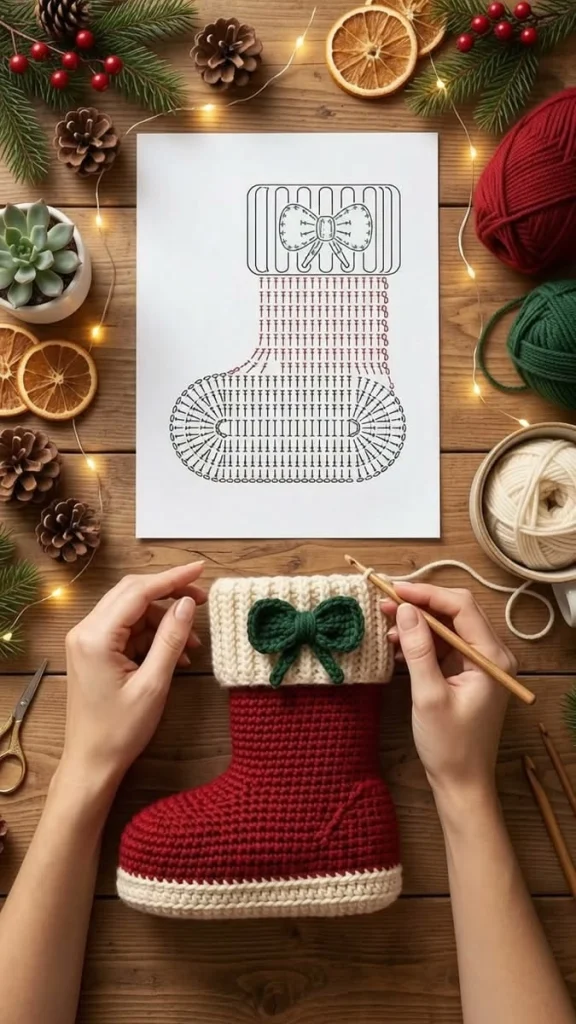
Bring handmade Christmas charm into your home with this beautiful Christmas crochet stocking. Featuring a rich red stocking body, a soft cream ribbed cuff, a delicate forest-green bow, and a matching cream border, this festive design combines traditional holiday colors with cozy crochet textures.
This handmade stocking is perfect for hanging beside the fireplace, decorating a staircase, displaying on a Christmas tree, or filling with small holiday surprises. Its classic shape and elegant details make it a lovely addition to rustic, farmhouse, and traditional Christmas decorations.
The simple red body creates a beautiful contrast with the textured cream cuff, while the green crochet bow adds a charming finishing touch. Whether you’re making Christmas decorations for your own home or preparing thoughtful handmade gifts, this stocking is a delightful seasonal project.
In this free crochet tutorial, you’ll learn how to create the stocking body, shape the heel and toe, crochet the ribbed cuff, add the decorative bow, and assemble the finished Christmas stocking.
Pattern Note: This is an original pattern inspired by the reference photograph. The printed crochet chart shown in the image is not fully legible, so the instructions below provide an independent, practical construction method rather than an exact transcription of that chart.
Pattern Information
- Skill Level: Intermediate
- Finished Length: Approximately 35–40 cm (14–16 inches)
- Finished Width: Approximately 15–18 cm (6–7 inches)
- Yarn Weight: Worsted-weight cotton or acrylic yarn
- Main Colors: Christmas red, cream, and forest green
- Hook Size: 4 mm crochet hook
- Terminology: US crochet terms
- Construction: Toe-up stocking with shaped heel, ribbed cuff, and separate decorative bow
- Estimated Time: 5–8 hours
Materials Needed
- 150–200 g red worsted-weight yarn
- 60–80 g cream worsted-weight yarn
- 20–30 g forest-green worsted-weight yarn
- 4 mm crochet hook
- Yarn needle
- Scissors
- Stitch markers
- Measuring tape
- Optional small amount of polyester fiberfill for display shaping
- Optional decorative ribbon or wooden gift tag
Crochet Abbreviations
- ch: Chain
- sc: Single crochet
- hdc: Half double crochet
- dc: Double crochet
- sl st: Slip stitch
- st: Stitch
- inc: Increase
- dec: Decrease
- sc2tog: Single crochet 2 stitches together
- MR: Magic ring
- BLO: Back loop only
- FO: Fasten off
Part 1: Crochet the Cream Stocking Toe
Begin at the rounded toe of the stocking using cream yarn and a 4 mm crochet hook.
Round 1
Make a magic ring and work 6 sc into the ring. (6 sc)
Round 2
Work 2 sc in each stitch around. (12 sc)
Round 3
*Sc in the next stitch, inc.* Repeat around. (18 sc)
Round 4
*Sc in the next 2 stitches, inc.* Repeat around. (24 sc)
Round 5
*Sc in the next 3 stitches, inc.* Repeat around. (30 sc)
Round 6
*Sc in the next 4 stitches, inc.* Repeat around. (36 sc)
Round 7
*Sc in the next 5 stitches, inc.* Repeat around. (42 sc)
Round 8
*Sc in the next 6 stitches, inc.* Repeat around. (48 sc)
Rounds 9–10
Sc in each stitch around. (48 sc)
At the end of Round 10, change to red yarn. Keep the working yarn attached and continue with the foot.
Part 2: Crochet the Red Stocking Foot
The red foot forms the main lower section of the Christmas stocking.
Rounds 11–30
Using red yarn, work 1 sc in each stitch around. (48 sc per round)
Continue working evenly until the foot measures approximately 17–20 cm from the tip of the toe.
Adjust the number of rounds if necessary to achieve your preferred stocking size.
Keep the stitches firm and even to create a structured fabric.
Part 3: Shape the Stocking Heel
The heel creates the characteristic curved shape of the Christmas stocking.
Divide the 48 stitches into two sections of 24 stitches.
Place a stitch marker at each side.
Heel Flap
Work the heel over 24 stitches only.
Row 1
Sc in the next 24 stitches. Ch 1 and turn.
Rows 2–12
Sc in each stitch across. Ch 1 and turn after each row, except the final row.
At the end of Row 12, you should have a rectangular heel flap.
Heel Turning
Row 13
Sc in the next 15 stitches, sc2tog, sc in the next stitch, turn.
Row 14
Ch 1, sc in the next 8 stitches, sc2tog, sc in the next stitch, turn.
Row 15
Ch 1, sc to one stitch before the gap created by the previous turn, sc2tog across the gap, sc in the next stitch if available, turn.
Repeat the turning process, working across the gaps until the heel is rounded and all side stitches have been incorporated.
Because turning methods and stitch placement can vary, check that the heel forms a smooth cup without large openings.
Part 4: Crochet the Stocking Leg
After completing the heel, return to working in rounds.
Step 1
Sc across the remaining heel stitches.
Step 2
Pick up stitches evenly along the first side of the heel flap.
Step 3
Work across the 24 unworked instep stitches.
Step 4
Pick up the same number of stitches along the opposite side of the heel flap.
Step 5
Work decrease rounds at the sides of the heel until the total stitch count returns to 48 stitches.
Leg Rounds
Sc in each stitch around. (48 sc)
Continue until the leg measures approximately 18–20 cm from the heel.
Maintain even tension throughout the red section.
At the end of the final round, change to cream yarn.
Part 5: Crochet the Cream Ribbed Cuff
The thick cream cuff adds softness and texture to the top of the stocking.
Use cream yarn and a 4 mm crochet hook.
Round 1
Work 1 sc in each stitch around the top opening. (48 sc)
Round 2
Work 1 hdc in each stitch around. (48 hdc)
Round 3
Work 1 hdc in BLO of each stitch around. (48 hdc)
Rounds 4–10
Repeat Round 3.
This creates horizontal ridges that give the cuff a textured appearance.
Round 11
Work 1 sc in each stitch around.
FO and weave in the yarn ends.
Fold the cuff outward and downward over the top of the stocking.
Adjust the fold until the cuff measures approximately 7–9 cm in height.
Optional: For more pronounced vertical ribbing like the reference image, crochet a separate rectangle using BLO sc rows and sew it around the top opening instead.
Part 6: Crochet the Forest-Green Bow
The green bow is the decorative centerpiece of the stocking cuff.
Use forest-green yarn and a 4 mm crochet hook.
Bow Rectangle
Row 1
Ch 17.
Row 2
Hdc in the third chain from the hook and across. (15 hdc)
Rows 3–10
Ch 2 and turn. Hdc in each stitch across. (15 hdc)
FO, leaving a long tail.
Shape the Bow
Fold the rectangle lengthwise to find the center.
Pinch the middle section to create two rounded loops.
Wrap a separate length of green yarn around the center several times.
Secure the yarn firmly at the back.
Bow Center Wrap
Ch 6.
Sc in the second chain from the hook and across. (5 sc)
Repeat for 4–5 rows.
FO, leaving a long tail.
Wrap this small rectangle around the center of the bow and sew it closed at the back.
Part 7: Crochet the Bow Tails
Make two short green bow tails.
Row 1
Ch 5.
Row 2
Sc in the second chain from the hook and across. (4 sc)
Rows 3–12
Ch 1 and turn. Sc across. (4 sc)
FO, leaving a long tail.
Repeat for the second tail.
Attach the tails behind the bow center.
Angle them slightly outward to create the appearance of a tied ribbon.
Part 8: Attach the Bow to the Stocking
Step 1
Lay the stocking flat with the front facing upward.
Step 2
Position the green bow at the center of the cream cuff.
Step 3
Use a yarn needle and matching green yarn to sew the bow securely in place.
Step 4
Attach the bow tails beneath the loops.
Step 5
Check that the bow is centered and symmetrical.
Gently shape the loops to create a full, rounded appearance.
Part 9: Crochet the Hanging Loop
A sturdy hanging loop makes it easy to display your stocking.
Step 1
Using cream yarn, ch 25.
Step 2
Sc in the second chain from the hook and across. (24 sc)
Step 3
FO, leaving a long tail.
Step 4
Fold the strip into a loop.
Step 5
Sew both ends securely to the inside back edge of the cuff.
Reinforce the attachment with several stitches, especially if you plan to fill the stocking with gifts.
Part 10: Final Assembly and Finishing
Step 1
Weave in all loose yarn ends using a yarn needle.
Step 2
Check the toe and heel for gaps.
Step 3
Fold the cream cuff neatly over the red stocking body.
Step 4
Adjust the green bow and tails.
Step 5
Gently shape the stocking by hand.
Step 6
If the stocking is intended for decorative display only, add a small amount of removable stuffing to help maintain its shape.
Step 7
Hang the stocking from its loop and check the overall appearance.
Your handmade Christmas crochet stocking is now ready to display!
Christmas Stocking Color Variations
Classic Christmas Red
Use a deep red body, cream cuff, and forest-green bow for a traditional holiday look.
Elegant Burgundy
Replace the bright red yarn with rich burgundy and use an ivory cuff with a gold bow.
Winter Wonderland
Make the stocking entirely cream with a soft sage-green bow.
Rustic Farmhouse
Use cranberry red, oatmeal beige, and muted olive green.
Vintage Christmas
Combine dusty rose, warm cream, and antique green.
Luxury Holiday
Use emerald green for the stocking body, ivory for the cuff, and deep red for the bow.
Neutral Scandinavian
Choose natural beige, soft white, and warm brown for a minimalist Christmas decoration.
Helpful Crochet Tips
- Use stitch markers to track the beginning of each round.
- Maintain even tension throughout the stocking body.
- Use a slightly smaller hook if your stitches are too loose.
- Count stitches regularly when shaping the heel.
- Keep the toe increases evenly spaced.
- Make the cream cuff slightly firm so it holds its folded shape.
- Use cotton yarn for a structured stocking.
- Use acrylic yarn for a softer, lightweight finish.
- Secure the green bow firmly to prevent it from shifting.
- Reinforce the hanging loop if the stocking will hold gifts.
- Weave in yarn ends carefully for a professional appearance.
- Block the stocking lightly if necessary.
- Avoid overstretching the cuff.
- Use matching yarn for invisible seams.
- Adjust the length of the foot and leg to customize the stocking size.
Frequently Asked Questions
Is this Christmas crochet stocking beginner-friendly?
The stocking is best suited to intermediate crocheters because it includes shaping the heel and working a ribbed cuff. Beginners familiar with basic crochet stitches can also try it with patience.
Can I make the stocking larger?
Yes. Increase the number of stitches in the toe and adjust the foot and leg lengths accordingly.
Can I make a mini Christmas stocking?
Yes. Use thinner yarn, a smaller crochet hook, and fewer stitches to create a miniature version suitable for tree ornaments.
What yarn works best for crochet Christmas stockings?
Worsted-weight cotton or acrylic yarn works well. Cotton provides structure, while acrylic offers a softer finish.
Can I use different colors?
Absolutely. Red, cream, green, burgundy, beige, and gold are all beautiful choices for Christmas stockings.
How do I keep the cuff folded?
Fold it evenly over the top edge. If needed, secure the fold with a few small stitches at the sides.
Can I add a name to the stocking?
Yes. You can embroider a name on the cream cuff or attach a personalized wooden or fabric tag.
Can the stocking hold Christmas gifts?
Yes, but the hanging loop and heel should be reinforced if you plan to add heavier items.
Can I sell stockings made from this pattern?
Yes. You may sell handmade stockings created using this original pattern. Credit to the designer is appreciated.
How should I store the stocking after Christmas?
Fold it gently and store it in a clean, dry container away from moisture and direct sunlight.
Care Instructions
- Hand wash gently in cool water.
- Use mild detergent.
- Avoid bleach and harsh chemicals.
- Do not twist or wring the stocking.
- Gently press out excess water using a towel.
- Reshape the stocking while damp.
- Lay flat to air dry.
- Avoid direct heat.
- Do not tumble dry unless your yarn label specifically allows it.
- Store in a dry place between holiday seasons.
Final Thoughts
This Christmas crochet stocking with green bow is a timeless handmade decoration that brings warmth and festive charm to any home. The rich red stocking body, soft cream cuff, delicate green bow, and matching trim create a beautiful combination of traditional Christmas colors and cozy crochet textures.
Whether you’re decorating a fireplace mantel, preparing handmade Christmas gifts, or creating matching stockings for the whole family, this free crochet pattern offers a wonderful opportunity to add a personal touch to your holiday celebrations.
Make one stocking or create a complete set in coordinating colors for a charming Christmas display.
Love this festive crochet project? Save this free Christmas crochet stocking pattern to Pinterest and share it with your crochet friends for more handmade holiday inspiration!