Elegant Blue Floral Granny Square Crochet Hobo Bag – Free Crochet Pattern
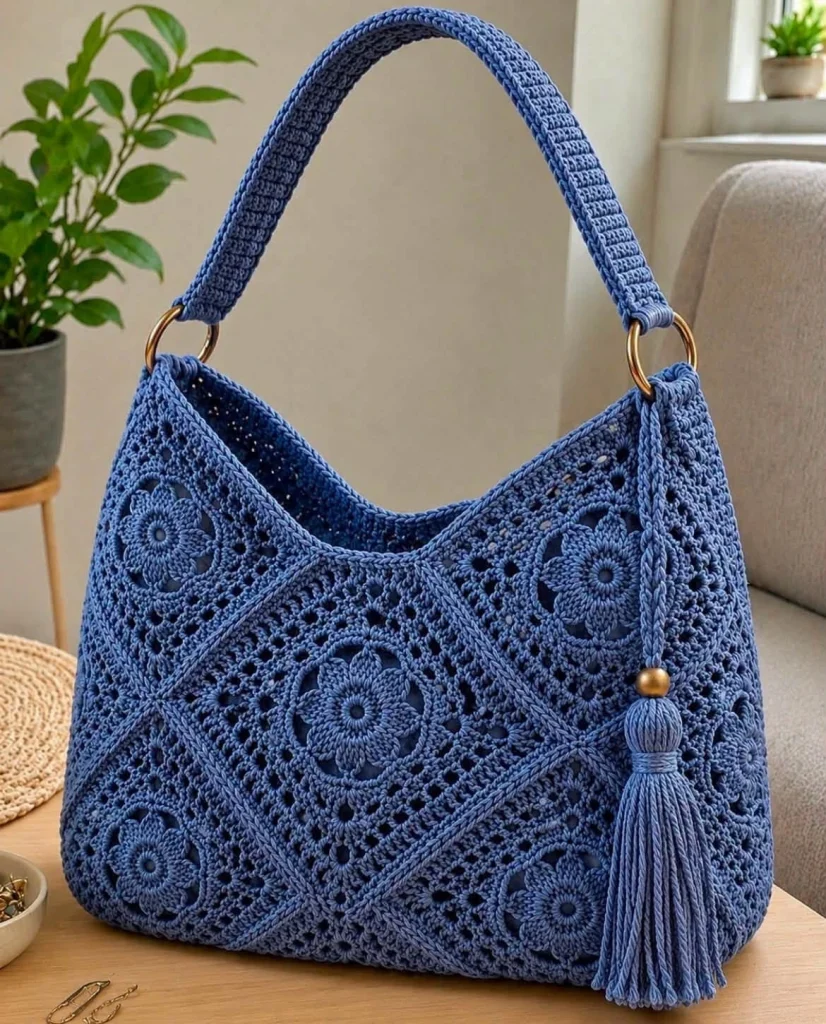
Create a timeless handmade accessory with this beautiful blue floral granny square crochet hobo bag. Featuring intricate flower motifs, elegant diamond-shaped square arrangements, a gently curved opening, and a comfortable shoulder strap, this crochet handbag combines vintage charm with modern everyday style.
The rich dusty blue color gives the bag a sophisticated appearance, while the delicate floral stitches add beautiful texture and handmade detail. Gold-tone rings and a matching yarn tassel complete the design with a polished finishing touch.
Perfect for everyday outings, shopping trips, casual weekends, or handmade gifts, this spacious crochet shoulder bag is both practical and stylish.
In this free crochet pattern, you will learn how to make the floral granny squares, assemble the bag panels, shape the hobo silhouette, crochet a sturdy shoulder strap, attach metal rings, and create the decorative tassel.
Pattern Note: This is an original crochet interpretation inspired by the reference image. The exact stitch construction cannot be determined from the photograph, so the instructions below provide a practical way to create a similar bag.
Pattern Information
- Skill Level: Intermediate to Advanced
- Finished Width: Approximately 35–38 cm (14–15 inches)
- Finished Height: Approximately 28–32 cm (11–12.5 inches)
- Bag Depth: Approximately 10–12 cm (4–4.7 inches)
- Shoulder Strap Length: Approximately 55–65 cm (22–26 inches)
- Yarn Weight: DK cotton or cotton-blend yarn
- Hook Size: 3.5 mm or 4 mm
- Construction: Floral granny square panels with reinforced seams
- Terminology: US crochet terms
- Estimated Time: 12–18 hours
Materials Needed
- Approximately 500–650 g dusty blue cotton yarn, depending on gauge and finished size
- 3.5 mm crochet hook for decorative squares
- 4 mm crochet hook for the strap, if needed
- Two gold-tone metal rings, approximately 3–4 cm in diameter
- One gold-tone decorative bead
- Yarn needle
- Scissors
- Stitch markers
- Measuring tape
- Optional cotton lining fabric
- Optional magnetic snap closure
- Optional lightweight bag interfacing
- Optional zipper for an interior pocket
Crochet Abbreviations
- MR: Magic ring
- ch: Chain
- sc: Single crochet
- hdc: Half double crochet
- dc: Double crochet
- tr: Treble crochet
- sl st: Slip stitch
- sp: Space
- st: Stitch
- inc: Increase
- FO: Fasten off
Part 1: Crochet the Floral Granny Square Motifs
The main feature of this bag is its intricate floral granny square design. Each square contains a raised flower surrounded by decorative openwork stitches.
For the closest resemblance to the reference image, crochet all the motifs in the same dusty blue color.
Make a sample square first and measure it after blocking. Aim for approximately 12–13 cm per square, adjusting hook size if necessary.
Round 1: Flower Center
Make a magic ring.
Ch 3 (counts as first dc), work 11 dc into the ring.
Join with a sl st to the top of the beginning ch 3.
(12 dc)
Round 2: Flower Foundation
Ch 1, sc in the same stitch.
*Ch 3, skip 1 stitch, sc in the next stitch.*
Repeat from * to * around, replacing the final sc with a sl st into the first sc.
(6 ch-3 spaces)
Round 3: Crochet the Flower Petals
Sl st into the first ch-3 space.
Work the following into each ch-3 space:
1 sc, 1 hdc, 3 dc, 1 hdc, 1 sc.
Repeat around to create six rounded flower petals.
Join with a sl st.
(6 petals)
Round 4: Create the Background Loops
Working behind the petals, join the yarn at the base of a petal.
Ch 5 and sc into the base between the next two petals.
Repeat around.
Join with a sl st.
(6 ch-5 spaces)
Round 5: Build the Openwork Foundation
Sl st into the first ch-5 space.
Ch 3, work 4 dc into the same space, ch 2.
Work 5 dc and ch 2 into each remaining ch-5 space.
Join with a sl st.
This creates six groups of stitches surrounding the central flower.
Round 6: Transition to a Square
To create a square around the six-petal flower, work the following sequence across the six ch-2 spaces from Round 5:
In the first space: (3 dc, ch 2, 3 dc) for Corner 1.
In the second space: 3 dc.
In the third space: (3 dc, ch 2, 3 dc) for Corner 2.
In the fourth space: (3 dc, ch 2, 3 dc) for Corner 3.
In the fifth space: 3 dc.
In the sixth space: (3 dc, ch 2, 3 dc) for Corner 4.
Join with a sl st.
The motif will now have four corners, with slightly different stitch distributions along the sides. This is acceptable for the decorative design and can be adjusted during blocking.
Round 7: Decorative Openwork
Work around the square using groups of dc separated by ch-1 spaces.
At each corner, work (2 dc, ch 2, 2 dc).
Keep the side stitches evenly distributed and maintain the four corners.
Join with a sl st.
Round 8: Textured Border
Ch 1 and work sc evenly around the entire square.
At each corner, work (2 sc, ch 2, 2 sc).
Join with a sl st.
Round 9: Reinforced Final Edge
Work another round of sc, maintaining the corner ch-2 spaces.
FO and weave in the ends.
Block the square gently to achieve an even shape.
Important: Because the original photograph contains intricate decorative stitching, these instructions create a simplified floral square inspired by its appearance rather than an exact stitch-for-stitch reproduction.
Part 2: Make the Granny Square Panels
For a similar hobo bag shape, create two main decorative panels using the floral motifs.
Front Panel
Make 6 floral granny squares.
Arrange them in two rows of three squares.
Rotate selected squares diagonally to create the diamond-like appearance seen in the reference image, if desired.
Join the squares with slip stitches or a flat single crochet seam.
For a simpler construction, keep all six squares aligned in a regular rectangular layout.
Back Panel
Make another 6 floral granny squares.
Join them in the same arrangement as the front panel.
Both panels should have matching dimensions.
Adjusting the Panel Shape
The original bag has a soft curved upper edge and a gently rounded lower silhouette.
To recreate this shape, use short rows of single crochet along the top edges and corners of each panel.
Gradually reduce the height near the center opening to create a shallow curved neckline.
Make sure the front and back panels match before assembly.
Part 3: Crochet the Side and Bottom Gusset
The gusset adds depth and creates the roomy shape of the finished bag.
Step 1
Ch 21.
Step 2
Sc in the second chain from the hook and in each remaining chain.
(20 sc)
Step 3
Ch 1, turn, sc across.
Step 4
Repeat Step 3 until the strip is long enough to run down one side, across the bottom, and up the opposite side of the bag.
Step 5
FO and leave a long sewing tail.
For a more structured finish, crochet one additional row of slip stitches along both long edges.
Part 4: Assemble the Crochet Bag
Step 1
Lay the front panel flat with the right side facing upward.
Step 2
Align one long edge of the gusset with the side and bottom edges of the front panel.
Step 3
Attach the gusset using single crochet stitches through corresponding edge stitches.
Step 4
Continue joining around the bottom and opposite side.
Step 5
Repeat the process with the back panel.
Step 6
Turn the bag right side out.
Step 7
Check the shape and gently adjust the corners.
The completed body should have a relaxed, slightly rounded hobo silhouette.
Part 5: Crochet the Curved Top Opening
The curved opening is one of the most distinctive details of the reference bag.
Round 1
Join the dusty blue yarn at one side of the bag opening.
Work sc evenly around the top edge.
Join with a sl st.
Round 2
Ch 1 and work sc around.
At the center front and back, use slightly tighter tension to emphasize the gentle curve.
Round 3
Work one round of slip stitches for a firm, polished edge.
FO and weave in the ends.
Tip: If the top edge stretches, crochet a narrow reinforcing cord into the final round or use a smaller hook.
Part 6: Crochet the Wide Shoulder Strap
The wide shoulder strap gives the bag a comfortable fit and matches its elegant handmade style.
Step 1
Ch 13.
Step 2
Sc in the second chain from the hook and across.
(12 sc)
Step 3
Ch 1, turn, sc across.
Step 4
Repeat Step 3 until the strap measures approximately 55–65 cm.
Step 5
Work a row of slip stitches along each long edge to strengthen the strap.
Step 6
FO, leaving long yarn tails at both ends.
Step 7
Fold each end around a gold-tone metal ring.
Step 8
Sew the folded ends securely using matching yarn and a yarn needle.
Tip: For a strap that stretches less, use a firm cotton yarn and reinforce the inside with a narrow strip of cotton webbing.
Part 7: Attach the Gold Metal Rings
The gold-tone rings provide a stylish contrast against the blue crochet texture.
Step 1
Position one ring at each upper side of the bag.
Step 2
Cut two short pieces of sturdy cotton webbing or crochet two reinforced attachment tabs.
Step 3
Fold each tab through its metal ring.
Step 4
Attach the tabs securely to the reinforced upper side seams of the bag.
Step 5
Make sure the rings sit at equal heights.
Step 6
Check that the strap hangs evenly.
For everyday use, reinforce the attachment points with several rows of stitching.
Part 8: Make the Decorative Crochet Tassel
The long blue tassel is a beautiful finishing detail that adds movement and elegance to the handbag.
Step 1
Cut approximately 40–50 strands of dusty blue yarn, each measuring 25–30 cm.
Step 2
Fold all strands in half.
Step 3
Tie a separate strand tightly around the folded center.
Step 4
Wrap another strand around the tassel approximately 2 cm below the top.
Step 5
Secure the wrapping yarn with a knot and hide the ends inside the tassel.
Step 6
Trim the tassel ends evenly.
Step 7
Add a gold-tone decorative bead above the tassel.
Step 8
Attach the tassel to one of the metal rings using a crocheted cord.
The tassel should hang naturally along the side of the bag.
Part 9: Add an Optional Fabric Lining
A fabric lining helps prevent small belongings from slipping through the decorative openwork stitches.
Step 1
Measure the inside width, height, and depth of the completed crochet bag.
Step 2
Cut cotton lining fabric to match the interior dimensions, adding seam allowances.
Step 3
Sew the lining pieces together, leaving the top open.
Step 4
Fold the top raw edge inward and press it neatly.
Step 5
Place the lining inside the crochet bag.
Step 6
Hand sew the lining to the inside of the upper edge using small, discreet stitches.
Step 7
Add an interior pocket if desired.
For a more professional finish, choose a lining fabric in dusty blue, cream, or soft gray.
Part 10: Add an Optional Magnetic Closure
A magnetic snap helps keep the contents secure while maintaining the relaxed hobo bag shape.
Step 1
Mark the center of the front and back upper edges.
Step 2
Attach each half of the magnetic snap to the lining fabric, following the manufacturer’s instructions.
Step 3
Reinforce the attachment area with interfacing.
Step 4
Check that both halves align correctly.
Step 5
Close the snap and adjust the bag shape.
Part 11: Final Finishing
Step 1
Weave in all remaining yarn ends.
Step 2
Check that every granny square seam is secure.
Step 3
Inspect the shoulder strap attachment points.
Step 4
Make sure both gold-tone rings are firmly attached.
Step 5
Adjust the curved upper opening.
Step 6
Straighten the tassel strands.
Step 7
Check the interior lining, if included.
Step 8
Gently block the bag body if needed, following the yarn care instructions.
Step 9
Allow the bag to dry completely.
Step 10
Fill the bag lightly to check its final shape and balance.
Beautiful Color Variations
Classic Dusty Blue
Recreate the elegant blue design shown in the reference image with matching floral squares, a blue strap, and a blue tassel.
Ivory and Gold
Use cream cotton yarn with gold-tone hardware for a sophisticated neutral handbag.
Sage Green
Choose muted sage green yarn for a soft, nature-inspired accessory.
Chocolate Brown
Create a rich brown version for a warm vintage aesthetic.
Blush Pink
Use dusty rose yarn for a romantic, feminine crochet handbag.
Classic Black
Make a black floral crochet bag with gold-tone rings for a timeless look.
Terracotta
Choose warm terracotta yarn for a beautiful bohemian-style accessory.
Two-Tone Blue
Combine dusty blue and navy blue for subtle contrast between the flowers and borders.
Helpful Crochet Tips
- Use cotton yarn for better stitch definition and structure.
- Make a gauge swatch before starting the full bag.
- Keep all floral granny squares the same size.
- Block the squares before joining them.
- Use stitch markers to align the seams.
- Reinforce the shoulder strap to reduce stretching.
- Choose strong metal rings suitable for handbag use.
- Secure the ring attachment points carefully.
- Use a fabric lining to protect smaller belongings.
- Keep the top opening slightly curved for the hobo silhouette.
- Use consistent yarn tension throughout the project.
- Attach the tassel after the bag is fully assembled.
- Choose a slightly smaller hook for firmer stitches.
- Do not overload the bag with heavy items.
- Store the bag with light padding to maintain its shape.
Frequently Asked Questions
Is this crochet hobo bag suitable for beginners?
This pattern is best for intermediate crocheters who are comfortable making granny squares, working decorative stitches, joining panels, and constructing accessories.
What yarn works best for this bag?
DK cotton yarn or a firm cotton blend is recommended because it provides good stitch definition and helps the bag maintain its shape.
Can I make the bag larger?
Yes. Add more granny squares, increase the gusset width, or use a slightly thicker yarn and larger crochet hook.
Can I make the bag smaller?
Yes. Use fewer squares, thinner yarn, or a smaller crochet hook to create a compact shoulder bag.
Does this crochet bag need a lining?
A lining is optional but highly recommended because the floral openwork design contains small spaces between stitches.
How can I prevent the shoulder strap from stretching?
Use firm cotton yarn, tight stitches, and an internal reinforcement strip such as cotton webbing.
Can I use acrylic yarn?
Yes, but acrylic yarn may stretch more than cotton. Consider adding lining and strap reinforcement.
Can I add a zipper?
Yes. A zipper can be sewn into a fabric lining or attached to a reinforced crochet opening.
Can I wash the finished bag?
Hand washing is recommended when compatible with the yarn, lining, and hardware. Avoid soaking metal hardware unnecessarily, and dry the bag flat.
Can I sell finished bags made from this pattern?
Yes. You may sell handmade bags created using this pattern. Credit to the pattern designer is appreciated.
Care Instructions
- Spot clean whenever possible.
- Hand wash gently in cool water if the materials allow.
- Use mild detergent.
- Avoid harsh bleach.
- Do not wring or twist the bag.
- Reshape while damp.
- Dry flat away from direct sunlight.
- Avoid machine drying.
- Protect the gold-tone hardware from moisture.
- Store with light padding to maintain the shape.
- Avoid carrying excessive weight.
- Check the strap seams regularly.
Final Thoughts
This blue floral granny square crochet hobo bag is a beautiful combination of vintage crochet artistry and modern handbag design. Its intricate floral motifs, elegant dusty blue color, comfortable shoulder strap, and decorative gold-tone details make it a standout handmade accessory.
Whether you make it for yourself, give it as a thoughtful handmade gift, or create several color variations, this crochet shoulder bag is a rewarding project that showcases the beauty of detailed crochet work.
The finished bag is perfect for casual outings, everyday styling, and anyone who loves unique handmade accessories.
Love this crochet bag? Save this free blue floral granny square hobo bag pattern to Pinterest and share it with your crochet friends for more beautiful handmade inspiration!