Autumn Pumpkin Crochet Door Hanger – Free Fall Decoration Pattern
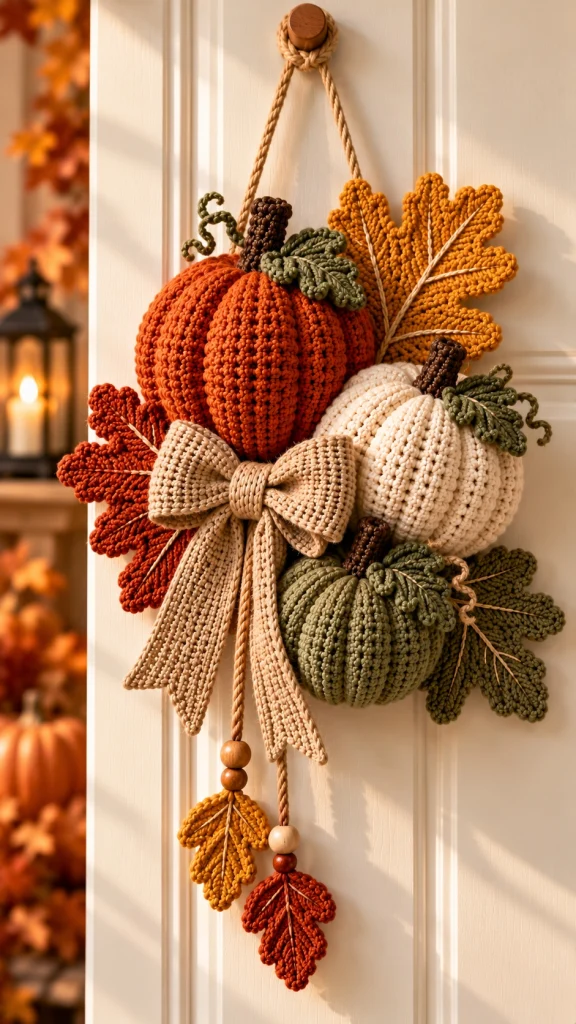
Welcome autumn into your home with this beautiful handmade crochet pumpkin door hanger. Featuring three plump textured pumpkins in burnt orange, creamy ivory, and muted sage green, this charming fall decoration brings warmth and rustic elegance to your front door.
Decorative crochet oak leaves in mustard yellow, terracotta, and olive green surround the pumpkins, while a soft beige bow, wooden beads, and two dangling leaf ornaments complete the cozy farmhouse-inspired design.
This free crochet pattern walks you through making the pumpkins, shaping their ridges, crocheting decorative leaves, assembling the arrangement, and creating a secure hanging loop.
Pattern Details
- Skill Level: Intermediate
- Finished Size: Approximately 45–55 cm long, including dangling leaves
- Project Type: Fall door decoration
- Technique: Amigurumi, ribbed crochet, appliqué, and assembly
- Hook Size: 3.5 mm and 4 mm
- Terminology: US crochet terms
Materials Needed
- Worsted-weight cotton or acrylic yarn in burnt orange
- Ivory or cream yarn
- Sage-green yarn
- Mustard-yellow yarn
- Terracotta and olive-green yarn for oak leaves
- Dark brown yarn for pumpkin stems
- Beige yarn for the large decorative bow
- 3.5 mm and 4 mm crochet hooks
- Polyester fiberfill stuffing
- Yarn needle and scissors
- Stitch markers
- Natural wooden beads
- Strong cotton cord for hanging
- Optional floral wire for shaping leaves
- Optional felt backing and a lightweight support frame
Abbreviations
- MR: Magic ring
- ch: Chain
- sc: Single crochet
- hdc: Half double crochet
- dc: Double crochet
- tr: Treble crochet
- sl st: Slip stitch
- inc: Increase (2 sc in one stitch)
- dec: Invisible decrease
- BLO: Back loop only
- FO: Fasten off
Part 1: Crochet the Large Burnt Orange Pumpkin
The large burnt orange pumpkin is the centerpiece of this autumn door hanger. Its deeply defined ribs create the beautiful dimensional texture shown in the reference image.
Pumpkin Body
Using burnt orange yarn and a 4 mm crochet hook:
- Round 1: MR, 6 sc. (6)
- Round 2: Inc in each stitch around. (12)
- Round 3: *Sc 1, inc* repeat around. (18)
- Round 4: *Sc 2, inc* repeat around. (24)
- Round 5: *Sc 3, inc* repeat around. (30)
- Round 6: *Sc 4, inc* repeat around. (36)
- Round 7: *Sc 5, inc* repeat around. (42)
- Round 8: *Sc 6, inc* repeat around. (48)
- Rounds 9–18: Sc in each stitch around. (48)
- Round 19: *Sc 6, dec* repeat around. (42)
- Round 20: *Sc 5, dec* repeat around. (36)
- Round 21: *Sc 4, dec* repeat around. (30)
- Round 22: *Sc 3, dec* repeat around. (24)
- Round 23: *Sc 2, dec* repeat around. (18)
- Stuff firmly but avoid overfilling.
- Round 24: *Sc 1, dec* repeat around. (12)
- Round 25: Dec around. (6)
FO, leaving a long tail. Close the opening securely.
Create the Pumpkin Ridges
- Thread a long piece of matching orange yarn through a yarn needle.
- Insert the needle through the center of the pumpkin from top to bottom.
- Bring the yarn around the outside and back through the center.
- Pull gently to create a deep vertical groove.
- Repeat evenly around the pumpkin to create 6–8 sections.
- Secure the yarn firmly at the bottom.
For a more pronounced textured appearance, work additional surface slip stitches along each groove.
Part 2: Crochet the Ivory Pumpkin
The ivory pumpkin adds a soft neutral contrast to the rich autumn colors.
Using cream yarn and a 4 mm hook:
- Round 1: MR, 6 sc. (6)
- Round 2: Inc around. (12)
- Round 3: *Sc 1, inc* around. (18)
- Round 4: *Sc 2, inc* around. (24)
- Round 5: *Sc 3, inc* around. (30)
- Round 6: *Sc 4, inc* around. (36)
- Rounds 7–15: Sc around. (36)
- Round 16: *Sc 4, dec* around. (30)
- Round 17: *Sc 3, dec* around. (24)
- Round 18: *Sc 2, dec* around. (18)
- Stuff firmly.
- Round 19: *Sc 1, dec* around. (12)
- Round 20: Dec around. (6)
Close the opening and create six pumpkin ridges using the same technique as the orange pumpkin.
Part 3: Crochet the Sage-Green Pumpkin
The small sage-green pumpkin balances the arrangement and introduces a beautiful earthy accent.
Using sage-green yarn:
- Round 1: MR, 6 sc. (6)
- Round 2: Inc around. (12)
- Round 3: *Sc 1, inc* around. (18)
- Round 4: *Sc 2, inc* around. (24)
- Round 5: *Sc 3, inc* around. (30)
- Rounds 6–13: Sc around. (30)
- Round 14: *Sc 3, dec* around. (24)
- Round 15: *Sc 2, dec* around. (18)
- Stuff the pumpkin.
- Round 16: *Sc 1, dec* around. (12)
- Round 17: Dec around. (6)
FO and close the opening. Shape six ridges using matching green yarn.
Part 4: Crochet the Brown Pumpkin Stems
Make three stems using dark brown yarn and a 3.5 mm hook.
- Round 1: MR, 6 sc. (6)
- Rounds 2–6: Sc around. (6)
- FO, leaving a sewing tail.
Lightly stuff each stem if necessary. Sew one stem securely to the top of each pumpkin.
For a natural appearance, bend the stem slightly before fastening it in place.
Part 5: Crochet the Curly Pumpkin Vines
Using olive-green yarn:
- Ch 22.
- Starting in the second chain from the hook, work 3 sc in each chain.
- Continue until the vine curls naturally.
- FO, leaving a long sewing tail.
Make 3–5 curly vines in different lengths.
Attach them near the pumpkin stems and allow them to curl outward.
Part 6: Crochet the Decorative Oak Leaves
The autumn leaves are an essential part of this design. Use mustard yellow, burnt orange, terracotta, and olive green to create a natural fall color palette.
Oak Leaf Foundation
Using a 3.5 mm hook:
- Ch 19.
- Starting in the second chain from the hook, sl st in the next 2 chains.
- Sc in the next 3 chains.
- Hdc in the next 4 chains.
- Dc in the next 5 chains.
- Hdc in the next 2 chains.
- Work 3 sc in the final chain.
- Continue along the opposite side, mirroring the stitches.
Create the Oak Leaf Lobes
Along the outer edge of the leaf, work decorative lobes using the following sequence:
- Sl st into the next edge stitch.
- Ch 4.
- Starting in the second chain, work sc, hdc, dc.
- Sl st into the next available edge stitch.
- Repeat to create 3–4 lobes on each side.
FO and weave in the ends.
Make approximately:
- 2 mustard-yellow leaves
- 2 burnt-orange leaves
- 2 olive-green leaves
- 2 smaller leaves for the dangling decorations
For added definition, embroider a central vein and branching veins using beige yarn.
Part 7: Crochet the Large Beige Bow
The oversized beige bow gives the door hanger a soft rustic farmhouse finish.
Bow Loops
Using beige yarn and a 4 mm hook:
- Ch 17.
- Row 1: Sc in the second chain and across. (16)
- Rows 2–12: Ch 1, turn, sc across. (16)
- FO, leaving a long tail.
Make two identical rectangles.
Fold each rectangle into a loop and sew the short ends together.
Bow Center
- Ch 7.
- Sc in the second chain and across. (6)
- Work 5 rows.
- FO.
Place the two bow loops side by side and wrap the center strip around them.
Sew securely on the back.
Bow Tails
Make two long strips:
- Ch 11.
- Sc in the second chain and across. (10)
- Continue for approximately 25–30 rows.
- Decrease gradually near the ends to create pointed tails.
Attach both tails behind the bow center.
Part 8: Create the Hanging Cord
Use a strong braided cotton cord for a secure hanging structure.
- Cut approximately 80–100 cm of strong cotton cord.
- Fold the cord to create two hanging strands.
- Secure the upper section around a suitable hook or wooden ring.
- Attach the lower ends to the supporting structure behind the pumpkin arrangement.
- Test the balance before adding the remaining decorations.
A lightweight felt or fabric backing can help distribute the weight of the pumpkins and prevent the arrangement from twisting.
Part 9: Assemble the Pumpkin Arrangement
Arrange the pumpkins to match the reference composition:
- Position the large burnt orange pumpkin toward the upper left.
- Place the ivory pumpkin slightly lower on the right.
- Position the sage-green pumpkin beneath the ivory pumpkin.
- Arrange the large mustard-yellow oak leaf behind the upper pumpkins.
- Place burnt-orange leaves toward the left side.
- Add olive-green leaves around the lower right.
- Attach the beige bow at the lower-left center.
- Secure the pumpkins and leaves to a lightweight backing using strong yarn or thread.
- Attach the hanging cord to the backing rather than relying on decorative stitches alone.
Make sure the finished arrangement hangs vertically and remains balanced.
Part 10: Add the Dangling Autumn Leaves
The two dangling oak leaves create beautiful movement and make the door hanger look more elaborate.
- Cut two pieces of cotton cord, approximately 20 cm and 27 cm long.
- Attach one mustard-yellow oak leaf to the shorter cord.
- Attach one burnt-orange oak leaf to the longer cord.
- Thread wooden beads onto each cord above the leaves.
- Secure the beads with small knots.
- Attach both cords behind the beige bow.
- Adjust the lengths so the leaves hang at different heights.
Part 11: Finishing Touches
- Weave in all loose yarn ends.
- Shape the pumpkin ridges evenly.
- Adjust the bow loops and pointed tails.
- Arrange the oak leaves so their details remain visible.
- Secure any loose wooden beads.
- Check that the hanging cord supports the complete decoration.
- Lightly steam-block the flat leaves if suitable for your yarn.
Your beautiful autumn crochet door hanger is now ready to display!
Creative Color Variations
Classic Harvest
Use burnt orange, ivory, mustard yellow, and olive green for a traditional fall appearance.
Neutral Farmhouse
Combine cream, taupe, beige, and muted sage green for an understated rustic look.
Elegant Autumn
Choose burgundy, terracotta, champagne, and deep forest green.
Soft Cottagecore
Use dusty peach, pale pumpkin, cream, and eucalyptus green.
Helpful Crochet Tips
- Use consistent yarn weights to maintain balanced pumpkin proportions.
- Stuff the pumpkins firmly enough to hold their shape without stretching the stitches.
- Use long yarn strands to create well-defined pumpkin ridges.
- Make the leaves in slightly different sizes for a natural appearance.
- Keep the decorative bow lightweight.
- Use a reinforced backing for stability.
- Secure every element carefully if the hanger will be placed on a frequently used door.
- Keep the decoration protected from rain and prolonged direct sunlight.
Frequently Asked Questions
Is this crochet pumpkin door hanger beginner-friendly?
This project is best suited to intermediate crocheters because it combines amigurumi pumpkins, decorative leaves, shaping, and detailed assembly.
Can I make the pumpkins larger?
Yes. Increase the number of rounds and stitches or use thicker yarn with a larger crochet hook.
Can I use this decoration outdoors?
It is best displayed on a covered porch or indoor door. Rain and strong sunlight may damage the yarn and decorative components.
Can I make the hanger without wooden beads?
Absolutely. Replace the wooden beads with crocheted beads, small yarn bows, or simple decorative knots.
What is the best yarn for this project?
Cotton yarn offers excellent stitch definition, while acrylic yarn is lightweight and available in a wide variety of autumn colors.
Care Instructions
- Spot-clean gently using a damp cloth.
- Avoid soaking decorations containing wooden beads or structural supports.
- Allow the hanger to air dry completely.
- Reshape the leaves and bow after cleaning.
- Store flat in a dry box between seasons.
Final Thoughts
This autumn pumpkin crochet door hanger is a beautiful way to celebrate the cozy colors of fall with handmade decorations.
From the deeply textured pumpkins to the delicate oak leaves and oversized beige bow, every detail adds warmth and character to the finished piece.
Display it on your front door, gift it to a crochet-loving friend, or use it as a charming seasonal decoration inside your home.
Love this free crochet pattern? Save it to Pinterest and share it with your crochet friends for more beautiful handmade fall inspiration!