Autumn Textured Crochet Blanket Pattern
Beginner Friendly
Perfect for those just starting their crochet journey, with clear instructions and simple techniques
Single-Day Project
A satisfying project you can complete in a single afternoon or evening.
Handmade Gift
A beautiful keepsake — free forever. Read online or print at home.
About This Autumn Textured Crochet Blanket Pattern
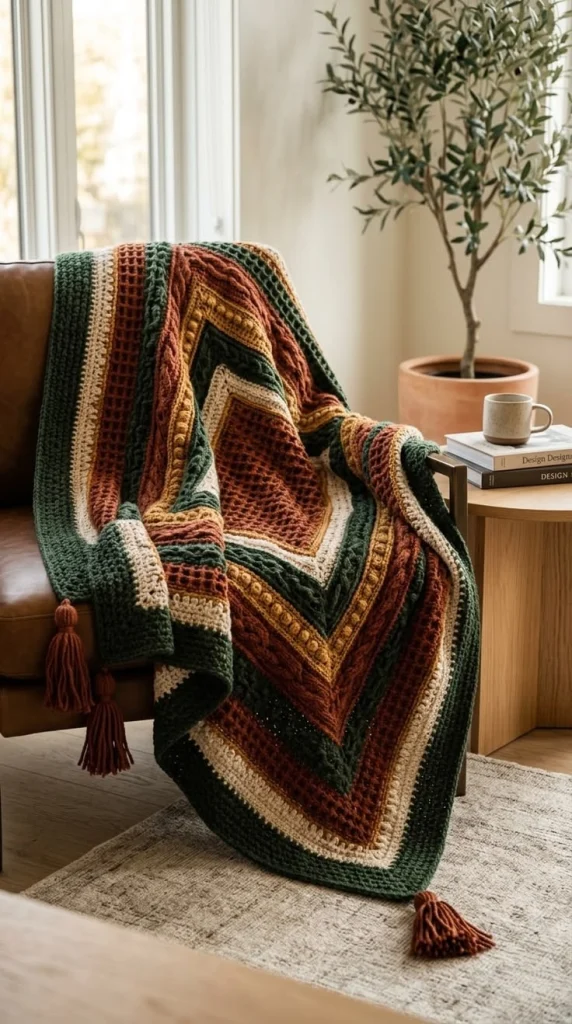
This autumn textured crochet blanket pattern creates a warm statement throw inspired by classic fall colors. Deep forest green, burnt rust, golden mustard and soft cream are worked in alternating textured sections to create a beautiful layered geometric design.
The blanket is worked from the center outward, so there are no separate squares to sew together. Simple solid rounds are mixed with open mesh, raised texture and decorative stitch sections. Four large rust-colored tassels finish the corners.
Materials
- Worsted #4 yarn in forest green 600 g
- Worsted #4 yarn in burnt rust 500 g
- Worsted #4 yarn in cream 300 g
- Worsted #4 yarn in mustard gold 250 g
- 5.0 mm crochet hook 1
- Yarn needle 1
- Scissors 1 pair
- Stitch markers 4
- Blocking mats and pins recommended
Abbreviations
MRmagic ringchchainsl stslip stitchscsingle crochethdchalf double crochetdcdouble crochetFPdcfront post double crochetBPdcback post double crochetspspaceststitchFOfasten offFinished Measurements
- Width: approximately 125 cm / 49 in
- Length: approximately 150 cm / 59 in
- Corner tassels: approximately 15-18 cm / 6-7 in
Color Sequence
The blanket uses repeating autumn bands rather than changing color every round.
- Burnt rust center
- Cream accent
- Forest green
- Mustard gold
- Burnt rust
- Forest green
- Cream accent
- Burnt rust
- Mustard gold
- Forest green outer border
You can add or remove rounds within each section to adjust the finished dimensions.
Rectangular Center
Using burnt rust, ch 61.
R1: Dc in 4th ch from hook and in each ch across. Turn.
R2: Ch 3, dc across. Turn.
R3: Ch 3, *FPdc around next st, BPdc around next st*. Repeat across, ending with dc in turning chain.
R4: Ch 3, work FPdc around FPdc and BPdc around BPdc across.
R5: Ch 3, dc across.
Repeat R2-R5 until the center rectangle measures approximately 45 × 55 cm / 18 × 22 in.
Do not fasten off.
Foundation Round Around the Center
Ch 1.
Sc evenly across the top edge.
At the first corner work sc, ch 2, sc.
Continue sc evenly down the side edge.
Work sc, ch 2, sc at each remaining corner.
Join with sl st.
Place one stitch marker into each ch-2 corner space.
Cream Accent Band
Change to cream.
R1: Ch 3. Dc in each st around. In every corner ch-2 sp work 2 dc, ch 2, 2 dc. Join.
R2: Ch 3, dc around, repeating the same corner increase.
R3: Ch 1, sc around. In each corner work sc, ch 2, sc.
FO cream.
Forest Green Textured Band
Join forest green in any corner.
R1: Ch 3, dc around. Work 2 dc, ch 2, 2 dc in every corner.
R2: Ch 3, *FPdc around next dc, BPdc around next dc*. Repeat around, maintaining the corner increases.
R3: Repeat R2.
R4: Dc in every stitch around with standard corner increases.
R5: Ch 1, sc around.
Mustard Raised Stitch Band
Change to mustard gold.
R1: Dc around, working 2 dc, ch 2, 2 dc into every corner.
R2: Ch 3, *dc in next 3 sts, FPdc around next st*. Repeat around.
R3: Dc around.
R4: Repeat R2, positioning the raised stitches directly above the previous FPdc stitches.
R5: Sc around.
FO.
Burnt Rust Openwork Band
Join burnt rust.
R1: Ch 4, skip 1 st, dc in next st, *ch 1, skip 1 st, dc in next st*. Repeat around.
At every corner work dc, ch 2, dc.
R2: Ch 4, dc in next dc, *ch 1, dc in next dc*. Repeat around.
R3: Repeat R2.
R4: Ch 3, dc in each dc and each ch-1 sp around. Maintain corner increases.
R5: Sc around.
Forest Green Solid Band
Join forest green.
R1: Hdc in every stitch around.
At each corner work 2 hdc, ch 2, 2 hdc.
R2-R4: Repeat R1.
R5: Sc around.
Cream Stripe
Join cream.
R1: Dc around with standard corner increases.
R2: Ch 1, sc around.
R3: Dc around.
FO.
This narrow cream band separates the darker autumn colors and makes the geometric pattern more visible.
Second Rust Texture Band
Join burnt rust.
R1: Dc around.
R2: *FPdc around next st, dc in next 2 sts*. Repeat around.
R3: Dc around.
R4: Repeat R2.
R5: Sc around.
Continue using the same 2 dc, ch 2, 2 dc corner increase whenever working dc rounds.
Second Mustard Band
Join mustard.
R1: Hdc around.
R2: *FPdc around next st, hdc in next 3 sts*. Repeat around.
R3: Hdc around.
R4: Sc around.
FO.
Outer Forest Green Section
Join forest green.
R1: Dc around with corner increases.
R2: Ch 1, sc around.
R3: Hdc around.
R4: Dc around.
R5: *FPdc, BPdc* around.
R6: Repeat R5.
R7: Hdc around.
R8: Sc around.
Final Border
Continue with forest green.
Border R1: Ch 1, sc in every stitch around. Work 3 sc into each corner space.
Border R2: Ch 1, hdc around, working 3 hdc into each corner stitch.
Border R3: Ch 1, reverse sc around for a firm decorative edge.
FO and weave in the yarn tail.
Making the Corner Tassels
Make 4 tassels using burnt rust yarn.
- Cut approximately 35 strands of yarn, each 35-40 cm long.
- Lay the strands together evenly.
- Fold the bundle in half.
- Tie a strong strand tightly around the folded center.
- Wrap another strand around the bundle approximately 2-3 cm below the top.
- Tie securely and weave the knot inside the tassel.
- Trim the bottom evenly.
Leave the top tying strands long for attaching.
Attaching the Tassels
Thread the two long tassel ties through one blanket corner.
Tie securely on the wrong side.
Thread the tails through nearby crochet stitches several times.
Repeat at the remaining three corners.
The tassels should hang freely without pulling the blanket corners downward.
Final Finishing
- Check every color-change join.
- Weave each yarn tail through several stitches in both directions.
- Wet block the blanket.
- Shape all four corners carefully.
- Make sure the center remains rectangular.
- Straighten the outer edges.
- Allow the blanket to dry completely.
- Attach the tassels after blocking if you want them to remain perfectly fluffy.
Frequently Asked Questions
Yes. Use a larger hook appropriate for the yarn and work fewer rounds. Chunky yarn will produce a heavier blanket with more dramatic texture.
Absolutely. Burgundy, camel, olive and oatmeal work beautifully. For a softer neutral version, try cream, taupe, beige and warm brown.
Curling usually means the corner increases are insufficient or your tension is too tight. Make sure every corner receives the required increase on every round.
Too many stitches around the corners can create waves. Check that you are adding stitches only through the established corner increase pattern.
Yes. The blanket can be finished after the final border. You can also replace the tassels with small pom-poms or leave the corners completely plain.
An adventurous beginner familiar with double crochet, post stitches, working in the round and color changes can make it, but the repeated rectangular increases make it best suited to an intermediate crocheter.
The finished Autumn Textured Crochet Blanket Pattern

