Beaded Crochet Handbag Pattern
Beginner Friendly
Perfect for those just starting their crochet journey, with clear instructions and simple techniques
Single-Day Project
A satisfying project you can complete in a single afternoon or evening.
Handmade Gift
A beautiful keepsake — free forever. Read online or print at home.
About This Beaded Crochet Handbag Pattern
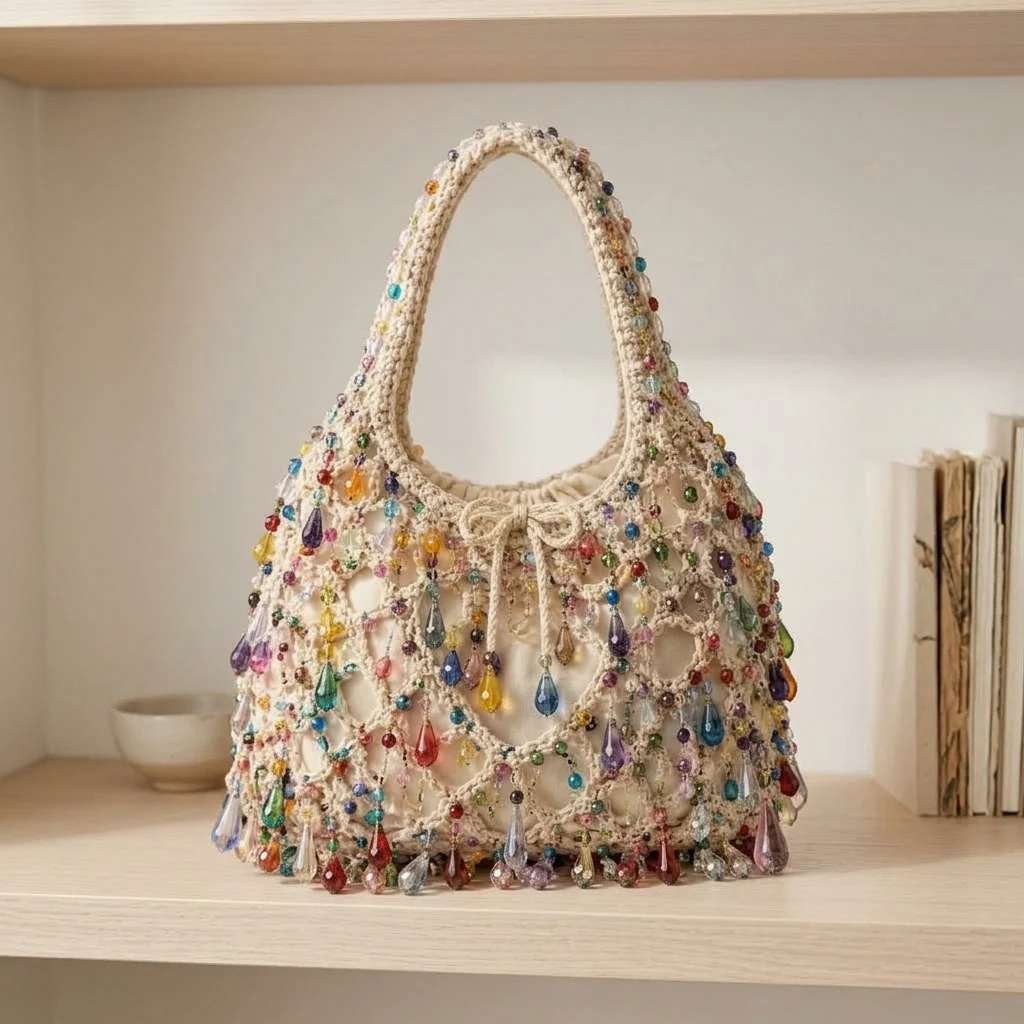
This beaded crochet handbag pattern creates a delicate statement purse combining an ivory crochet lace body with dozens of colorful beads and dangling teardrop embellishments.
The design has a soft rounded shape, a wide integrated crochet handle, an open diamond-style lace overlay and a neutral fabric lining underneath. Multicolored beads are scattered across the lace, while larger jewel-like drops hang from selected points to create the beautiful cascading effect.
It is an eye-catching project for anyone who loves romantic, bohemian and vintage-inspired accessories.
Materials
- Ivory or natural cotton yarn approximately 350-450 g
- 3.5 mm crochet hook main bag
- 3.0 mm crochet hook optional edging
- Neutral cream lining fabric approximately 50 x 60 cm
- Small multicolored glass or acrylic beads approximately 150-200
- Medium faceted beads approximately 50-70
- Teardrop crystal-style beads approximately 30-40
- Small jump rings or jewelry pins for dangling beads
- Strong transparent beading thread 1 spool
- Fine sewing needle 1
- Yarn needle 1
- Magnetic snap optional
- Bag stabilizer optional
- Stitch markers 4
- Scissors 1 pair
Abbreviations
chchainsl stslip stitchscsingle crochethdchalf double crochetdcdouble crochettrtreble crochetspspaceinc2 stitches in same stitchdeccrochet 2 stitches togetherFOfasten offBag Base
- Ch 33.
- Round 1: Sc in second ch from hook and in each chain across.
- Work 3 sc into the final chain.
- Continue along the opposite side of the foundation chain.
- Work 1 sc into each chain.
- Work 2 additional sc into the first chain.
- Join with sl st.
- Round 2: Ch 1 and sc around, increasing evenly around both curved ends.
- Round 3: Repeat the increases around both ends.
- Continue until the oval measures approximately 28-30 cm long and 10-11 cm wide.
Lower Bag Body
- Work one round of sc in the back loops only to create a defined base edge.
- Continue working sc around without increasing.
- Work approximately 5-6 cm in solid sc.
- Keep the tension firm and even.
- Place stitch markers at both side centers.
This solid lower section gives the handbag enough strength to support the weight of the decorative beads.
Diamond Lace Body
- Ch 5, skip 3 stitches, sc in next stitch.
- Repeat *ch 5, skip 3 stitches, sc in next stitch* around.
- Join with sl st.
- Next round: Sl st into the first ch-5 space.
- Ch 5 and sc into the next ch-5 space.
- Repeat around.
- Continue working the mesh pattern for approximately 14-16 cm.
The mesh should create a loose repeating diamond structure. Avoid making the chains too tight because the lace needs enough space for the beads to hang naturally.
Decorative Scalloped Lace
- Work into one ch-5 space: sc, hdc, 3 dc, hdc, sc.
- Sl st into the next ch-5 space.
- Repeat around selected areas to create soft scalloped arches.
- For larger arches, work 5 dc instead of 3 dc.
- Alternate simple mesh rows with scalloped rows for a layered appearance.
These scalloped sections create natural attachment points for the larger teardrop beads.
Shaping the Upper Bag
- Continue the diamond mesh until the body reaches approximately 21-22 cm high.
- Mark the center front and center back.
- Begin decreasing gradually near both side edges.
- On a decrease round, replace two neighboring mesh spaces with one ch-5 space.
- Repeat the decreases every second round until the opening becomes slightly narrower than the lower body.
- Finish with one round of sc around the upper opening.
Integrated Crochet Handle
The handle continues naturally from the upper sides of the handbag and forms one long rounded arch.
- Mark approximately 8 cm across the center front and center back. These sections will remain open.
- Work sc along the first side section.
- Ch approximately 70-80 stitches for the handle.
- Attach the chain to the opposite side with sl st.
- Turn and work sc into every chain.
- Continue working back and forth over the handle for 6-8 rows.
- Work additional rows if a thicker handle is desired.
- Finish with one row of tight sc around both edges of the handle.
Upper Edge & Drawstring Detail
- Join yarn at the center front.
- Work one complete round of sc around the opening.
- Next round: *dc, ch 1, skip 1 stitch*. Repeat around.
- This creates small openings for a decorative drawstring.
- Make a chain approximately 80 cm long.
- Sl st back along the entire chain for extra thickness.
- Weave the cord through the openings.
- Tie into a small bow at the center front.
Preparing the Small Beads
Use several bead sizes to achieve the richly embellished appearance.
- Separate beads into small, medium and large groups.
- Mix colors rather than arranging them in strict repeating sequences.
- Thread strong transparent beading thread onto a fine needle.
- Sew one small bead onto selected intersections of the crochet mesh.
- Secure each bead with 2 passes through the crochet stitch.
- Knot the thread securely on the inside.
Color Placement
For the colorful jewel-box effect, mix shades such as:
- Ruby red
- Sapphire blue
- Emerald green
- Amethyst purple
- Rose pink
- Amber yellow
- Turquoise
- Clear crystal
- Pale lavender
- Soft peach
Do not place identical colors directly beside one another too often. Randomized placement creates the rich handcrafted appearance.
Making the Beaded Drops
- Cut approximately 12-15 cm of strong beading thread.
- Thread on 1 tiny bead.
- Add 1 medium faceted bead.
- Add another tiny bead.
- Finish with 1 teardrop bead.
- Pass the thread back through the previous beads.
- Tie securely.
- Attach the strand to a crochet mesh intersection.
Create strands of different lengths so the beads do not form one perfectly straight row.
Short Bead Strands
- Use 2-4 small beads per strand.
- Attach them around the upper half of the bag.
- Keep most strands between 1 and 3 cm long.
- Mix clear, pink, blue, green and amber beads.
Long Crystal Drops
- Select the larger teardrop beads.
- Attach one small bead above each teardrop.
- Add an optional faceted bead between them.
- Create drops approximately 3-5 cm long.
- Attach these mostly along the lower edge and larger lace scallops.
The larger drops should hang freely instead of being sewn flat against the bag.
Creating the Cascading Effect
- Begin with shorter strands near the upper edge.
- Use medium-length strands through the middle section.
- Place the longest teardrop strands around the lower portion.
- Leave small sections of plain crochet visible between bead clusters.
- Step back frequently while working to check the overall balance.
- Add additional tiny beads only where the design appears too empty.
Beading the Handle
- Use mostly tiny beads on the handle to keep it comfortable.
- Sew individual beads along both outer edges.
- Space them approximately 1-2 cm apart.
- Add occasional clusters of 2-3 tiny beads.
- Avoid large teardrops on the top center of the handle.
- Use only a few small dangling beads close to the lower handle attachments.
Lower Beaded Fringe
- Mark attachment points approximately 2-3 cm apart around the lower edge.
- Attach a teardrop bead at the first point.
- At the next point, attach a shorter faceted bead strand.
- Continue alternating lengths and colors.
- Add smaller beads between larger drops.
- Check that every strand can move freely.
Fabric Lining
- Place the completed crochet bag flat on your lining fabric.
- Trace the approximate body shape.
- Add approximately 1.5 cm seam allowance.
- Cut 2 matching lining pieces.
- Sew the side and bottom edges together.
- Leave the top open.
- Turn the upper raw edge inward approximately 1 cm.
- Insert the lining into the crochet bag.
- Hand-sew it around the upper edge using small hidden stitches.
A cream lining works especially well because it allows the open crochet lace to remain visible while giving the bag a finished interior.
Optional Interior Pocket
- Cut a rectangle of lining fabric approximately 18 x 14 cm.
- Fold the raw edges inward.
- Hem the upper edge.
- Position the pocket on one lining panel before assembling the lining.
- Sew both sides and the bottom edge.
Optional Magnetic Closure
- Mark the center of the bag opening.
- Install one half of the magnetic snap on the front lining.
- Install the matching half directly opposite on the back lining.
- Add a small square of interfacing behind each snap for reinforcement.
Final Assembly
- Check every bead attachment before using the bag.
- Reinforce all large teardrop beads with additional thread.
- Weave in every crochet yarn end.
- Trim excess beading thread carefully.
- Shape the bag by hand.
- Adjust the lining so it sits smoothly behind the lace.
- Arrange the front drawstring into a neat bow.
- Allow all dangling beads to fall naturally.
Tips for Success
- Use cotton yarn: It gives the lace much better definition than fuzzy yarn.
- Line the bag: The lining prevents objects from showing through the open mesh.
- Mix bead sizes: Tiny beads plus larger teardrops create depth.
- Keep the handle lighter: Too many dangling beads can make it uncomfortable to hold.
- Reinforce heavy beads: Sew through the attachment point several times.
- Work gradually: Add approximately 20 beads, check the overall look, then continue.
- Use irregular spacing: Slight variation gives the embellishment a more organic handmade look.
Common Mistakes to Avoid
- Adding every bead before lining: Heavy embellishment can make lining installation difficult.
- Using weak sewing thread: Use strong beading thread for dangling pieces.
- Making every strand identical: Variation is what creates the cascading effect.
- Overloading one crochet stitch: Spread heavy beads across several attachment points.
- Using very stretchy yarn: The weight of the beads may distort the handbag.
- Making the handle too narrow: A wider handle distributes the weight more comfortably.
Ways to Customize This Handbag
- Use only clear and pearl beads for a bridal version.
- Combine amber, brown and olive beads for an autumn version.
- Use pink, pearl and crystal beads for a romantic feminine style.
- Try black crochet with jewel-tone beads for an evening bag.
- Add pearl strands instead of teardrop crystals.
- Use pastel beads for a soft spring version.
- Replace the drawstring bow with a vintage brooch.
- Add a removable shoulder chain for another carrying option.
Frequently Asked Questions
The finished bag is approximately 30 cm wide and 25 cm high, excluding the handle. Your finished measurements may vary depending on yarn, hook size and tension.
Most of the beads can be sewn onto the completed crochet fabric. This provides much more control over the final placement, especially for the dangling teardrop strands.
Yes. Acrylic beads are significantly lighter and are a practical choice if you plan to use the handbag frequently.
A lining is strongly recommended because the decorative crochet mesh is intentionally open. The lining also helps support the weight of the embellishments.
The exact number depends on how heavily you embellish the bag. A richly decorated version may use around 200 small beads plus 30-40 larger dangling teardrops.
Hand cleaning is safest, particularly when using glass beads, jewelry findings or a structured lining. Avoid twisting or wringing the embellished crochet.
Yes. The diamond lace construction can be used alone, although the colorful cascading beads are the main decorative feature of this design.
The finished Beaded Crochet Handbag Pattern