Christmas Poinsettia Crochet Placemat Pattern
Beginner Friendly
Perfect for those just starting their crochet journey, with clear instructions and simple techniques
Single-Day Project
A satisfying project you can complete in a single afternoon or evening.
Handmade Gift
A beautiful keepsake — free forever. Read online or print at home.
About This Christmas Poinsettia Crochet Placemat Pattern
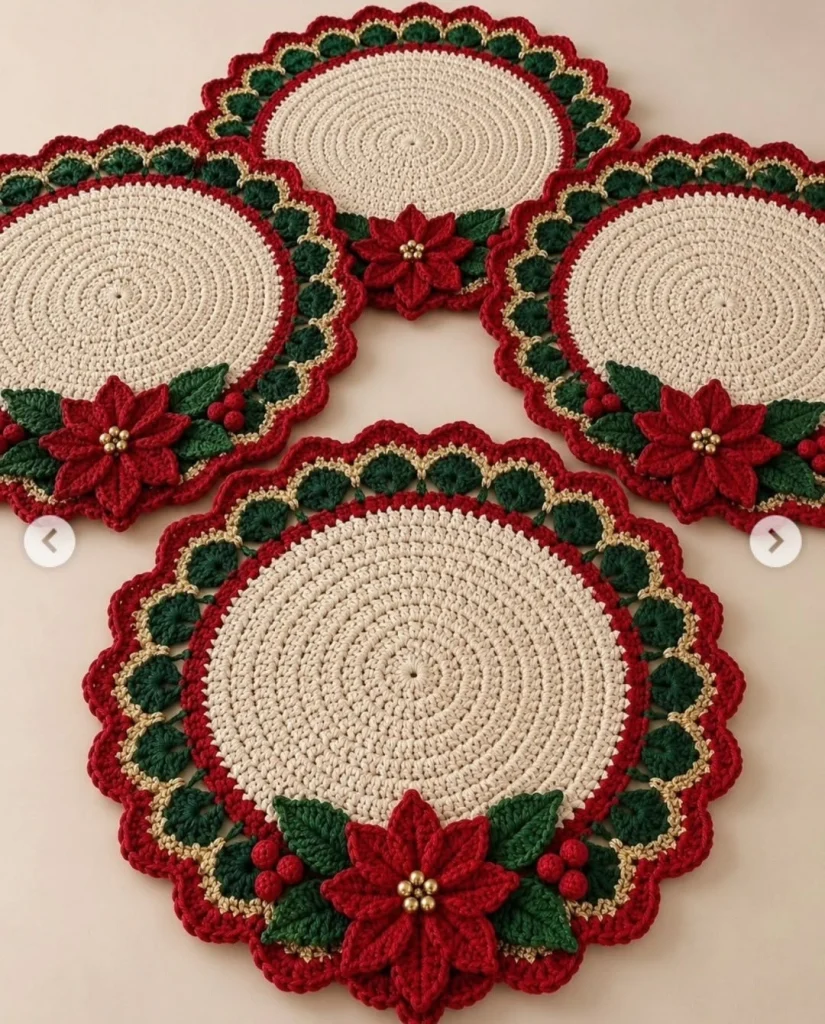
This Christmas crochet placemat pattern creates an elegant round holiday placemat with a warm cream center, rich green decorative border, deep red scalloped edging and a dimensional crochet poinsettia arrangement.
The combination of traditional Christmas red, evergreen and cream gives the finished piece a classic handmade look that works beautifully for Christmas dinner tables, coffee tables, sideboards and holiday displays.
The poinsettia is crocheted separately and attached near the lower edge of the placemat together with green leaves and small red berries. This gives the finished piece the beautiful raised floral detail seen in the inspiration.
Materials
- DK or light worsted cotton yarn – cream 80–100 g
- DK or light worsted cotton yarn – Christmas red 40–60 g
- DK or light worsted cotton yarn – dark green 30–50 g
- Gold or champagne yarn small amount
- 3.5–4.0 mm crochet hook 1
- Yarn needle 1
- Scissors 1 pair
- Stitch markers 4–6
- Small gold beads for flower center optional
Abbreviations – US Terms
MRmagic ringchchainsl stslip stitchscsingle crochethdchalf double crochetdcdouble crochettrtreble crochetdc2togdouble crochet 2 togetherst(s)stitch(es)spspaceFOfasten offFinished Size
Approximately 36–40 cm / 14–16 in diameter, depending on yarn, hook size and tension.
For a smaller centerpiece or charger, stop the cream center a few rounds earlier. For a larger placemat, continue increasing the circular center before beginning the decorative border.
Construction Overview
The placemat is made in five main sections:
- Crochet the flat cream circular center.
- Add the red transition round.
- Create the dark green decorative shell border.
- Finish with the deep red scalloped edging and optional gold accent.
- Crochet the poinsettia, leaves and berries separately and sew them onto the finished placemat.
Part 1 – Cream Circular Center
Round 1
Using cream yarn, make a MR.
Ch 3. This counts as the first dc.
Work 11 dc into the ring.
Pull the ring closed and join with sl st to the top of beginning ch-3.
12 dc.
Round 2
Ch 3.
Work 1 dc in the same stitch.
Work 2 dc in every stitch around.
Join with sl st.
24 dc.
Round 3
Ch 3.
Work 2 dc in next st.
Repeat:
[1 dc, 2 dc in next st] around.
Join.
36 dc.
Round 4
Repeat:
[1 dc in next 2 sts, 2 dc in next st] around.
48 dc.
Round 5
Repeat:
[1 dc in next 3 sts, 2 dc in next st] around.
60 dc.
Round 6
Repeat:
[1 dc in next 4 sts, 2 dc in next st] around.
72 dc.
Part 2 – Continue Enlarging the Center
Round 7
Repeat:
[1 dc in next 5 sts, 2 dc in next st] around.
84 dc.
Round 8
Repeat:
[1 dc in next 6 sts, 2 dc in next st] around.
96 dc.
Round 9
Repeat:
[1 dc in next 7 sts, 2 dc in next st] around.
108 dc.
Round 10
Repeat:
[1 dc in next 8 sts, 2 dc in next st] around.
120 dc.
Continue using the same increase principle until the cream circle measures approximately 27–30 cm / 10.5–12 in.
FO cream yarn.
Part 3 – Red Transition Round
Join Christmas red yarn anywhere around the outer edge.
Round 1
Ch 1.
Work 1 sc in every stitch around.
Join with sl st.
Round 2
Ch 1.
Work another round of sc evenly around.
FO red.
This narrow red section creates a clean separation between the neutral center and the decorative green border.
Part 4 – Green Decorative Border
Join dark green yarn.
Round 1 – Foundation Spaces
Ch 1.
Repeat around:
[sc in next 3 sts, ch 2, skip 1 st]
Adjust the final repeat slightly if necessary so the spaces are distributed evenly.
Round 2 – Green Fans
Sl st into the first ch-2 space.
Into each ch-2 space work:
sc, hdc, 3 dc, hdc, sc.
Sl st into the stitches between the fans as needed.
Repeat around.
These green fans create the raised leaf-like border visible around the placemat.
Part 5 – Gold Accent
Join gold or champagne yarn at the top of the first green fan.
Work loosely around the outer edge using slip stitches.
Place approximately 1 sl st into each stitch across the top of every green fan.
Between fans, work a longer slip stitch or ch 1 if necessary.
Keep the gold round relaxed so it does not pull the placemat inward.
FO.
Part 6 – Red Scalloped Outer Edge
Join red yarn between two green fans.
Work the following around each decorative section:
sc, hdc, 3 dc, hdc, sc
Place a sl st between each scallop.
Continue around the entire placemat.
The red scallops should sit just outside the green border, creating the festive flower-like outer edge.
Join with sl st and FO.
Part 7 – Crochet the Poinsettia Center
Use red yarn.
Make a MR.
Round 1
Ch 1 and work 12 sc into the ring.
Join with sl st.
Round 2 – Petal Foundations
Repeat around:
[ch 5, skip 1 st, sl st in next st]
You should have 6 loops.
Part 8 – First Layer of Poinsettia Petals
Into each ch-5 loop work:
sc, hdc, dc, 2 tr, dc, hdc, sc.
Repeat for all six loops.
Join with sl st.
This creates six pointed red petals.
Part 9 – Second Layer of Poinsettia Petals
Turn the flower slightly so you can work behind the first layer.
Join red yarn around the back of a stitch between two petals.
Repeat around:
[ch 7, sl st around the next space behind the flower]
Create 6 large loops.
Into each loop work:
sc, hdc, dc, 3 tr, dc, hdc, sc.
Repeat around.
FO and weave in ends.
Part 10 – Poinsettia Center
For a completely crocheted center, use gold yarn.
Make approximately 5–7 tiny French knots or small bobble stitches in the center.
Alternatively, sew several small gold beads securely into the center of the flower.
Make sure any beads are firmly attached if the placemats will be frequently handled or washed.
Part 11 – Green Leaves
Make approximately 3–5 leaves for each placemat.
Using dark green yarn:
Ch 11.
Starting in second ch from hook, work:
sl st, sc, hdc, dc, tr, tr, dc, hdc, sc, sl st.
Ch 2 at the tip.
Continue down the opposite side of the foundation chain:
sl st, sc, hdc, dc, tr, tr, dc, hdc, sc, sl st.
Join at the base.
FO, leaving a long tail for sewing.
Part 12 – Add a Leaf Vein
For a more detailed leaf, surface crochet a line of slip stitches from the base to the tip.
Keep the stitches relaxed.
You can also embroider a few short diagonal stitches extending from the center vein toward the sides.
This makes the leaves look more dimensional when placed behind the poinsettia.
Part 13 – Crochet Berries
Using red yarn, make a MR.
Work 6 sc into the ring.
Do not join.
Round 2
Work 2 sc in each stitch.
12 sts.
Round 3
Sc around.
Round 4
Work sc2tog around.
Stuff very lightly with a tiny amount of yarn scrap.
Close the remaining opening.
FO leaving a sewing tail.
Make approximately 3 berries for each side of the poinsettia arrangement.
Part 14 – Arrange the Decoration
Lay the finished placemat completely flat.
Position the poinsettia near the lower edge of the placemat.
Place approximately two leaves behind each side of the flower.
Add groups of three berries between the leaves.
The arrangement should extend slightly across the decorative border without covering too much of the cream center.
Use stitch markers or pins to hold everything in position before sewing.
Part 15 – Sew the Poinsettia in Place
Using the long yarn tails and a yarn needle, sew the leaves to the placemat first.
Stitch mainly through the center vein so the leaf edges remain slightly raised.
Next, sew the poinsettia over the leaf bases.
Secure the flower through its center and around the base of several petals.
Do not sew every petal completely flat.
Finally, attach the berry clusters securely beside the flower.
Part 16 – Final Gold Detail
If desired, add a very fine gold accent around the outer red scallops.
Join gold yarn and work loose slip stitches along the tips of the scallops.
Alternatively, use a thin metallic crochet thread held together with the red yarn when working the final edging.
Use gold sparingly so the placemat keeps an elegant handmade appearance.
Final Shaping and Blocking
Lightly dampen the finished placemat.
Lay it on a blocking mat or thick towel.
Stretch the cream center gently into a perfect circle.
Arrange every green fan and red scallop evenly.
Shape the poinsettia petals individually.
Open the leaves and position the berries.
Allow the placemat to dry completely before removing the pins.
Color Ideas
Classic Christmas: cream center, forest green leaves and rich Christmas red poinsettia.
Elegant Christmas: ivory, deep burgundy, dark sage and champagne gold.
Winter White: ivory center, white poinsettia, sage leaves and subtle gold details.
Vintage Christmas: warm cream, muted brick red, olive green and antique gold.
Modern Christmas: natural beige, burgundy and eucalyptus green.
Snowy Christmas: white center, dark green border, white poinsettia and silver accents.
Ways to Customize the Placemat
- Replace the red poinsettia with a white poinsettia.
- Add a second smaller poinsettia beside the main flower.
- Use burgundy instead of bright Christmas red.
- Add small crochet holly leaves around the border.
- Replace gold details with silver for a winter theme.
- Make matching crochet coasters using the same cream, green and red colors.
- Make a larger version as a Christmas table centerpiece.
- Use the poinsettia motif separately for napkin rings or ornaments.
- Add more berries for a fuller botanical arrangement.
- Make an entire matching set of four, six or eight placemats.
Care Instructions
Hand wash gently in cool water with mild detergent.
Do not twist or wring the placemat.
Press excess water out gently between clean towels.
Lay flat to dry.
Reshape the circular center, scalloped border, leaves and poinsettia while damp.
If beads have been used, avoid machine washing.
Do not tumble dry.
Frequently Asked Questions
Curling usually means there are not enough increases in the circular center. Add a few increases evenly around the next round until the piece lies flat.
A wavy circle usually has too many increases. Work the next round with fewer increases and block the finished piece gently.
The circular base is beginner friendly, but the layered poinsettia and decorative border are easier if you already know basic crochet stitches and how to work in the round.
Yes. The poinsettia can be made separately and used as a Christmas ornament, gift decoration, wreath embellishment or napkin-ring decoration.
Yes. Continue the circular increase sequence before beginning the red and green border. Add approximately 12 evenly distributed increases per round as needed to keep the circle flat.
Yes. Crochet a much smaller cream circle, then add a simplified green and red border. A tiny poinsettia or single leaf can be added as decoration.
No, but cotton is recommended because it creates crisp stitches, lies flat and generally handles table use better than very stretchy yarn.
Absolutely. The placemat will still have a traditional Christmas appearance using only cream, red and green.
A set of four or six works well for most tables. You can also make one larger matching centerpiece using the same border and poinsettia decoration.
The finished Christmas Poinsettia Crochet Placemat Pattern