Christmas Teddy Bear Crochet Wreath Pattern
Beginner Friendly
Perfect for those just starting their crochet journey, with clear instructions and simple techniques
Single-Day Project
A satisfying project you can complete in a single afternoon or evening.
Handmade Gift
A beautiful keepsake — free forever. Read online or print at home.
About This Christmas Teddy Bear Crochet Wreath Pattern
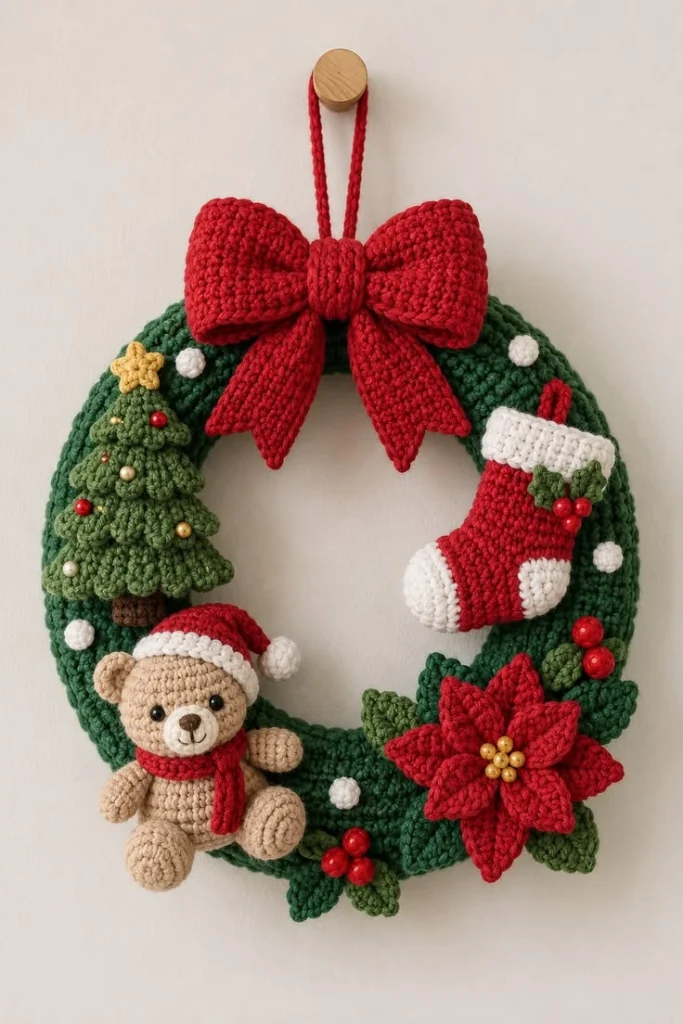
This Christmas crochet wreath pattern combines several adorable holiday motifs into one cozy handmade decoration: a little teddy bear wearing a Santa hat and scarf, a decorated Christmas tree, a red-and-white stocking, a dimensional poinsettia, holly berries and an oversized red crochet bow.
The wreath is especially cute for a front door, nursery, children’s room or cozy Christmas living room. The individual motifs are crocheted separately and then arranged on a thick green wreath base, making it easy to adjust the final layout.
Materials
- DK #3 yarn – dark Christmas green 150-180 g
- DK #3 yarn – medium green 50-70 g
- DK #3 yarn – bright Christmas red 120-150 g
- DK #3 yarn – white 50-70 g
- DK #3 yarn – beige / teddy brown 70-90 g
- DK #3 yarn – dark brown small amount
- DK #3 yarn – yellow or gold small amount
- 3.5 mm crochet hook 1
- 30-35 cm wreath ring 1
- Fiberfill small amount
- 8-10 mm safety eyes 2
- Black embroidery thread small amount
- Red and gold beads optional
- Yarn needle 1
- Scissors 1 pair
- Stitch markers optional
Abbreviations
MRmagic ringchchainsl stslip stitchscsingle crochethdchalf double crochetdcdouble crochettrtreble crochetinc2 sc in same stitchdecsingle crochet decreaseBLOback loop onlyFLOfront loop onlyFOfasten offFinished Size
The completed wreath measures approximately 38-42 cm / 15-16.5 in across when made with DK yarn and a 30-35 cm wreath base.
The teddy bear measures approximately 15 cm / 6 in when seated.
Green Wreath Base
Wrap a sturdy wreath ring completely with dark green yarn.
- Tie the yarn securely around the ring.
- Wrap tightly so no part of the base remains visible.
- Push each wrap close to the previous wrap.
- Continue around the entire ring.
- Tie securely at the back.
For a crocheted appearance, make a long rectangle of sc wide enough to wrap around your wreath ring. Sew the long edges together around the base.
Large Red Bow – Main Piece
Using red yarn:
Ch 18.
Row 1: Sc in second ch from hook and across – 17 sts.
Rows 2-42: Ch 1, turn, sc across.
Fasten off.
Bring both short ends toward the center and overlap slightly. Sew securely to create one large loop.
Flatten the loop with the seam at the center back, then pinch firmly through the middle.
Bow Center
Using red yarn:
Ch 7.
Sc across for approximately 10-12 rows.
Wrap the strip around the pinched center of the bow.
Pull firmly enough to create two rounded loops and sew the band closed at the back.
Bow Tails – Make 2
Ch 11.
Sc across and continue in rows until the piece measures approximately 17 cm / 6.5 in.
During the final rows, decrease at both sides to create the pointed end.
Fasten off.
Attach both tails behind the bow center so they angle downward.
Christmas Tree – Main Triangle
Using medium green yarn:
Row 1: Ch 2, 2 sc in second ch from hook – 2 sts.
Row 2: Ch 1, turn, inc in each stitch – 4 sts.
Row 3: Ch 1, turn, sc across.
Row 4: Inc, sc across to last stitch, inc.
Continue alternating one straight row and one increase row until the tree reaches approximately 13-14 cm / 5-5.5 in tall.
Tree Branch Texture
Working across selected rows of the tree:
Sl st, ch 3, 2 dc in same stitch, skip 1 stitch, sl st in next stitch.
Repeat across.
Work several horizontal layers from bottom to top to create dimensional branches.
Tree Trunk
Using dark brown:
Ch 7.
Sc in second ch from hook and across.
Work 5-6 rows.
Fasten off and sew behind the bottom center of the tree.
Tree Star
Using yellow yarn:
Make a MR.
Repeat 5 times:
Ch 4, sl st in second ch, sc in next ch, hdc in next ch, sl st into MR.
Pull the ring closed.
Fasten off and sew the star to the top of the tree.
Tree Decorations
Sew small red, white and gold beads across the tree.
If you prefer an entirely crocheted wreath, replace beads with tiny French knots made from red, white and gold yarn.
Christmas Stocking – Leg
Using red yarn:
Ch 16.
Join carefully without twisting.
Rounds 1-12: Sc around – 16 sts.
Stocking Heel
Work across only 8 stitches.
Rows 1-4: Ch 1, turn, sc across.
Fold the small heel section and seam the edges.
Rejoin red yarn around the complete stocking and continue working around.
Stocking Foot
Continue in red:
Rounds 1-5: Sc around.
Change to white.
Round 6: Sc around.
Round 7: (2 sc, dec) around.
Round 8: (sc, dec) around.
Lightly stuff the toe.
Decrease until closed.
White Stocking Cuff
Join white yarn around the top opening.
Rounds 1-4: Sc around.
Fasten off.
Fold the cuff slightly outward.
Stocking Hanging Loop
Using red:
Ch 12.
Sl st back along the chain.
Fold into a loop and sew behind the top corner of the stocking.
Holly Leaves for Stocking
Using green yarn:
Ch 7.
Starting in second chain:
sl st, sc, hdc, dc, hdc.
Work (sc, ch 2, sc) into final chain.
Mirror the stitches along the opposite side.
Make 2 leaves and sew them near the stocking cuff.
Red Holly Berries
Make 3 berries.
Round 1: 6 sc in MR.
Round 2: Sc around.
Stuff very lightly.
Decrease around and close.
Sew the three berries together between the holly leaves.
Teddy Bear Head
Using beige yarn:
Round 1: 6 sc in MR.
Round 2: Inc around – 12 sts.
Round 3: (sc, inc) around – 18 sts.
Round 4: (2 sc, inc) around – 24 sts.
Round 5: (3 sc, inc) around – 30 sts.
Rounds 6-11: Sc around – 30 sts.
Insert safety eyes between rounds 7 and 8, approximately 6 stitches apart.
Round 12: (3 sc, dec) around – 24 sts.
Round 13: (2 sc, dec) around – 18 sts.
Stuff firmly.
Round 14: (sc, dec) around – 12 sts.
Round 15: Dec around – 6 sts.
Close and fasten off.
Teddy Muzzle
Using cream or light beige:
Round 1: 6 sc in MR.
Round 2: Inc around – 12 sts.
Round 3: Sc around.
Fasten off leaving a long sewing tail.
Embroider a small dark brown triangular nose.
From the bottom of the nose, embroider one short vertical line and a curved smile.
Sew the muzzle to the lower center of the face.
Teddy Ears – Make 2
Using beige:
Round 1: 6 sc in MR.
Round 2: Inc around – 12 sts.
Round 3: Sc around.
Do not stuff.
Fold slightly and sew one ear to each side of the head.
Teddy Body
Using beige:
Round 1: 6 sc in MR.
Round 2: Inc around – 12 sts.
Round 3: (sc, inc) around – 18 sts.
Round 4: (2 sc, inc) around – 24 sts.
Rounds 5-9: Sc around.
Round 10: (2 sc, dec) around – 18 sts.
Rounds 11-12: Sc around.
Round 13: (sc, dec) around – 12 sts.
Stuff firmly.
Fasten off leaving a long tail.
Teddy Arms – Make 2
Round 1: 6 sc in MR.
Round 2: (sc, inc) around – 9 sts.
Rounds 3-8: Sc around.
Stuff the lower half lightly.
Flatten the opening and sc through both layers.
Fasten off.
Teddy Legs – Make 2
Round 1: 6 sc in MR.
Round 2: Inc around – 12 sts.
Rounds 3-5: Sc around.
Round 6: (2 sc, dec) around – 9 sts.
Rounds 7-8: Sc around.
Stuff lightly.
Fasten off leaving a long sewing tail.
Assemble the Teddy
- Sew the head firmly to the body.
- Attach both arms near the shoulders.
- Position the legs toward the front so the teddy appears seated.
- Sew each leg securely through several stitches.
- Shape the body gently with your fingers.
Santa Hat
Using red:
Round 1: 4 sc in MR.
Round 2: Sc around.
Round 3: (sc, inc) around – 6 sts.
Round 4: Sc around.
Round 5: (2 sc, inc) around – 8 sts.
Round 6: Sc around.
Round 7: (3 sc, inc) around – 10 sts.
Continue increasing gradually until the opening fits around the teddy’s head.
Work 2 straight rounds in red.
Change to white and work 3 rounds of sc for the brim.
Fasten off.
Hat Pom-Pom
Using white:
Round 1: 6 sc in MR.
Round 2: Inc around – 12 sts.
Round 3: Sc around.
Round 4: Dec around – 6 sts.
Stuff lightly and close.
Sew to the tip of the Santa hat.
Teddy Scarf
Using red:
Ch 6.
Sc in second chain and across – 5 sts.
Continue in rows until the scarf measures approximately 28-30 cm / 11-12 in.
Fasten off.
Wrap once around the teddy’s neck and allow both ends to hang naturally.
Large Red Poinsettia – Center
Using red yarn:
Make a MR and work 8 sc into the ring.
Join with a sl st.
Large Poinsettia Petals
For each of the 8 petals:
Ch 8.
Starting in second chain:
sl st, sc, hdc, dc, tr, dc, hdc.
Sl st back into the same base stitch.
Sl st into the next stitch.
Repeat around until 8 petals are complete.
Small Poinsettia Layer
Make a MR and work 6 sc.
For each petal:
Ch 6, sl st, sc, hdc, dc, hdc back down the chain.
Sl st into the next base stitch.
Repeat around.
Sew this smaller flower on top of the large flower.
Poinsettia Center
Sew approximately 6 small gold beads into the flower center.
For an all-yarn version, make several gold French knots instead.
Large Holly Leaves
Make approximately 8-10 leaves using dark and medium green.
Ch 11.
Starting in second chain:
sl st, sc, hdc, dc, tr, dc, hdc, sc.
Work (sc, ch 2, sc) in the final chain.
Mirror the stitches down the opposite side.
Fasten off leaving a long sewing tail.
White Snowballs
Make approximately 6-8.
Round 1: 6 sc in MR.
Round 2: Inc around – 12 sts.
Round 3: Sc around.
Stuff lightly.
Round 4: Dec around – 6 sts.
Close and fasten off.
Additional Red Berry Clusters
Make approximately 9-12 berries.
Use the same berry pattern as for the stocking decoration.
Arrange them in clusters of three around the bottom and right side of the wreath.
Arrange the Wreath
Place the completed wreath flat on a table before attaching the decorations.
A balanced layout is:
- 12 o’clock: oversized red bow
- 9 o’clock: decorated Christmas tree
- 2 o’clock: red-and-white stocking
- 7 o’clock: seated Santa teddy bear
- 5 o’clock: large red poinsettia
- Bottom: holly leaves and berry clusters
- Throughout: small white snowballs
Attach the Christmas Tree
Position the tree on the upper-left section of the wreath.
Sew through the trunk, center and several branch sections.
Leave some branch edges unattached so the tree retains a dimensional appearance.
Attach the Stocking
Place the stocking on the upper-right section.
Angle the toe slightly toward the center opening.
Sew through the back of the cuff, heel and toe to prevent the stocking from rotating.
Attach the Teddy Bear
Position the teddy on the lower-left side as if it is sitting on the wreath.
Sew the back of the body directly to the wreath base.
Add several hidden stitches through the legs and one arm for extra support.
Keep the other arm slightly raised for a playful pose.
Attach the Poinsettia
Place the poinsettia on the lower-right side.
Arrange several green leaves underneath before sewing the flower down.
Sew securely through the flower center and the inner portions of several petals.
Add Berries and Snowballs
Use the small white snowballs to fill empty green spaces.
Arrange red berries in clusters of three rather than individually.
Keep some open green areas visible so the wreath does not become overcrowded.
Attach the Large Bow
Center the bow at the very top of the wreath.
Sew the center band directly through the wreath base.
Add hidden stitches behind each bow loop to keep the bow upright.
Let the pointed tails fall toward the center opening.
Hanging Loop
Using red yarn:
Ch 55-65.
Sl st back along the entire chain to strengthen it.
Fold into a loop.
Sew both ends firmly behind the upper center of the wreath.
Make sure the loop is attached directly to the wreath base rather than only to the bow.
Final Shaping
- Hang the wreath temporarily and check its balance.
- Adjust the bow loops until they are symmetrical.
- Shape the poinsettia petals outward.
- Spread the holly leaves around the flower.
- Straighten the stocking cuff.
- Adjust the teddy’s hat and scarf.
- Rotate the berry clusters so they face forward.
- Weave in every remaining yarn end.
Color Variations
- Classic: Christmas red + forest green + white + beige
- Vintage: burgundy + olive + cream + camel
- Snowy: sage green + ivory + dusty red + champagne
- Gingerbread: brown + cream + deep red + forest green
- Pastel: dusty pink + sage + ivory + soft gold
Finishing
Check every motif from the front and side before hanging the wreath permanently.
Any heavy piece should be stitched directly into the wreath base. Decorative pieces should not rely only on another motif for support.
Lightly steam-block the bow tails, poinsettia petals and holly leaves if needed, taking care not to touch acrylic yarn directly with a hot iron.
Store the wreath flat in a large box after Christmas so the teddy, bow and flowers keep their shape.
Frequently Asked Questions
The individual stitches are simple, but the wreath includes several shaped amigurumi and decorative components. It is best suited to an adventurous beginner or intermediate crocheter who is comfortable working in rounds.
Yes. Replace the teddy with additional poinsettias, a second stocking, a snowman or a group of crochet Christmas ornaments.
Yes. The teddy can be finished as a small standalone Christmas decoration. Add a hanging loop behind the Santa hat or leave it as a miniature stuffed toy.
Yes. Use a larger wreath ring and add more holly leaves, berries and snowballs to fill the additional space. The main decorative motifs can remain the same size.
It is best displayed indoors or on a protected covered door. Moisture can affect the yarn, stuffing and decorative beads.
Sew the bow center firmly to the wreath and add one hidden securing stitch behind each loop. This keeps the oversized bow upright while preserving its dimensional shape.
The finished Christmas Teddy Bear Crochet Wreath Pattern