Chunky Crochet Cable Blanket Pattern – Cozy Autumn Throw
Beginner Friendly
Perfect for those just starting their crochet journey, with clear instructions and simple techniques
Single-Day Project
A satisfying project you can complete in a single afternoon or evening.
Handmade Gift
A beautiful keepsake — free forever. Read online or print at home.
About This Chunky Crochet Cable Blanket Pattern – Cozy Autumn Throw
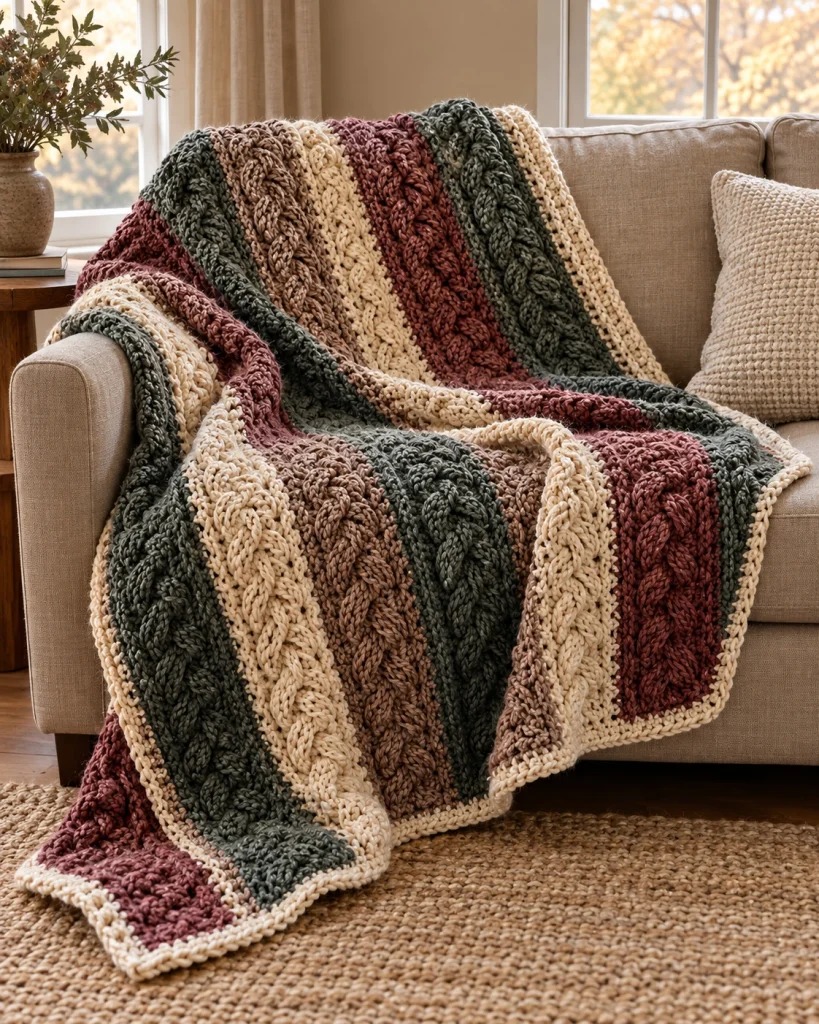
This chunky crochet cable blanket pattern creates a thick, cozy throw filled with oversized braided texture. The combination of warm cream, soft taupe, deep forest green and muted burgundy gives it a beautiful autumn-inspired look without making the blanket feel overly seasonal.
The design is worked in long textured panels. Each panel features a large raised cable running vertically through the center, while simpler stitches between the cables help the braids stand out. Once the panels are joined, a simple cream border gives the whole blanket a clean finished edge.
Materials
- Super bulky #6 yarn – warm cream 700-800 g
- Super bulky #6 yarn – forest green 700-800 g
- Super bulky #6 yarn – warm taupe 600-700 g
- Super bulky #6 yarn – muted burgundy 600-700 g
- 10 mm crochet hook 1
- Large yarn needle 1
- Stitch markers 4-6
- Scissors 1 pair
- Measuring tape 1
Abbreviations
chchainscsingle crochethdchalf double crochetdcdouble crochetFPdcfront post double crochetFPtrfront post treble crochetBPdcback post double crochetsl stslip stitchststitchstsstitchesRSright sideWSwrong sidereprepeatFinished Size
- Width: approximately 125 cm / 49 in
- Length: approximately 160 cm / 63 in
- Cable width: approximately 12-15 cm
- Border: approximately 2.5-3 cm
The finished dimensions can easily be adjusted by adding or removing panels or by working additional rows.
Color Layout
Arrange the textured panels in a repeating warm autumn sequence:
- Forest green
- Warm cream
- Soft taupe
- Forest green
- Muted burgundy
- Warm cream
- Forest green
- Soft taupe
- Muted burgundy
You don’t need to follow the order perfectly. Slight variation makes the finished blanket feel more naturally handmade.
Understanding the Cable Panel
Each panel is worked lengthwise with a wide raised braid running through the center. The cable effect is created by working tall front-post stitches around stitches from previous rows and crossing groups of stitches over one another.
The basic panel consists of:
- 4 edge stitches
- 6 cable stitches
- 2 center background stitches
- 6 cable stitches
- 4 edge stitches
This creates a 22-stitch panel.
Make the First Panel
Foundation
Ch 24.
Row 1 – WS
Dc in 4th ch from hook and in each ch across. (22 sts)
Row 2 – RS
Ch 2, turn. Hdc in first 4 sts, FPdc around next 6 sts, hdc in next 2 sts, FPdc around next 6 sts, hdc in final 4 sts.
Row 3 – WS
Ch 2, turn. Hdc across, keeping the stitches relaxed.
First Cable Cross
Row 4 – RS
- Ch 2 and turn.
- Hdc in first 4 sts.
- Skip the first 3 cable posts.
- Work FPtr around the next 3 cable posts.
- Working in front of the stitches just made, work FPtr around the 3 skipped posts.
- Hdc in the next 2 sts.
- Repeat the cable cross over the next 6 cable posts.
- Hdc in the final 4 sts.
The two crossed sections should now begin forming the thick braided texture.
Setting Row
Row 5 – WS
Ch 2, turn. Hdc in every st across.
Row 6 – RS
Ch 2, turn. Hdc in first 4 sts, FPdc around next 6 cable sts, hdc in next 2 sts, FPdc around next 6 cable sts, hdc in final 4 sts.
Row 7 – WS
Ch 2, turn. Hdc across.
Second Cable Cross
Row 8 – RS
Repeat the same cable-cross technique from Row 4.
- Hdc in first 4 sts.
- Cross the first group of 6 cable stitches.
- Hdc in center 2 sts.
- Cross the second group of 6 cable stitches.
- Hdc in final 4 sts.
Continue the Panel
Continue repeating Rows 5-8 until the panel measures approximately 155 cm.
End after a WS row so the final cable section sits neatly before the border.
FO, leaving a long tail for joining.
Make the Remaining Panels
Make approximately 9 panels total for a generous sofa throw.
- 2 forest green panels
- 2 cream panels
- 2 taupe panels
- 2 burgundy panels
- 1 additional panel in your preferred color
For a wider blanket, simply add more panels.
Joining the Panels
Lay all panels on a flat surface before joining them. Move the colors around until the blanket looks balanced.
- Place two panels beside each other with the RS facing upward.
- Thread a long matching yarn tail onto a yarn needle.
- Use mattress stitch to join the long edges.
- Insert the needle beneath the outer loops only.
- Pull gently after every few stitches.
- Do not pull so tightly that the seam puckers.
- Continue until the full length is joined.
Repeat until all panels form one large blanket.
Alternative Crochet Join
If you prefer not to sew the panels, you can join them with slip stitches.
- Place panels with WS together.
- Insert the hook through the edge stitch of both panels.
- Join yarn.
- Sl st evenly along the entire edge.
- Keep each slip stitch loose.
This creates a subtle raised line between the cable panels and adds even more texture.
Cream Border
Join the warm cream yarn in any corner.
Round 1
Ch 1. Work sc evenly around the entire blanket, placing approximately 3 sc in each corner.
Round 2
Ch 1. Sc in every st around, again placing 3 sc in each corner.
Round 3
Sl st loosely around the entire edge for a clean rounded finish.
FO and weave in the yarn tail securely.
Blocking
Blocking helps straighten the edges while keeping the chunky cables full and dimensional.
- Lay the finished blanket flat.
- Gently shape it into an even rectangle.
- Lightly mist with water if your yarn allows wet blocking.
- Straighten each cable with your fingers.
- Don’t stretch the braids flat.
- Allow the blanket to dry completely.
Smaller Throw Size
For a smaller approximately 100 x 130 cm lap blanket:
- Make 7 panels instead of 9.
- Stop each panel at approximately 125 cm.
- Add the same 3-round border.
Large Blanket Size
For an approximately 150 x 190 cm blanket:
- Make 11-12 panels.
- Work each panel to approximately 185 cm.
- Add an additional border round if desired.
Color Variations
- Autumn: burgundy + forest green + taupe + cream
- Neutral: ivory + oatmeal + beige + warm brown
- Christmas: deep red + forest green + cream
- Modern: charcoal + cream + camel
- Soft farmhouse: sage + ivory + mushroom
- Winter: navy + gray + ivory
Finishing
- Check every seam and reinforce any loose joins.
- Weave all yarn tails deeply into the thick stitches.
- Trim excess yarn only after the ends are secure.
- Lay the blanket flat and straighten each panel.
- Use your fingers to gently lift and shape the cable braids.
- Check that the cream border lies flat around all four sides.
Frequently Asked Questions
It’s best for an adventurous beginner or intermediate crocheter. The basic stitches are simple, but you’ll need to be comfortable working front-post stitches and crossing cable groups.
Absolutely. A solid cream, forest green, taupe or burgundy version would emphasize the cable texture even more.
A little curling is normal with heavy post stitches. Make sure your cable stitches aren’t too tight and lightly block each panel before or after joining.
Yes, but the blanket will be much lighter and the oversized cable effect won’t look quite as chunky. You can hold two strands together to create a fuller texture.
The easiest method is to crochet additional cable panels before joining. This lets you increase the width without changing the cable pattern itself.
Follow the washing instructions printed on your yarn label. For a heavy cable blanket, gentle washing and flat drying usually help preserve the raised texture and overall shape.
The finished Chunky Crochet Cable Blanket Pattern – Cozy Autumn Throw

