Colorful Granny Square Crochet Blanket Pattern
Beginner Friendly
Perfect for those just starting their crochet journey, with clear instructions and simple techniques
Single-Day Project
A satisfying project you can complete in a single afternoon or evening.
Handmade Gift
A beautiful keepsake — free forever. Read online or print at home.
About This Colorful Granny Square Crochet Blanket Pattern
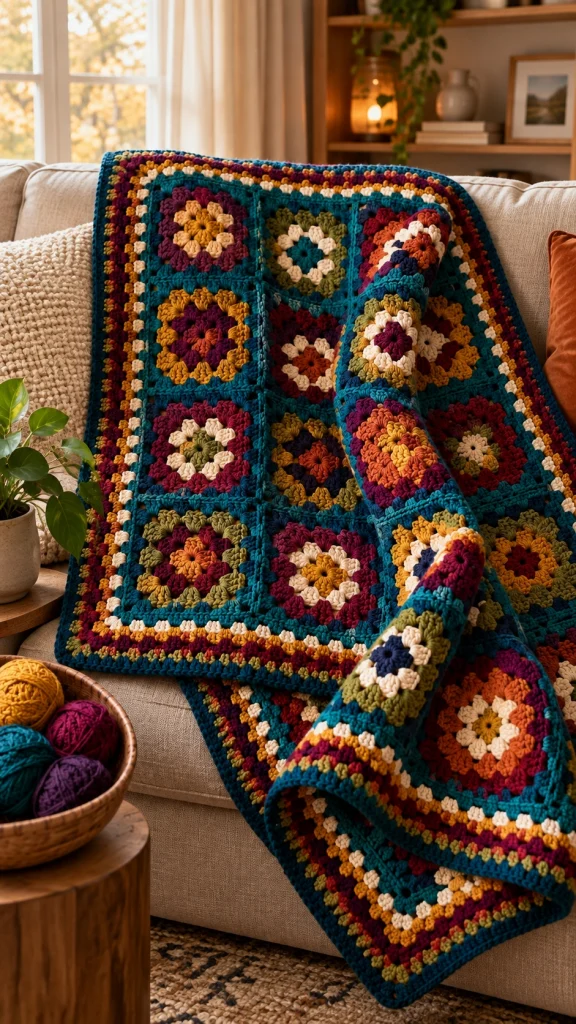
This granny square crochet blanket combines rich autumn-inspired colors with classic floral granny squares and a gorgeous deep teal border. Each square uses a different combination of mustard, burgundy, burnt orange, olive, cream, navy and purple, while the same teal finishing round ties the entire design together.
The result is a cozy, colorful blanket with a collected handmade look—perfect draped over a sofa, folded at the end of a bed or given as a special handmade gift.
Materials
- Worsted weight #4 yarn – deep teal 900–1100 g
- Worsted weight #4 yarn – burgundy 200–250 g
- Worsted weight #4 yarn – mustard 200–250 g
- Worsted weight #4 yarn – burnt orange 150–200 g
- Worsted weight #4 yarn – olive green 150–200 g
- Worsted weight #4 yarn – cream 150–200 g
- Worsted weight #4 yarn – purple/navy accents 100–150 g
- 5 mm crochet hook 1
- Yarn needle 1
- Scissors 1 pair
- Blocking mats and pins recommended
Abbreviations – US Terms
MRmagic ringchchainsl stslip stitchscsingle crochethdchalf double crochetdcdouble crochetspspaceststitchFOfasten offFinished Size
The sample blanket measures approximately 120 × 150 cm / 47 × 59 in.
The pattern is easy to resize. Simply make more or fewer squares before joining.
Granny Square Size
Each blocked square should measure approximately 15 × 15 cm / 6 × 6 in.
Try to keep every square close to the same finished measurement so the blanket joins evenly.
Basic Floral Granny Square
Round 1 – Flower Center
With your first color, make a magic ring.
Ch 3, work 11 dc into the ring.
Join with sl st to the top of beginning ch-3.
Fasten off.
Round 2 – Petals
Join a contrasting color in any stitch.
Ch 2, then work 2 dc in the same stitch.
In each stitch around, work 3 dc together to create a chunky petal-like texture.
Join with sl st and fasten off.
Round 3 – Build the Square
Join your third color between two petal groups.
Ch 3, 2 dc in same space.
Work 3 dc in each space around.
At four evenly spaced points work:
3 dc, ch 2, 3 dc
These four corners begin turning the flower into a square.
Round 4 – Expand
Join another contrasting shade.
Work 3 dc into each space between clusters.
In every corner ch-2 space work:
3 dc, ch 2, 3 dc.
Join with sl st.
Round 5 – Teal Finishing Round
Join deep teal in any corner.
Ch 3, 2 dc, ch 2, 3 dc in the same corner.
Work 3 dc in every space across each side.
In each corner work:
3 dc, ch 2, 3 dc.
Join with sl st and fasten off.
Suggested Square Color Combinations
Square A: mustard center → cream petals → burgundy → teal
Square B: teal center → cream petals → olive → teal
Square C: burnt orange center → burgundy petals → mustard → teal
Square D: burgundy center → mustard petals → purple → teal
Square E: olive center → cream petals → burgundy → teal
Square F: purple center → orange petals → mustard → teal
Repeat these combinations in different positions across the blanket.
How Many Squares?
For a throw approximately 120 × 150 cm / 47 × 59 in, make around 63 squares.
A layout of 7 squares across × 9 squares down creates a comfortable sofa blanket.
You can also use:
- 5 × 6 squares – baby or lap blanket
- 6 × 8 squares – small throw
- 7 × 9 squares – standard throw
- 9 × 11 squares – large bed throw
Blocking the Squares
- Lightly dampen each finished granny square.
- Pin it to approximately 15 × 15 cm / 6 × 6 in.
- Make sure all four corners form right angles.
- Allow the squares to dry completely.
- Sort them by color before arranging the blanket.
Arrange the Blanket
Lay all squares on the floor or a large table before joining.
Move them around until the colors feel balanced.
Avoid placing too many squares with the same dominant color directly beside each other.
Spread mustard, cream, burgundy, orange and olive evenly throughout the blanket.
Joining the Granny Squares
Use deep teal yarn so the joins blend naturally into the outer rounds.
Slip Stitch Join
Place two squares with wrong sides together.
Insert your hook through the corresponding stitches of both squares.
Work a loose slip stitch through both layers.
Continue across the entire edge.
Add the next square and repeat.
First join all squares into horizontal strips, then join the strips together.
Alternative Flat Join
If you prefer a flatter seam, place two squares with right sides facing.
Using a yarn needle and teal yarn, whip stitch through the corresponding outer loops.
Do not pull the yarn too tightly.
Open the squares after joining and gently flatten the seam with your fingers.
Blanket Border – Round 1
Join deep teal yarn in any corner.
Ch 1 and work sc evenly around the entire blanket.
Work 3 sc in every corner.
When working across joined seams, place stitches evenly so the edge remains flat.
Join with sl st.
Border – Round 2
Continue with deep teal.
Ch 3.
Work dc in every stitch around.
At each corner work:
2 dc, ch 2, 2 dc.
Join with sl st.
Border – Round 3
Change to cream.
Ch 1.
Work sc, ch 1, skip 1 around the blanket.
At each corner work:
sc, ch 2, sc.
This creates the small cream accent visible around the blanket.
Border – Round 4
Change to mustard.
Work 2 dc into each ch-1 space around.
At the corners work:
2 dc, ch 2, 2 dc.
Border – Round 5
Change to burgundy.
Work one sc in each stitch around.
Work 3 sc into each corner.
Fasten off at the end of the round.
Border – Round 6
Join olive green.
Work:
sc, ch 1, skip 1 around.
Use sc, ch 2, sc at each corner.
Final Teal Border
Join deep teal.
Work one round of sc evenly around the entire blanket.
For a slightly thicker finished edge, add one additional round of reverse single crochet or standard sc.
Fasten off securely.
Finishing
- Weave in every yarn end securely.
- Check all square joins.
- Trim excess yarn.
- Lightly wet or steam block the complete blanket.
- Shape all four corners.
- Allow it to dry completely while lying flat.
How to Make a Larger Blanket
Simply add more granny squares before joining.
For a larger bed blanket, try a 9 × 11 or 10 × 12 square layout.
Keep the same border sequence after all squares have been joined.
How to Make It More Autumnal
Replace brighter colors with:
- burnt orange
- rust
- mustard
- olive green
- deep burgundy
- cream
- dark teal
This creates a rich fall-inspired blanket while preserving the colorful granny-square style.
Care Instructions
Check the care instructions on your yarn label before washing.
For most acrylic or cotton-blend blankets, wash gently in cool water and reshape while damp.
Dry flat whenever possible to help preserve the square shape and decorative border.
Frequently Asked Questions
An adventurous beginner who is comfortable with chains, double crochet and joining rounds can make it. The main challenge is producing consistent square sizes and joining many motifs neatly.
No. Using different inner color combinations creates the beautiful patchwork effect. Keeping the final round the same deep teal color helps unify the blanket.
Yes. This is an excellent scrap-yarn project as long as the yarns have similar weights. Save enough teal yarn for the outer square rounds, joining and blanket border.
Yes. Classic granny squares can be mixed with the floral squares for an even more varied patchwork design.
Check that your tension is not too tight and block every square before joining. Consistent corner spaces are also important for keeping each motif flat.
Deep teal makes a beautiful grounding color. Pair it with mustard, burgundy, burnt orange, olive, cream, navy and purple for the rich cozy palette shown in this design.
The finished Colorful Granny Square Crochet Blanket Pattern

