Cream Crochet Lace Tote Bag Pattern
Beginner Friendly
Perfect for those just starting their crochet journey, with clear instructions and simple techniques
Single-Day Project
A satisfying project you can complete in a single afternoon or evening.
Handmade Gift
A beautiful keepsake — free forever. Read online or print at home.
About This Cream Crochet Lace Tote Bag Pattern
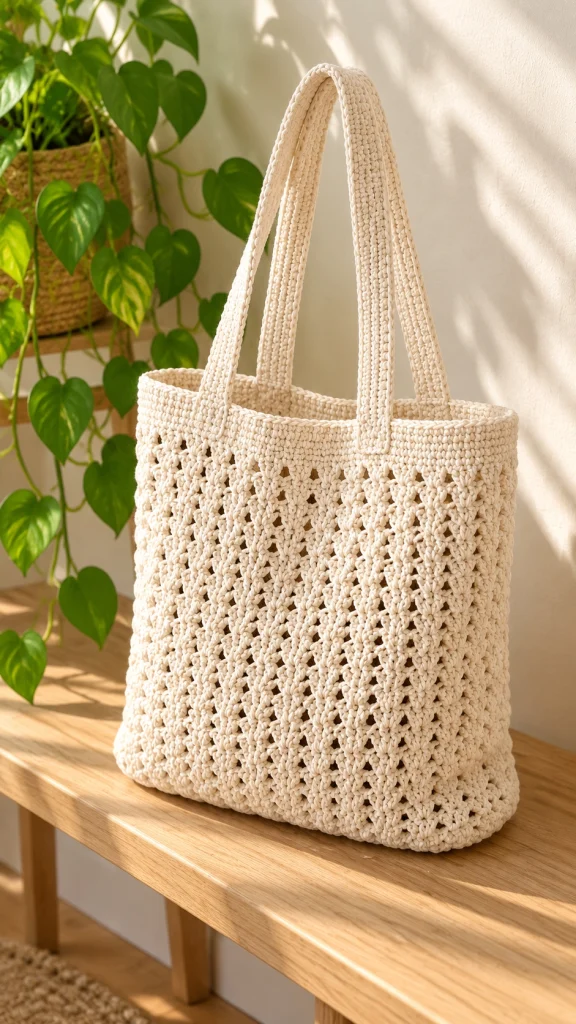
This crochet lace tote bag pattern creates a roomy everyday bag with a beautiful handmade texture, an open lace body and a clean structured silhouette.
The design is worked in warm natural cream cotton. A dense crochet base and reinforced upper band help the tote keep its shape, while the long double-layer shoulder straps make it comfortable for everyday use.
Materials
- DK / Light #3 cotton yarn or cotton cord in natural cream 650-800 g
- 3.5 mm crochet hook 1
- 3.0 mm crochet hook optional for straps
- Yarn needle 1
- Scissors 1 pair
- Stitch markers 4-6
- Cotton fabric for lining optional
- Magnetic snap optional
Abbreviations
chchainsl stslip stitchscsingle crochethdchalf double crochetdcdouble crochettrtreble crochetskskipspspaceststitchstsstitchesBLOback loop onlyFOfasten offFinished Measurements
- Width: approximately 36-38 cm / 14-15 in
- Height: approximately 37-39 cm / 14.5-15.5 in
- Depth: approximately 9-10 cm / 3.5-4 in
- Strap length: approximately 65-70 cm / 25.5-27.5 in
- Strap width: approximately 3.5-4 cm / 1.5 in
Bag Construction
The tote is worked from the bottom upward. First crochet an oval rectangular base, then work the lower body in dense stitches. The lace section is worked in repeating vertical openwork motifs before finishing with a solid upper band.
The two long shoulder straps are crocheted separately and sewn securely to the front and back of the tote.
Foundation Chain
Using the 3.5 mm hook, ch 61.
This foundation should measure approximately 30-31 cm.
If your chain is significantly shorter or longer, adjust your hook size before continuing.
Base – Round 1
Sc in second ch from hook.
Sc in each chain across until one chain remains.
Work 5 sc into the final chain.
Rotate the work and continue along the opposite side of the foundation chain.
Sc in each remaining loop across.
Work 4 sc into the same chain where the first sc was made.
Join with sl st.
Base – Round 2
Ch 1.
Sc across the first long side.
At the curved end, work 2 sc into each of the next 5 sts.
Sc across the opposite long side.
Work 2 sc into each of the final 5 curved stitches.
Join with sl st.
Base – Round 3
Ch 1.
Sc across the straight section.
Across each curved end work:
*sc in next st, 2 sc in next st*
Repeat around the curve.
Continue sc across the opposite straight edge and repeat the increases at the second end.
Base – Rounds 4-6
Continue working sc around, adding enough evenly spaced increases at each rounded end to keep the base completely flat.
Stop when the base measures approximately 34-36 cm long × 9-10 cm wide.
Do not increase after the base reaches the desired size.
Turning the Base Upward
Next round: ch 1 and work one sc in the BLO of every stitch around.
Join with sl st.
This creates a defined fold between the base and the walls of the tote.
Lower Solid Band
Rounds 1-5: ch 1, sc in every stitch around. Join with sl st.
The solid lower section should measure approximately 3-4 cm.
Keep the stitch count unchanged throughout these rounds.
Lace Pattern – Setup Round
Ch 3.
Dc evenly around the bag while adjusting the stitch count to a multiple of 6.
Join with sl st to the top of the beginning ch-3.
Lace Pattern – Round 1
Ch 3.
*Dc in next 2 sts, ch 2, sk 2 sts, dc in next 2 sts.*
Repeat from * to * around.
Join with sl st.
Lace Pattern – Round 2
Ch 3.
Dc in next dc.
*Ch 1, work 2 dc into next ch-2 sp, ch 1, dc in next 2 dc.*
Repeat around.
Join.
Lace Pattern – Round 3
Ch 3.
*Ch 2, sk next 2 sts, work 2 dc into next ch-1 sp, ch 2, dc in next 2 sts.*
Repeat around.
Join.
Lace Pattern – Round 4
Ch 1.
Sc in first stitch.
*Ch 3, sc into next ch-2 sp, ch 3, sc between next 2 dc.*
Repeat around.
Join with sl st.
Lace Pattern – Round 5
Sl st into first ch-3 space.
Ch 3, 2 dc into same space.
*Ch 1, 3 dc into next ch-3 sp.*
Repeat around.
Join.
Lace Pattern – Round 6
Ch 1.
Sc in each dc and work 2 sc into every ch-1 space.
Join.
This stabilizing round helps maintain the vertical structure of the lace.
Continue the Lace Body
Repeat Lace Rounds 1-6 until the lace portion measures approximately 27-29 cm from the lower solid band.
For a bag matching the tall proportions shown, complete approximately 4 full pattern repeats, then add additional rounds as required.
Upper Transition Round
Ch 1.
Sc evenly around the entire opening.
When working into chain spaces, place enough sc into each space to create a smooth edge without puckering.
Join with sl st.
Reinforced Upper Band
Rounds 1-6: ch 1, sc in each stitch around. Join.
Round 7: sl st loosely in each stitch around.
FO and weave in the end.
The finished band should measure approximately 4-5 cm.
First Shoulder Strap
Using the 3.0-3.5 mm hook, ch 8.
Row 1: sc in second ch from hook and across. (7 sc)
Row 2: ch 1, turn, sc in BLO across.
Repeat Row 2 until the strap measures approximately 65-70 cm.
Do not FO yet.
Strap Edging
Ch 1.
Work sc evenly down the long side of the strap.
Work 3 sc across the short end.
Continue sc along the opposite long side.
Work 3 sc across the remaining end.
Join and FO.
Second Shoulder Strap
Repeat the same instructions to make a second identical strap.
Place both finished straps beside each other before attaching them.
They should be exactly the same length.
Strap Placement
Lay the tote flat.
Position the ends of the first strap approximately 7-8 cm from each side edge on the front of the bag.
Position the second strap in exactly the same location on the back.
Each strap end should overlap the upper band by approximately 5-6 cm.
Attaching the Straps
Thread a yarn needle with a long strand of matching cream yarn.
Sew around all four edges of each strap end using small firm stitches.
Then sew an X through the center of each attachment area for additional strength.
Repeat for all four strap ends.
Knot securely on the inside and weave in the yarn tails.
Optional Crocheted Strap Attachment
Instead of sewing, the handles can be attached with surface crochet.
Hold the strap against the upper band.
Insert the hook through both layers and work sc around the outside of the attachment area.
Repeat for all four ends.
Optional Fabric Lining
- Measure the inside width, height and depth of the completed tote.
- Cut two cotton fabric rectangles using these measurements plus seam allowance.
- Sew the side seams.
- Create boxed corners matching the depth of the crochet base.
- Fold the upper raw edge toward the wrong side.
- Insert the lining into the bag.
- Pin it directly below the upper crochet band.
- Hand sew it in place with small invisible stitches.
Optional Inner Pocket
Cut a fabric rectangle approximately 20 × 18 cm.
Fold and press the raw edges inward.
Hem the upper edge.
Sew the remaining three edges onto the lining before installing the lining inside the tote.
Optional Magnetic Closure
A magnetic snap can be installed at the center of the lining.
Position each half approximately 2-3 cm below the upper edge.
Reinforce the fabric behind the snap with a small square of interfacing.
Blocking the Finished Tote
- Lightly dampen the bag.
- Gently shape the base into a rectangle.
- Straighten the side walls.
- Open the lace motifs with your fingers.
- Arrange the upper band so it sits evenly.
- Lay both handles straight and parallel.
- Allow everything to dry completely.
Final Finishing
- Weave in every remaining yarn end.
- Check all four strap attachments.
- Trim any loose fibers.
- Shape the bottom corners.
- Steam lightly if needed.
- Allow the tote to cool completely before using it.
Frequently Asked Questions
Yes. Increase the length of the foundation chain and continue the oval base until it reaches your desired dimensions. Keep the stitch count compatible with the lace repeat before beginning the openwork section.
Yes. For a hand-carry tote, make each strap approximately 40-45 cm long. For comfortable shoulder straps similar to the pictured design, approximately 65-70 cm works well.
A smooth cotton yarn or cotton cord provides the best structure and stitch definition. Very soft acrylic yarn may cause the bag and handles to stretch more with use.
No, but lining is recommended for everyday use because the body contains open lace stitches. A lining also helps the tote maintain its rectangular shape.
Yes. Natural cream creates the clean neutral look shown here, while sage green, terracotta, chocolate brown, dusty rose or navy can give the same design a completely different style.
Use firm cotton, work the straps with a slightly smaller hook, add a reinforcing edging and optionally crochet a non-stretch cotton cord inside the final edging round.
The finished Cream Crochet Lace Tote Bag Pattern

