Crochet Acorn Door Hanger Pattern
Beginner Friendly
Perfect for those just starting their crochet journey, with clear instructions and simple techniques
Single-Day Project
A satisfying project you can complete in a single afternoon or evening.
Handmade Gift
A beautiful keepsake — free forever. Read online or print at home.
About This Crochet Acorn Door Hanger Pattern
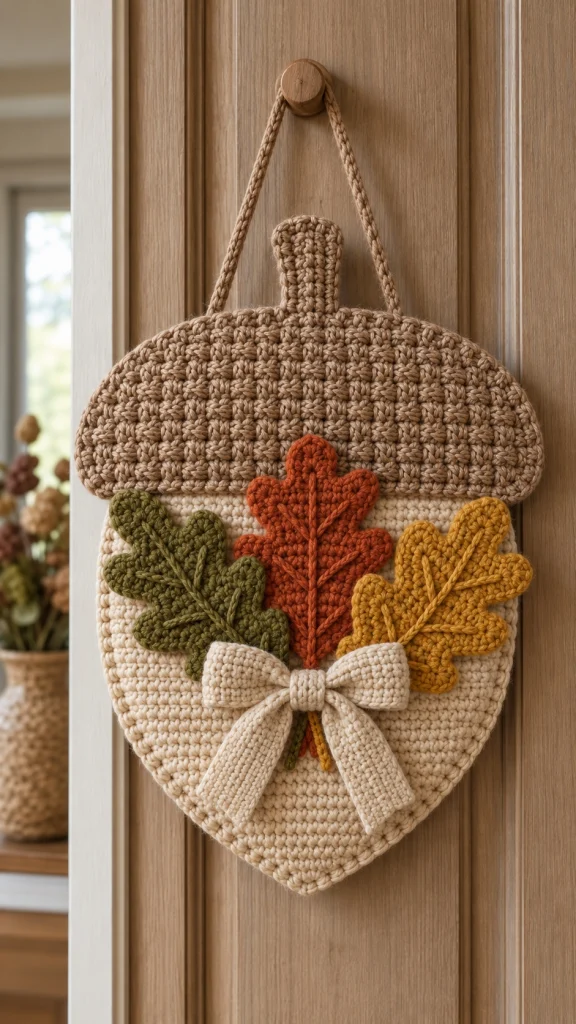
This crochet acorn door hanger pattern creates a beautiful oversized acorn decoration with a textured warm-brown cap, creamy ivory body, dimensional autumn oak leaves and a soft crochet bow.
The finished piece has a cozy farmhouse-inspired look that works beautifully on an interior door, entryway wall, kitchen cabinet or autumn gallery wall. The combination of rust orange, mustard yellow, olive green, warm cream and natural brown gives it a classic fall palette without making the decoration feel overly busy.
The acorn base is worked first, followed by the cap, hanging cord, three dimensional oak leaves and the decorative bow. The appliqués are then layered and sewn securely onto the front.
Materials
- Worsted / Aran cotton yarn – warm cream 120–150 g
- Worsted / Aran cotton yarn – warm taupe brown 80–100 g
- Worsted yarn – burnt orange 20–30 g
- Worsted yarn – mustard yellow 20–30 g
- Worsted yarn – olive green 20–30 g
- 4.0–4.5 mm crochet hook 1
- Yarn needle 1
- Scissors 1 pair
- Stitch markers optional
- Light fabric stiffener optional
Abbreviations – US Terms
chchainsl stslip stitchscsingle crochethdchalf double crochetdcdouble crochettrtreble crochetsc2togsingle crochet 2 togetherBLOback loop onlyst(s)stitch(es)FOfasten offFinished Size
Approximately 38–42 cm / 15–16.5 in tall from the top of the acorn stem to the bottom point.
The widest section measures approximately 28–32 cm / 11–12.5 in.
The hanging cord can be made longer or shorter depending on where you want to display the decoration.
Construction Overview
- Crochet the large cream acorn body as a flat shaped panel.
- Crochet the wide textured brown acorn cap.
- Add the small top stem.
- Make and attach the hanging cord.
- Crochet three dimensional oak leaves.
- Add raised veins to each leaf.
- Crochet the cream bow.
- Arrange the leaves and bow over the acorn body.
- Sew all pieces securely and block the finished hanger.
Part 1 – Cream Acorn Body
Using warm cream yarn:
Ch 31.
Row 1
Starting in second ch from hook, sc across.
30 sc.
Ch 1, turn.
Rows 2–4
Sc across.
Ch 1, turn.
Row 5
2 sc in first st, sc across to last st, 2 sc in last st.
32 sts.
Row 6
Sc across.
Row 7
2 sc in first st, sc across to last st, 2 sc in last st.
34 sts.
Part 2 – Shape the Wide Acorn Body
Rows 8–12
Sc evenly across.
The upper part of the acorn should remain broad and gently rounded.
Row 13
Sc2tog, sc across to last 2 sts, sc2tog.
32 sts.
Row 14
Sc across.
Row 15
Sc2tog, sc across to last 2 sts, sc2tog.
30 sts.
Rows 16–17
Sc across.
Part 3 – Create the Pointed Bottom
Continue decreasing gradually:
Row 18
Sc2tog, sc across to last 2 sts, sc2tog.
Row 19
Sc across.
Rows 20–27
Repeat Rows 18–19, decreasing by 2 stitches every second row.
Once approximately 14 stitches remain, decrease on every row:
sc2tog, sc across, sc2tog.
Continue until 4 stitches remain.
Final Row
Sc2tog twice.
FO.
Part 4 – Border the Acorn Body
Join cream yarn at the upper edge.
Work sc evenly around the entire outside of the acorn body.
Along the bottom point, work:
sc, ch 1, sc
into the point to keep it defined.
Join with sl st.
FO.
Block the body flat before attaching the remaining pieces.
Part 5 – Textured Brown Acorn Cap
Using warm taupe-brown yarn:
Ch 37.
Row 1
Starting in second ch from hook, sc across.
36 sc.
Row 2
Ch 1, turn.
Sc in BLO across.
Row 3
2 sc in first st, sc across to last st, 2 sc in last st.
38 sts.
Row 4
Sc in BLO across.
Row 5
2 sc in first st, sc across to last st, 2 sc in last st.
40 sts.
Part 6 – Round the Acorn Cap
Rows 6–9
Sc across, alternating regular sc rows with BLO sc rows.
This creates the subtle ridged texture visible across the cap.
Row 10
Sc2tog, sc across to last 2 sts, sc2tog.
Row 11
Sc across.
Row 12
Sc2tog, sc across to last 2 sts, sc2tog.
FO leaving a long sewing tail.
Part 7 – Border the Brown Cap
Join brown yarn at one lower corner.
Work sc evenly around the entire cap.
At each rounded upper corner work 2 sc into the same stitch.
Join and FO.
Position the cap over the top of the cream body so approximately 2–3 rows of cream remain hidden behind it.
Sew securely along the lower and side edges.
Part 8 – Crochet the Acorn Stem
Using brown yarn:
Ch 8.
Row 1
Starting in second ch from hook, sc across.
7 sc.
Rows 2–5
Ch 1, turn, sc across.
FO leaving a long tail.
Round the upper corners slightly with a few sc stitches if desired.
Sew the lower edge of the stem behind the center top of the brown cap.
Part 9 – Hanging Cord
Using brown yarn, make a long chain approximately 45–55 cm / 18–22 in.
Starting in second chain from hook, work sl st back across the entire chain.
This creates a firm braided-looking cord.
FO leaving long tails at both ends.
Sew one end securely behind the upper-left side of the cap and the other end behind the upper-right side.
Part 10 – Crochet the Oak Leaves
Make 3 leaves:
- 1 olive green
- 1 burnt orange
- 1 mustard yellow
Each leaf is worked around a central foundation chain.
Ch 17.
Starting in second ch from hook:
sl st, sc, hdc, dc, dc, tr, tr, dc, dc, hdc, sc, sc, sl st
toward the base.
Work around the opposite side of the foundation chain to begin forming the second half.
Part 11 – Shape the Oak Leaf Lobes
Oak leaves need rounded side lobes rather than sharp maple-style points.
Along the first side of the leaf, create lobes by working:
[sl st, sc, hdc, 3 dc in same st, hdc, sc]
over each selected section.
Work a sl st between lobes to create the inward curve.
Repeat approximately 3 times along the first side.
At the top of the leaf work:
sc, hdc, 3 dc, hdc, sc.
Mirror the same three lobes down the opposite side.
Part 12 – Leaf Stem
At the bottom of the oak leaf:
Ch 8–10.
Starting in second ch from hook, sl st back down the chain.
Sl st into the base of the leaf.
FO leaving a long sewing tail.
Part 13 – Raised Oak Leaf Veins
Join matching yarn at the bottom of the leaf.
Surface crochet slip stitches from the stem all the way toward the top.
Then embroider several diagonal side veins extending from the central vein toward each rounded lobe.
Keep these stitches slightly raised.
This detail gives each leaf the dimensional botanical appearance seen in the finished decoration.
Part 14 – Cream Crochet Bow
The bow is made from two loops, two tails and a center band.
Bow Loop Piece
Using cream yarn:
Ch 31.
Starting in second ch from hook, sc across.
30 sc.
Work approximately 7–8 rows of sc.
FO.
Bring both short ends toward the center and overlap slightly.
Sew the ends together at the back.
Pinch the middle tightly to create two rounded bow loops.
Part 15 – Bow Tails
Make two.
Ch 10.
Starting in second ch from hook, sc across.
Work approximately 22–26 rows, or until each tail measures about 13–15 cm / 5–6 in.
For a tapered end, decrease one stitch at both sides over the final 2–3 rows.
FO leaving a sewing tail.
Sew both tails behind the center of the bow, allowing them to angle gently downward.
Part 16 – Bow Center Band
Using cream yarn:
Ch 6.
Starting in second ch from hook, sc across.
Work approximately 8–10 rows.
Wrap this small rectangle tightly around the pinched center of the bow.
Sew the ends together at the back.
Shape the loops with your fingers so they remain full and dimensional.
Part 17 – Arrange the Autumn Leaves
Place the acorn flat before sewing the appliqués.
Position the olive green leaf on the left.
Place the burnt orange leaf vertically in the center.
Position the mustard yellow leaf on the right.
Allow the leaves to overlap slightly.
Their stems should meet near the lower center of the arrangement.
Keep the upper leaf edges partially overlapping the brown cap.
Part 18 – Sew the Leaves
Use each leaf’s long yarn tail.
Sew securely through the center vein and around the base of the leaf.
Add a few small stitches beneath the larger lobes.
Leave the outer edges and tips mostly free.
This creates the raised layered appearance of the finished acorn decoration.
Part 19 – Attach the Bow
Place the cream bow across the lower section of the three leaves.
The center knot should cover the overlapping leaf stems.
Sew the center band firmly to the cream acorn body.
Add one or two hidden stitches beneath each loop.
Allow both tails to hang downward naturally.
The tails should overlap the cream acorn body without reaching the pointed bottom.
Part 20 – Final Border and Reinforcement
Check the entire decoration from the front.
If the outer edges feel too soft, work an additional round of sc around the cream body and brown cap before final assembly.
For a firmer wall hanging, lightly apply fabric stiffener to the back only.
Allow it to dry completely flat.
Final Blocking
Lightly dampen the completed decoration.
Lay it flat on a blocking mat or thick towel.
Shape the cream acorn body into a symmetrical rounded point.
Curve the brown cap gently outward at both sides.
Pin each oak leaf lobe individually.
Arrange the bow loops and tails.
Straighten the hanging cord.
Allow everything to dry completely before hanging.
Color Ideas
Classic Autumn: cream, camel brown, olive, mustard and burnt orange.
Rustic Farmhouse: ivory, oatmeal, chocolate brown, sage and terracotta.
Deep Fall: beige, dark brown, burgundy, forest green and pumpkin orange.
Soft Neutral: cream, taupe, dusty sage, caramel and muted rust.
Thanksgiving: warm ivory, chestnut brown, golden yellow, pumpkin and deep olive.
Modern Autumn: natural cream, mocha, eucalyptus green and cinnamon.
Ways to Customize It
- Add two small crochet acorns beside the leaves.
- Replace the cream bow with burgundy or plaid-inspired colors.
- Add small crochet berries between the oak leaves.
- Make five smaller leaves instead of three large leaves.
- Add an embroidered family initial to the cream acorn body.
- Use a wooden ring instead of the crochet hanging cord.
- Make a miniature version for kitchen cabinets.
- Add a small “Welcome” wooden tag below the bow.
- Use variegated yarn for naturally changing autumn leaves.
- Make matching acorn ornaments from leftover yarn.
Care Instructions
Hand wash gently in cool water if necessary.
Use a mild detergent.
Do not twist or wring.
Press excess water gently between towels.
Lay flat to dry.
Reshape the acorn, oak leaves and bow while damp.
Do not tumble dry.
Store flat between seasons to prevent the hanging cord and appliqués from becoming distorted.
Frequently Asked Questions
Yes. Use a heavier yarn and larger hook, or begin the cream body with a longer foundation chain and add additional rows before starting the decreases.
Your tension may be too tight. Try a slightly larger hook and block the panel thoroughly before attaching the cap and decorations.
Cotton yarn, careful blocking and a light application of fabric stiffener to the back can help the decoration hold its shape.
Yes. Acrylic works well, although the leaves and bow may be softer. A smaller hook or light stiffening can help maintain their shape.
Yes. The leaves can also be used for autumn garlands, table decorations, wreaths, gift wrapping or individual hanging ornaments.
The acorn body and bow use simple stitches. The shaped oak leaves and assembly require a little more attention, making the project suitable for confident beginners or intermediate crocheters.
It is best used on an indoor door or a well-protected covered entrance because prolonged rain, moisture and direct sunlight can distort or fade the yarn.
Yes. The three oak leaves can be used alone, or the bow can be replaced with small crochet acorns, berries or a simple wooden seasonal tag.
The finished Crochet Acorn Door Hanger Pattern

