Crochet Acorn Door Hanging – Autumn Crochet Decoration Pattern
Beginner Friendly
Perfect for those just starting their crochet journey, with clear instructions and simple techniques
Single-Day Project
A satisfying project you can complete in a single afternoon or evening.
Handmade Gift
A beautiful keepsake — free forever. Read online or print at home.
About This Crochet Acorn Door Hanging – Autumn Crochet Decoration Pattern
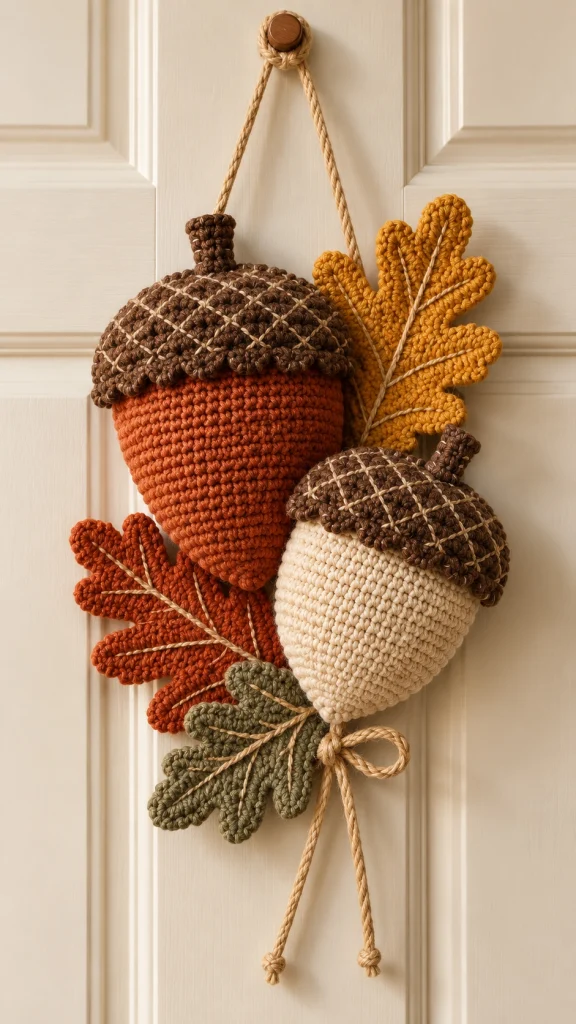
This crochet acorn door hanging brings all the warm colors of autumn into one beautiful handmade decoration. The design combines two oversized stuffed acorns, deeply textured brown caps and layered crochet oak leaves in mustard, burnt orange and muted olive green.
The finished piece looks beautiful hanging from a door, wall hook, cabinet or entryway peg. The large rust-colored acorn creates the main focal point, while the smaller cream acorn adds contrast and gives the arrangement its charming gathered look.
Materials
- Worsted / Medium #4 cotton yarn – burnt orange / rust 80-100 g
- Worsted / Medium #4 cotton yarn – warm cream 60-80 g
- Worsted / Medium #4 cotton yarn – chocolate brown 80-100 g
- Worsted / Medium #4 cotton yarn – mustard gold 40-50 g
- Worsted / Medium #4 cotton yarn – muted olive green 40-50 g
- Worsted / Medium #4 cotton yarn – burnt orange for leaves 40-50 g
- Beige or natural cotton yarn for leaf veins and hanging cords 30-40 g
- 3.5 mm crochet hook 1
- Polyester fiberfill approximately 120-150 g
- Yarn needle 1
- Scissors 1 pair
- Stitch markers optional
Abbreviations
MRmagic ringchchainsl stslip stitchscsingle crochethdchalf double crochetdcdouble crochettrtreble crochetinc2 sc in same stitchdecsingle crochet decreaseBLOback loop onlyststitchstsstitchesFOfasten offFinished Size
- Entire hanging: approximately 45-50 cm / 18-20 in long
- Large acorn: approximately 22 cm / 8.5 in long
- Small acorn: approximately 17 cm / 6.5 in long
- Large oak leaves: approximately 18-21 cm long
- Hanging loop: approximately 25-30 cm when folded
Construction
The decoration is made from:
- 1 large rust-colored stuffed acorn
- 1 smaller cream stuffed acorn
- 2 textured brown acorn caps
- 1 mustard oak leaf
- 1 burnt-orange oak leaf
- 1 muted olive oak leaf
- Natural-colored surface crochet leaf veins
- 1 long hanging cord
- 1 decorative bow and hanging tails
Part 1 – Large Acorn Body
Using burnt orange / rust yarn, work continuously in rounds.
R1: MR, 6 sc. [6]
R2: inc around. [12]
R3: (sc, inc) × 6. [18]
R4: (2 sc, inc) × 6. [24]
R5: (3 sc, inc) × 6. [30]
R6: (4 sc, inc) × 6. [36]
R7: (5 sc, inc) × 6. [42]
R8: (6 sc, inc) × 6. [48]
R9-R18: sc around. [48]
R19: (6 sc, dec) × 6. [42]
R20: sc around. [42]
R21: (5 sc, dec) × 6. [36]
R22: sc around. [36]
R23: (4 sc, dec) × 6. [30]
R24: sc around. [30]
R25: (3 sc, dec) × 6. [24]
Begin stuffing firmly.
R26: (2 sc, dec) × 6. [18]
R27: (sc, dec) × 6. [12]
R28: dec around. [6]
Add the final stuffing before closing. FO and close the remaining opening.
Part 2 – Small Cream Acorn Body
Using warm cream yarn:
R1: MR, 6 sc. [6]
R2: inc around. [12]
R3: (sc, inc) × 6. [18]
R4: (2 sc, inc) × 6. [24]
R5: (3 sc, inc) × 6. [30]
R6: (4 sc, inc) × 6. [36]
R7-R15: sc around. [36]
R16: (4 sc, dec) × 6. [30]
R17: sc around. [30]
R18: (3 sc, dec) × 6. [24]
R19: sc around. [24]
R20: (2 sc, dec) × 6. [18]
Stuff firmly.
R21: (sc, dec) × 6. [12]
R22: dec around. [6]
FO and close.
Part 3 – Large Textured Acorn Cap
Using chocolate brown yarn:
R1: MR, 6 sc. [6]
R2: inc around. [12]
R3: (sc, inc) × 6. [18]
R4: (2 sc, inc) × 6. [24]
R5: (3 sc, inc) × 6. [30]
R6: (4 sc, inc) × 6. [36]
R7: (5 sc, inc) × 6. [42]
R8: (6 sc, inc) × 6. [48]
Now begin the textured section.
R9: BLO sc around. [48]
R10: (sl st, ch 2, hdc in same st, sl st in next st) around.
R11: sc around behind the textured loops.
R12: repeat textured stitch round.
R13: sc around.
R14: repeat textured stitch round.
FO leaving a long sewing tail.
Part 4 – Small Textured Acorn Cap
Using chocolate brown:
R1: MR, 6 sc. [6]
R2: inc around. [12]
R3: (sc, inc) × 6. [18]
R4: (2 sc, inc) × 6. [24]
R5: (3 sc, inc) × 6. [30]
R6: (4 sc, inc) × 6. [36]
R7: BLO sc around. [36]
R8: work textured stitch round.
R9: sc around.
R10: work textured stitch round.
R11: sc around.
FO leaving a long tail.
Part 5 – Decorative Cap Crosshatch
Thread a yarn needle with natural beige yarn.
Beginning near one edge of the brown cap, embroider long diagonal stitches across the textured surface.
Repeat in the opposite direction to create a loose diamond-shaped crosshatch.
Keep the stitches relaxed so they sit visibly over the brown texture without pulling the cap out of shape.
Repeat for both caps.
Part 6 – Acorn Stem
Using chocolate brown yarn:
R1: MR, 6 sc. [6]
R2-R8: sc around. [6]
FO leaving a sewing tail.
For the smaller acorn, work only R1-R6.
Stuffing is not necessary unless you want a very firm stem.
Part 7 – Assemble Each Acorn
- Position the brown cap over the widest upper section of the acorn body.
- Allow the lower edge of the cap to overlap the body slightly.
- Sew around the entire cap edge using brown yarn.
- Position the stem at the center top.
- Sew through the stem, cap and acorn body several times.
- Knot securely inside the cap.
Part 8 – Crochet Oak Leaf Foundation
The same leaf pattern can be used for mustard, rust and olive leaves.
Ch 28.
Beginning in second ch from hook:
sl st in first ch,
sc in next 2 ch,
hdc in next 3 ch,
dc in next 6 ch,
tr in next 8 ch,
dc in next 4 ch,
5 dc in final ch.
Continue working along the opposite side of the foundation chain:
dc in next 4 ch,
tr in next 8 ch,
dc in next 6 ch,
hdc in next 3 ch,
sc in next 2 ch,
sl st in final ch.
Part 9 – Form the Oak Leaf Lobes
Continue around the outer edge of the leaf.
Work repeating groups of:
(sl st, sc, hdc, 3 dc in one st, hdc, sc, sl st)
Space the groups evenly along both sides of the leaf.
Make approximately 4-5 pronounced lobes on each side.
At the pointed leaf tip, work:
sc, hdc, dc, tr, dc, hdc, sc into the tip section.
FO.
Part 10 – Leaf Veins
Using natural beige yarn, surface crochet from the base of the leaf to the tip.
This forms the main central vein.
Next, add diagonal surface slip-stitch lines from the central vein toward each leaf lobe.
Make approximately 4-5 veins on each side.
FO and weave the ends into the back.
Part 11 – Make the Three Leaves
Using the oak leaf pattern, make:
- 1 mustard-gold leaf – large
- 1 burnt-orange leaf – large
- 1 muted olive-green leaf – slightly smaller
For the smaller green leaf, begin with ch 23 rather than ch 28 and reduce the number of taller stitches proportionally.
Part 12 – Main Hanging Cord
Using natural beige yarn, make a strong crochet cord approximately 65-70 cm long.
You can use a Romanian cord, twisted crochet cord or simple tight chain reinforced with slip stitches.
Fold the cord in half over your door hook.
The two ends should hang down behind the acorns.
Part 13 – Arrange the Decoration
Lay all pieces flat before sewing.
Place the large rust acorn toward the upper left.
Place the smaller cream acorn lower and slightly to the right.
Position the mustard leaf behind the upper-right side.
Place the burnt-orange leaf behind the lower-left area.
Place the olive-green leaf underneath the two acorns.
Allow parts of every leaf to remain visible.
Part 14 – Secure the Leaves
Using matching yarn and a yarn needle, stitch the leaf bases together where they overlap.
Add several small hidden stitches between overlapping lobes.
Do not sew every edge together.
Leaving the outer lobes free gives the arrangement more depth.
Part 15 – Attach the Large Acorn
Position the large rust acorn over the upper portion of the leaves.
Sew through the back of the acorn cap into the leaves and hanging cord.
Add several stitches along the back side of the acorn body for stability.
Keep all attachment stitches hidden from the front.
Part 16 – Attach the Cream Acorn
Place the cream acorn in front of the lower-right side of the large acorn.
Overlap the two pieces slightly.
Sew the cream acorn to:
- the leaves behind it,
- the large acorn at one hidden contact point,
- the main hanging cord.
This three-point attachment keeps the arrangement from twisting when hung.
Part 17 – Bottom Decorative Tie
Using natural beige yarn, make a crochet cord approximately 70 cm long.
Wrap the center around the lower attachment point beneath the cream acorn.
Tie a small bow.
Allow both tails to hang approximately 20-25 cm below the arrangement.
Tie a small knot at the bottom of each tail.
Part 18 – Finishing the Hanging Loop
At the top, bring the two sections of natural cord together.
Form a loop large enough to fit comfortably over a door hook or wooden peg.
Secure the loop with several hidden stitches.
For additional strength, wrap matching yarn around the base of the loop several times and knot securely.
Part 19 – Shape the Finished Piece
- Hold the decoration vertically.
- Adjust the large acorn slightly toward the left.
- Bring the cream acorn forward.
- Fan the mustard leaf upward.
- Pull the orange leaf outward toward the lower left.
- Spread the olive leaf across the bottom.
- Gently curve individual leaf lobes with your fingers.
- Straighten the bottom bow and cords.
Part 20 – Optional Extra Texture
For an even more handmade autumn look, embroider several tiny beige stitches across the brown caps after assembly.
You can also add a few surface slip stitches along the acorn bodies to create subtle vertical shaping.
Keep these details minimal so the acorns remain clean and elegant.
Color Ideas
- Classic autumn: rust + cream + chocolate + mustard + olive
- Woodland: caramel + beige + dark brown + moss
- Thanksgiving: pumpkin + cream + mustard + burgundy
- Neutral farmhouse: oatmeal + ivory + taupe + sage
- Deep fall: burgundy + burnt orange + forest green + brown
Finishing Checklist
- Crochet and stuff the large rust acorn.
- Crochet and stuff the smaller cream acorn.
- Make both textured brown caps.
- Embroider the cap crosshatch.
- Add both acorn stems.
- Make three oak leaves.
- Add beige veins to every leaf.
- Block the leaves.
- Make the strong hanging cord.
- Arrange the leaves behind the acorns.
- Secure all pieces together.
- Add the lower decorative bow.
- Weave in every loose end.
- Shape the decoration after hanging.
Frequently Asked Questions
Stuff them firmly and attach each acorn at several hidden points rather than only by its stem. Connecting the cap, body and hanging cord makes the decoration much more stable.
The dimensional acorns need stuffing to keep their full shape. For a flatter wall decoration, you could instead crochet two flat acorn panels and join them around the edges with only a small amount of filling.
Use cotton yarn, block the leaves firmly and add a thin piece of floral wire along the back of the central vein if extra structure is needed.
It is best used on an indoor door or a completely covered porch. Cotton yarn and fiberfill can absorb moisture, so prolonged exposure to rain is not recommended.
Yes. Use DK yarn with a 2.5-3 mm hook, or stop the increase rounds earlier to create a smaller circumference.
Yes. The acorns, oak leaves and warm rust, mustard and olive colors make this design especially suitable for autumn and Thanksgiving decorating.
Individual acorns can be used as ornaments, garland pieces, shelf decorations, gift toppers or autumn table decorations. Smaller versions also work beautifully on fall wreaths.
The finished Crochet Acorn Door Hanging – Autumn Crochet Decoration Pattern