Crochet Autumn Maple Leaf Garland Pattern
Beginner Friendly
Perfect for those just starting their crochet journey, with clear instructions and simple techniques
Single-Day Project
A satisfying project you can complete in a single afternoon or evening.
Handmade Gift
A beautiful keepsake — free forever. Read online or print at home.
About This Crochet Autumn Maple Leaf Garland Pattern
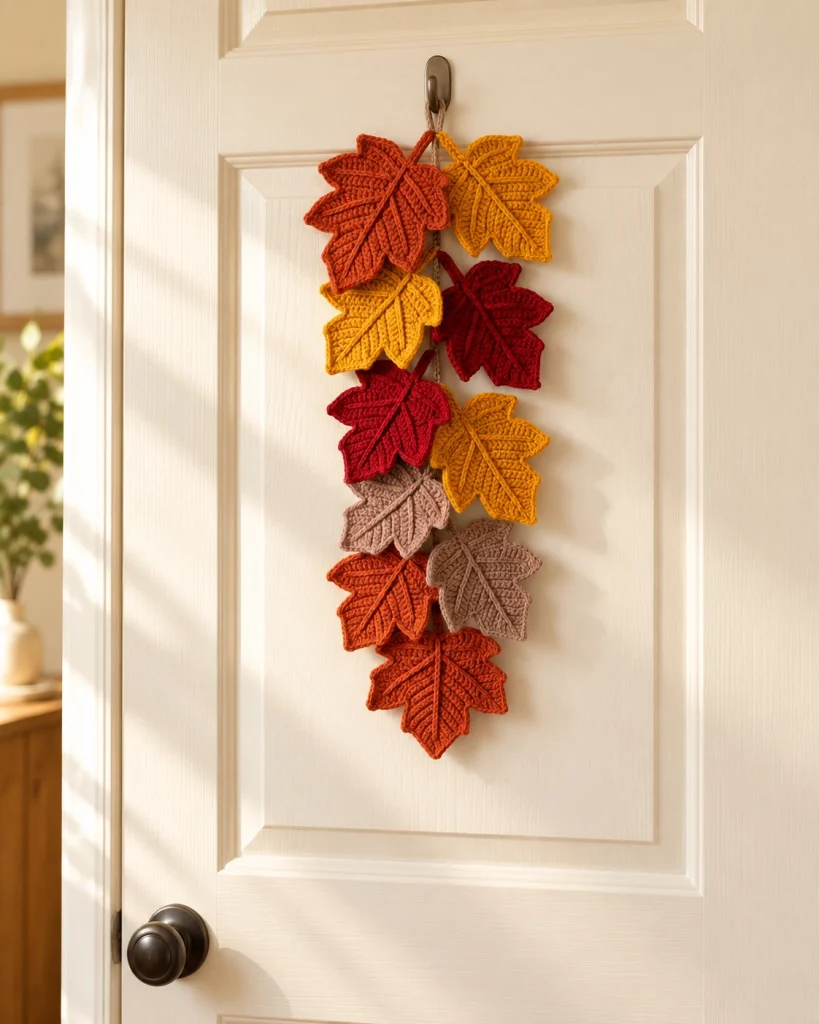
This crochet autumn leaf garland pattern creates a beautiful vertical hanging decoration inspired by colorful falling maple leaves. The finished piece features approximately nine textured crochet leaves arranged in warm shades of burnt orange, mustard yellow, deep red and soft taupe.
Each leaf has a sculpted maple shape with pointed lobes and raised crochet veins. Once joined to a simple hanging cord, the leaves create an elegant fall decoration for a door, wall, entryway or cozy seasonal corner.
Materials
- DK #3 cotton yarn – burnt orange 50-70 g
- DK #3 cotton yarn – mustard yellow 40-50 g
- DK #3 cotton yarn – deep autumn red 40-50 g
- DK #3 cotton yarn – warm taupe 30-40 g
- DK #3 cotton yarn – brown or rust for joining cord 20 g
- 3.5 mm crochet hook 1
- Yarn needle 1
- Scissors 1 pair
- Stitch markers optional
Abbreviations
chchainsl stslip stitchscsingle crochethdchalf double crochetdcdouble crochettrtreble crochetdtrdouble treble crochetststitchFOfasten offFinished Size
Each maple leaf measures approximately 11-13 cm / 4.25-5 in wide and 12-14 cm / 4.75-5.5 in long, including the short stem.
The complete hanging decoration measures approximately 60-70 cm / 24-28 in long.
Color Layout
For a hanging similar to the reference, make approximately:
- 3 burnt-orange leaves
- 2 mustard-yellow leaves
- 2 deep-red leaves
- 2 warm-taupe leaves
Do not arrange identical colors directly underneath each other. Alternate the shades to create the natural appearance of falling autumn leaves.
Maple Leaf – Foundation
Each leaf is worked from a central foundation that becomes the main vein.
Foundation: Ch 16.
Beginning in the second chain from hook:
Sl st in next ch, sc in next 2 ch, hdc in next 2 ch, dc in next 4 ch, hdc in next 3 ch, sc in next 2 ch, then work 3 sc in the final chain.
Rotate the work and continue along the opposite side of the foundation chain.
Sc in next 2 ch, hdc in next 3 ch, dc in next 4 ch, hdc in next 2 ch, sc in next 2 ch and sl st into the tip.
Creating the First Side Lobe
Working along one side of the leaf:
Sl st forward approximately 3 stitches.
Ch 7.
Beginning in second chain from hook:
Sl st, sc, hdc, dc, tr, tr.
Sl st back into the main leaf body.
This creates the first pointed side lobe.
Creating the Large Middle Lobe
Move approximately 2 stitches toward the upper center.
Ch 10.
Beginning in second chain from hook:
Sl st, sc, hdc, dc, tr, dtr, tr, dc, hdc.
Sl st into the leaf body.
This longer section forms one of the prominent maple points.
Center Point
The center lobe should be the longest point of the leaf.
Ch 12.
Beginning in second chain from hook:
Sl st, sc, hdc, dc, tr, dtr, dtr, tr, dc, hdc, sc.
Sl st securely into the top-center of the leaf.
Complete the Opposite Side
Mirror the lobes on the opposite side.
Make another large lobe with ch 10, followed by the smaller outer lobe with ch 7.
Keep the stitch sequence symmetrical so the finished leaf has five clearly defined maple points.
Leaf Edging
With the same color, work around the entire outside edge.
Work mostly sc along straight areas.
At each pointed tip work:
(sc, ch 2, sc) into the tip stitch.
Work sl sts into the deepest spaces between the lobes.
This combination creates the sharp peaks and deep indentations characteristic of a maple leaf.
Central Raised Vein
The strong raised center vein is one of the most important details of this design.
Place the leaf right side facing you.
Join matching yarn at the bottom center.
Surface sl st in a straight line from the base toward the center point.
Keep the stitches slightly loose so the leaf remains flat.
Fasten off at the upper tip.
Side Veins
Join yarn along the central vein.
Surface crochet diagonally toward the tip of the first lobe.
Fasten off.
Repeat toward each remaining side lobe.
You should have one central vein with several diagonal branches extending outward.
This creates the realistic ribbed appearance visible in the reference.
Leaf Stem
Join yarn at the bottom center of the leaf.
Ch 8-10.
Beginning in second chain from hook, sl st into every chain.
Sl st back into the base of the leaf.
Fasten off and weave in the ends.
Make the Remaining Leaves
Repeat the same pattern until you have approximately 9 leaves.
For a natural handmade appearance, vary the size slightly:
- Large leaves: use the complete pattern.
- Medium leaves: reduce each lobe foundation by 1 chain.
- Small leaves: reduce each lobe foundation by 2 chains.
Keep the overall maple shape consistent.
Blocking the Leaves
- Lightly dampen each finished leaf.
- Lay it flat on a blocking mat or folded towel.
- Stretch each lobe gently outward.
- Pin every pointed tip.
- Pin the valleys between the lobes inward.
- Straighten the central vein.
- Allow the leaf to dry completely.
Proper blocking makes a dramatic difference to the final shape.
Main Hanging Cord
Using rust, brown or another coordinating color:
Ch approximately 130-150, or until the cord measures approximately 75 cm / 29.5 in.
Starting in the second chain from hook, sl st into every chain.
This creates a stronger cord that will not stretch easily.
Fasten off.
Top Hanging Loop
Fold approximately 8-10 cm / 3-4 in of the top cord back onto itself.
Use a yarn needle to stitch the end securely to the main cord.
This creates a small loop that can hang from a door hook or wall hook.
Arrange the Leaves
Lay the hanging cord vertically on a table.
Arrange the leaves on alternating sides of the cord.
Overlap some leaves slightly to create depth.
For a layout similar to the reference:
- Place two leaves near the top.
- Place two leaves slightly lower on opposite sides.
- Add another pair through the middle.
- Continue with staggered leaves toward the bottom.
- Finish with one large burnt-orange leaf pointing downward.
Attach the Leaves
Thread a yarn needle with matching yarn.
Sew each leaf stem securely around the main hanging cord.
Add a few hidden stitches behind the upper part of each leaf if necessary.
The leaves should remain securely positioned while still appearing as though they are naturally layered over the cord.
Suggested Reference Arrangement
From top to bottom:
- Burnt orange + mustard
- Mustard + deep red
- Deep red + mustard
- Taupe
- Burnt orange + taupe
- Burnt orange
Exact placement does not need to be perfectly symmetrical.
Finishing
- Weave in every loose yarn end.
- Check that the leaves are firmly attached.
- Gently reshape any curled points.
- Steam lightly from a distance if needed.
- Hang the decoration vertically for several hours.
- Make final adjustments to the position of the leaves.
Alternative Color Palettes
- Classic autumn: pumpkin + mustard + burgundy + brown
- Soft farmhouse: cream + camel + rust + sage
- Deep fall: burgundy + forest green + burnt orange + gold
- Neutral: ivory + oatmeal + mocha + taupe
- Vintage autumn: dusty mustard + brick red + olive + brown
Make It Into a Horizontal Garland
The same leaves can also be turned into a traditional mantel garland.
Make a longer crochet cord approximately 150-180 cm / 59-71 in.
Attach one leaf approximately every 12-15 cm / 4.75-6 in.
Alternate colors and leaf directions.
Add small crochet acorns between the leaves for an even more detailed autumn decoration.
Make It Fuller
For a fuller door hanging, make 12-14 leaves instead of nine.
Add several smaller leaves behind the main motifs and allow them to overlap.
Keep the lower section slightly narrower so the decoration retains its elegant tapered shape.
Frequently Asked Questions
Cotton or a cotton-blend DK yarn is ideal because it produces crisp stitches and helps the pointed maple-leaf shape stay defined after blocking.
Use firm, even tension and avoid overcrowding the edging with stitches. Wet blocking or gentle steam blocking will help flatten and define the finished leaves.
Yes. Acrylic yarn works, although the leaves may feel softer. Gentle steam blocking can help shape them, but avoid touching acrylic directly with a hot iron.
Yes. Use a smaller hook and lighter yarn, or reduce the number of chains used for each lobe while maintaining the same overall construction.
It works beautifully on an interior door, entryway wall, cabinet, mantel area or covered seasonal display. If used outdoors, keep it protected from rain and prolonged moisture.
Nine leaves create a balanced vertical hanging similar to the reference. For a fuller decoration, increase the number to twelve or fourteen and overlap the motifs more closely.
The finished Crochet Autumn Maple Leaf Garland Pattern

