Crochet Bed Runner Pattern – Elegant Diamond Lace Throw
Beginner Friendly
Perfect for those just starting their crochet journey, with clear instructions and simple techniques
Single-Day Project
A satisfying project you can complete in a single afternoon or evening.
Handmade Gift
A beautiful keepsake — free forever. Read online or print at home.
About This Crochet Bed Runner Pattern – Elegant Diamond Lace Throw
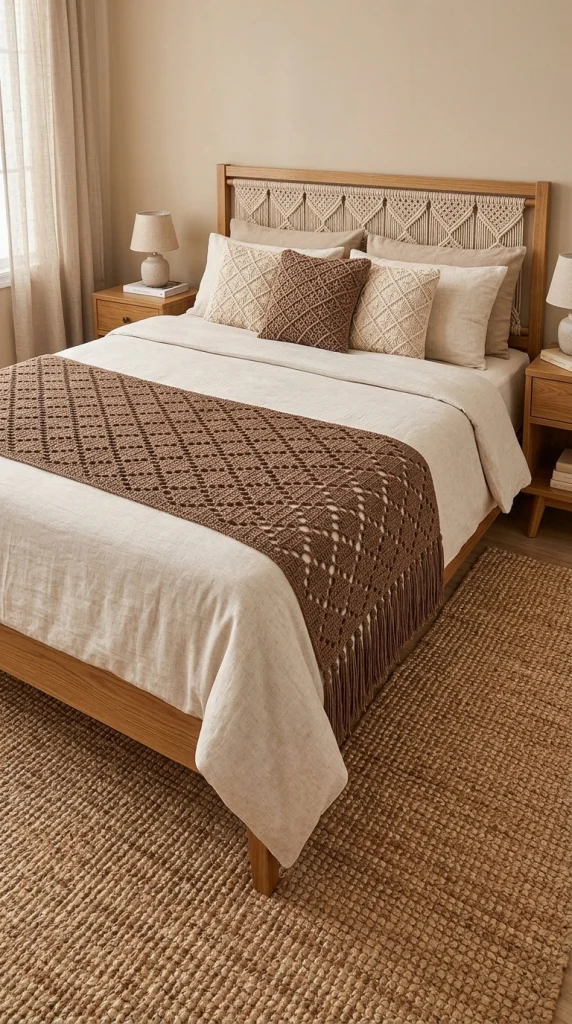
This crochet bed runner pattern creates an elegant long rectangular throw designed to lie across the foot of a bed. The rich mocha-brown color, repeating geometric diamond motifs and delicate openwork give it a warm handmade look that works beautifully with cream, beige and natural wood interiors.
The runner uses a repeating combination of solid crochet sections and chain spaces to form rows of elongated diamonds. Long fringe at both short ends gives the finished piece a soft, relaxed finish.
It is a beautiful project for a bedroom refresh, housewarming gift or neutral handmade home décor piece.
Materials
- Mocha / warm brown DK or light worsted yarn 700–900 g
- 4.0–4.5 mm crochet hook 1
- Yarn needle 1
- Stitch markers 4–6
- Scissors 1 pair
- Measuring tape 1
- Blocking mats and pins optional
Abbreviations – US Terms
chchainststitchsl stslip stitchscsingle crochethdchalf double crochetdcdouble crochetspspaceskskipreprepeatFOfasten offFinished Size
Approximately 55 cm / 22 in wide and 180 cm / 71 in long, excluding fringe.
With fringe, the finished length is approximately 195–200 cm / 77–79 in.
The width and length are easy to customize. Measure the mattress before beginning if you want the runner to drape farther over each side of the bed.
Pattern Construction
The runner is worked flat in rows from one short end to the other.
The main fabric alternates between:
- solid double crochet sections,
- open chain spaces,
- diagonal increases and decreases in the openwork,
- narrow solid divider rows.
These sections combine to create the repeating geometric diamond design.
Part 1 – Foundation Chain
Using mocha-brown yarn:
Ch 103.
The foundation should measure approximately 54–56 cm / 21–22 in without stretching.
If your chain is significantly shorter or longer, adjust your hook size before continuing.
Part 2 – Foundation Rows
Row 1
Dc in 4th ch from hook.
Dc in every remaining ch across.
Turn.
Row 2
Ch 3, dc in each st across.
Turn.
Row 3
Ch 3, dc in each st across.
Turn.
These three rows create a firm lower edge before the lace pattern begins.
Part 3 – First Openwork Row
Row 4:
Ch 3, dc in next 3 sts.
*Ch 2, sk 2 sts, dc in next 3 sts.*
Repeat from * to * across, adjusting the final repeat as necessary so both outer edges remain solid.
Turn.
Part 4 – Beginning the Diamond
Row 5:
Ch 3, dc in next 5 sts.
*Ch 2, sk next 2 sts, dc in next 5 sts.*
Repeat across.
Turn.
The additional solid stitches begin narrowing the open sections and create the first diagonal edges of the diamonds.
Part 5 – Diamond Expansion
Row 6:
Ch 3, dc in next 7 sts.
*Ch 2, sk 2 sts, dc in next 7 sts.*
Repeat across.
Turn.
Row 7:
Ch 3, dc in next 9 sts.
*Ch 2, sk 2 sts, dc in next 9 sts.*
Repeat across.
Turn.
Part 6 – Center of the Diamond
Row 8:
Ch 3.
Work dc across while positioning the largest open spaces near the center of each motif.
For each center opening:
ch 3, sk 3 sts.
Continue the established repeat across.
Turn.
Part 7 – Closing the Diamond
The following rows mirror the previous expansion rows.
Row 9: repeat the structure of Row 7.
Row 10: repeat the structure of Row 6.
Row 11: repeat the structure of Row 5.
Row 12: repeat the structure of Row 4.
The open spaces should now form complete elongated diamond shapes.
Part 8 – Solid Divider
Row 13:
Ch 3.
Dc in every dc and work the required number of dc into each chain space so the original stitch count is restored.
Turn.
Row 14:
Ch 3, dc across.
Turn.
This narrow solid section separates one diamond band from the next.
Part 9 – Second Diamond Band
Repeat Rows 4–14.
For a more decorative appearance, offset the second band so its diamonds sit between the diamonds from the previous section.
This creates the alternating geometric appearance visible across the finished runner.
Part 10 – Main Repeat
Continue repeating the diamond bands and divider rows until the runner measures approximately 175 cm / 69 in.
For the suggested finished size, you will need approximately 12–15 complete motif sections, depending on your gauge.
Always finish after completing an entire diamond repeat.
Part 11 – Final Solid Rows
Once the runner reaches the desired length:
Row 1: ch 3, dc across.
Row 2: ch 3, dc across.
Row 3: ch 3, dc across.
FO and weave in the yarn end.
The beginning and ending edges should now match.
Part 12 – Side Border
Join yarn in one corner.
Ch 1.
Work sc evenly along the first long edge.
Place approximately 2 sc around each dc row-end, adjusting slightly if the border begins to ripple.
Work 3 sc into the corner.
Continue around the entire runner.
Join with sl st.
Part 13 – Second Border Round
Ch 1.
Sc in each stitch around.
Work 3 sc into each corner stitch.
Join with sl st.
FO.
This simple border strengthens the lace fabric while keeping the clean modern appearance of the design.
Part 14 – Preparing the Fringe
Cut strands of brown yarn approximately 30–34 cm / 12–13.5 in long.
Each fringe bundle uses 3 strands.
Fold the three strands in half together.
The finished fringe will measure approximately 14–16 cm / 5.5–6.3 in.
Part 15 – Attaching the Fringe
Insert the crochet hook through a stitch along one short edge.
Catch the folded center of one fringe bundle and pull it partly through.
Pass all loose ends through the loop.
Pull gently to tighten.
Repeat evenly across the entire short edge.
Add fringe to the opposite end in exactly the same way.
Part 16 – Fringe Spacing
For a full luxurious edge, attach one fringe bundle approximately every 2 stitches.
For a lighter look, attach one bundle every 3 stitches.
Make sure both ends contain approximately the same number of fringe bundles.
Part 17 – Blocking
Lay the runner flat on blocking mats.
Gently stretch it to the desired dimensions.
Pay special attention to the diamond motifs so each opening appears symmetrical.
Pin the long edges straight.
Lightly wet-block or steam according to the fiber content of your yarn.
Allow the runner to dry completely before removing the pins.
How to Adjust the Width
For a narrower decorative runner, reduce the number of motif repeats across the foundation chain.
For a wider runner, add complete repeats rather than adding random stitches.
A width of approximately:
- 40–45 cm creates a narrow accent runner.
- 50–60 cm works well for most double and queen beds.
- 65–75 cm creates a more dramatic hotel-style runner.
How to Adjust the Length
Measure across the bed from one side to the other at the point where the runner will sit.
Add approximately 20–35 cm / 8–14 in if you want the runner to hang over both sides.
Continue repeating complete diamond sections until you reach the desired length.
Remember that the fringe adds additional length at both ends.
Matching Crochet Pillow – Optional
The geometric diamond motif can also be used to create matching decorative pillow covers.
For a standard accent cushion, crochet two square panels measuring approximately 45 × 45 cm / 18 × 18 in.
Use the same brown yarn for a coordinated look, or make the pillows in cream and beige for a softer neutral bedroom palette.
Suggested Pillow Color Combination
For a bedroom inspired by this design:
- Bed runner – mocha brown
- Main pillows – natural cream
- Accent pillow – mocha brown
- Second accent pillow – oatmeal beige
- Bedding – warm ivory
This keeps the handmade crochet details visible without making the room feel overly busy.
Color Variations
Warm Neutral: mocha brown, oatmeal and ivory.
Modern Minimalist: charcoal, cream and warm gray.
Boho: terracotta, camel and natural beige.
Coastal: dusty blue, sand and ivory.
Autumn: chocolate brown, rust and mustard.
Soft Feminine: dusty rose, cream and taupe.
Farmhouse: warm white, medium brown and sage.
Styling Ideas
- Place the runner horizontally across the lower third of the bed.
- Pair it with plain linen or cotton bedding.
- Add one matching crochet pillow instead of covering every pillow in crochet.
- Use natural wood furniture to complement warm brown yarn.
- Layer with cream, beige and oatmeal textiles.
- Use a slightly oversized runner for a relaxed draped look.
- Pair it with woven rugs and simple neutral accessories.
Care Instructions
Check the yarn label before washing.
For best results, hand wash the runner in cool or lukewarm water using a mild detergent.
Do not twist or wring the lace fabric.
Gently press excess water out using a clean towel.
Lay flat and reshape the diamond motifs while drying.
Straighten the fringe with your fingers before the runner is completely dry.
Frequently Asked Questions
It is best for an adventurous beginner or intermediate crocheter who is comfortable with double crochet, chains, skipped stitches and following repeating lace sections.
Yes. Simply finish both short ends with the same sc border used along the sides. The result will look cleaner and more modern.
A smooth DK or light worsted yarn gives the geometric openings good definition. Cotton blends create a crisp result, while acrylic or wool blends produce a softer drape.
This usually happens when chain stitches are worked much tighter or looser than the double crochet stitches. Try keeping the chain spaces relaxed and consistent throughout the project.
Yes. Increase the number of complete motif repeats across the foundation chain and continue the pattern until the desired blanket length is reached.
Place it horizontally across the lower third of the mattress. It can remain entirely on top of the bed or extend slightly over both sides depending on the look you prefer.
Yes, but the finished piece will become larger and heavier. Use a hook appropriate for the yarn and make a small swatch first to determine the size of each diamond repeat.
The finished Crochet Bed Runner Pattern – Elegant Diamond Lace Throw