Crochet Christmas Bell Pattern – Rustic Holiday Hanging Bells
Beginner Friendly
Perfect for those just starting their crochet journey, with clear instructions and simple techniques
Single-Day Project
A satisfying project you can complete in a single afternoon or evening.
Handmade Gift
A beautiful keepsake — free forever. Read online or print at home.
About This Crochet Christmas Bell Pattern – Rustic Holiday Hanging Bells
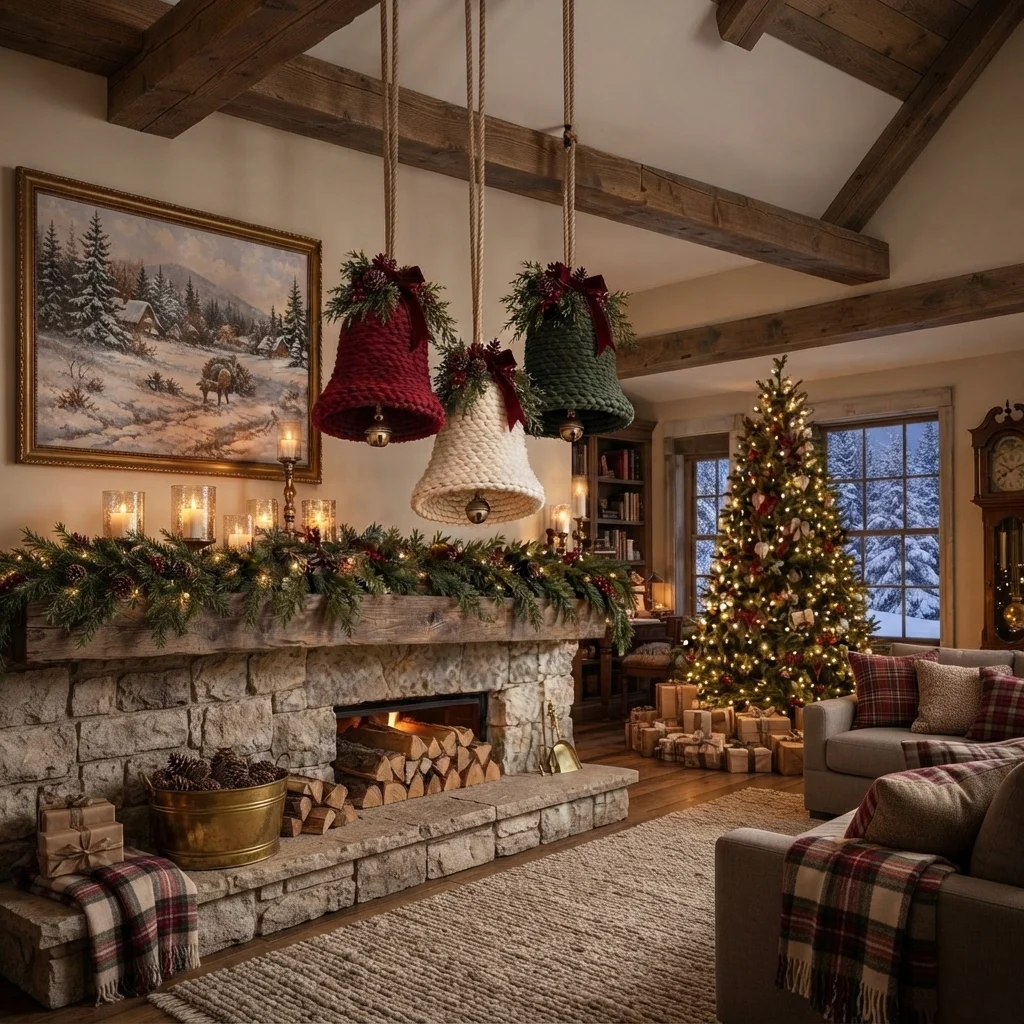
This crochet Christmas bell pattern creates an oversized, cozy holiday decoration inspired by traditional Christmas bells. Made with thick yarn and finished with a real metal jingle bell, each piece has a beautiful handmade texture that looks especially striking hanging above a fireplace, doorway or holiday table.
The design works beautifully as a set of three using deep burgundy, forest green and warm winter cream. Velvet bows, pinecones, evergreen sprigs and red berries give the bells an elegant rustic Christmas finish.
Materials
- Super bulky or jumbo yarn in burgundy 150-200 g
- Super bulky or jumbo yarn in forest green 150-200 g
- Super bulky or jumbo yarn in cream 150-200 g
- 8-10 mm crochet hook 1
- Large metal jingle bells 3
- Natural jute or thick hanging rope approximately 2-3 m
- Deep burgundy velvet ribbon approximately 1.5 m
- Artificial or preserved evergreen sprigs several
- Small pinecones 6-9
- Red decorative berries several clusters
- Yarn needle 1
- Scissors 1 pair
- Floral wire or strong thread for attaching greenery
Abbreviations
MRmagic ringchchainsl stslip stitchscsingle crochethdchalf double crochetinc2 stitches in one stitchBLOback loop onlyFOfasten offBell Construction
The bell is crocheted from the narrow top downward in continuous rounds. Use a stitch marker to mark the beginning of each round.
- Make a MR.
- Round 1: Work 6 sc into MR. (6)
- Round 2: Inc around. (12)
- Round 3: Sc around. (12)
- Round 4: *1 sc, inc* around. (18)
- Round 5: Sc around. (18)
- Round 6: *2 sc, inc* around. (24)
- Rounds 7-8: Sc around. (24)
- Round 9: *3 sc, inc* around. (30)
- Rounds 10-12: Sc around. (30)
- Round 13: *4 sc, inc* around. (36)
- Rounds 14-17: Sc around. (36)
- Round 18: *5 sc, inc* around. (42)
- Rounds 19-21: Sc around. (42)
At this stage the piece should resemble a long cone with a gradually widening lower section.
Creating the Flared Bell Edge
The final rounds create the characteristic outward curve at the bottom.
- Round 22: *6 sc, inc* around. (48)
- Round 23: Sc around. (48)
- Round 24: *7 sc, inc* around. (54)
- Round 25: Sc around. (54)
- Round 26: *8 sc, inc* around. (60)
- Round 27: BLO sc around. (60)
- Round 28: Sc around. (60)
- Sl st into the first stitch and FO.
Gently shape the lower edge outward with your fingers to create the rounded bell opening.
Optional Structured Rim
If your yarn is very soft, add one extra finishing round to help the bell hold its shape.
- Join yarn at the bottom edge.
- Work one round of tight sl st around the entire opening.
- Keep the tension firm but even.
- FO and weave in the ends.
Hanging Loop
- Cut approximately 80-120 cm of thick natural rope, depending on your desired hanging height.
- Fold the rope in half.
- Pass the folded end through the top center of the crochet bell.
- Secure the rope firmly inside the bell with several stitches.
- Leave enough rope above the bell for hanging.
For a grouped display, make each rope a slightly different length so the three bells hang at staggered heights.
Inner Jingle Bell
- Cut a strong piece of yarn approximately 30 cm long.
- Thread it through the loop of a metal jingle bell.
- Pass both yarn ends through the center of the crochet bell.
- Secure them firmly near the top interior.
- Adjust the length so the metal bell sits just below the crochet opening.
The jingle bell should remain clearly visible beneath the crochet bell without hanging too far below it.
Velvet Bow
- Cut approximately 45-55 cm of burgundy velvet ribbon.
- Form two generous loops.
- Cross the loops at the center and secure tightly with thread or floral wire.
- Leave two ribbon tails approximately 15-20 cm long.
- Trim the ends diagonally or in a V shape.
For the burgundy bell, you can use an even darker wine-colored ribbon to keep the bow visible against the crochet texture.
Evergreen Topper
Each bell uses a small Christmas arrangement around its upper edge.
- Cut 4-6 small evergreen sprigs.
- Arrange them in a loose fan shape.
- Add 2-3 small pinecones.
- Add a cluster of red berries.
- Position the velvet bow slightly to one side rather than directly in the center.
- Secure the arrangement together with floral wire.
- Sew or wire the complete arrangement securely to the top of the crochet bell.
Making the Burgundy Bell
- Follow the complete bell pattern using deep burgundy yarn.
- Add a brass or antique-gold jingle bell.
- Decorate the top with evergreen branches and pinecones.
- Add red berries.
- Finish with a dark burgundy velvet bow.
Making the Cream Bell
- Follow the complete bell pattern using warm ivory or winter cream yarn.
- Attach an antique brass jingle bell.
- Add evergreen sprigs, berries and pinecones around the top.
- Finish with a burgundy velvet bow for contrast.
The cream bell works beautifully as the central piece because it brightens the darker red and green bells.
Making the Forest Green Bell
- Follow the complete pattern using dark forest green yarn.
- Add a brass jingle bell underneath.
- Decorate with evergreen branches.
- Add red berries and small pinecones.
- Finish with the same burgundy velvet ribbon used on the other bells.
Creating the Three-Bell Display
- Hang the burgundy bell slightly to the left.
- Position the cream bell lower in the center.
- Hang the forest green bell slightly higher on the right.
- Leave approximately 15-25 cm between the bells.
- Rotate each bell slightly so all three openings remain visible.
- Adjust the greenery so the arrangements do not overlap too heavily.
The staggered placement makes the display feel balanced while keeping each handmade bell clearly visible.
Finished Measurements
- Bell height: approximately 25-32 cm
- Bottom diameter: approximately 22-28 cm
- Metal jingle bell: approximately 4-6 cm
- Top greenery: approximately 15-20 cm wide
- Velvet bow: approximately 15-18 cm wide
- Hanging rope: customizable
Color Palette
- Bell 1: deep cranberry or burgundy
- Bell 2: warm winter ivory
- Bell 3: dark forest green
- Ribbon: wine or burgundy velvet
- Hardware: antique brass
- Greenery: deep natural evergreen
- Accents: cranberry red berries and brown pinecones
Ways to Customize Your Crochet Christmas Bells
- Make a single oversized bell for a front door.
- Create three smaller bells for a Christmas garland.
- Use gold ribbon for a more traditional holiday look.
- Replace burgundy with classic Christmas red.
- Add tiny warm-white battery lights around the greenery.
- Add wooden beads to the hanging rope.
- Use faux snow on the pinecones for a winter effect.
- Make miniature versions as Christmas tree ornaments.
- Add small crochet holly leaves instead of artificial greenery.
- Use all cream yarn for a neutral farmhouse Christmas style.
Frequently Asked Questions
No. These bells are designed to remain hollow. The thick yarn and firm crochet tension help them maintain their shape.
A structured super bulky or jumbo yarn works best. Cotton cord, tube yarn or a sturdy chunky yarn will create a firmer bell than a very soft fluffy yarn.
Yes. Use thinner yarn and a smaller hook, or stop increasing earlier in the pattern. Keep the same general cone-to-flared-rim construction.
The crochet bells are best protected from rain and moisture. For outdoor use, hang them in a covered porch or sheltered doorway and choose weather-resistant decorative greenery.
Yes. You can replace the evergreen branches, berries and pinecones with crocheted versions for a completely handmade decoration.
Use a sturdy yarn, crochet with firm tension and add the optional slip-stitch rim. For very large bells, a lightweight hidden craft ring can also be placed inside the lower opening for additional structure.
The finished Crochet Christmas Bell Pattern – Rustic Holiday Hanging Bells