Crochet Christmas Poinsettia Ornament Pattern
Beginner Friendly
Perfect for those just starting their crochet journey, with clear instructions and simple techniques
Single-Day Project
A satisfying project you can complete in a single afternoon or evening.
Handmade Gift
A beautiful keepsake — free forever. Read online or print at home.
About This Crochet Christmas Poinsettia Ornament Pattern
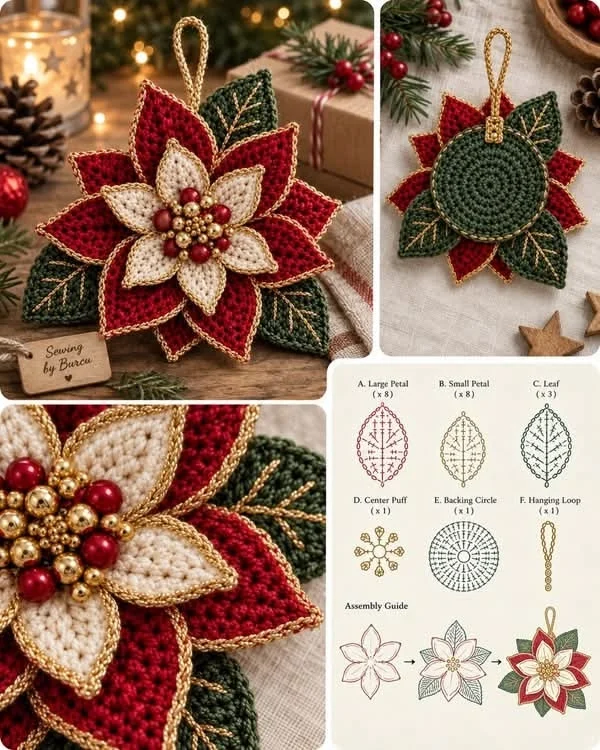
This crochet Christmas poinsettia ornament pattern creates a richly layered holiday flower inspired by the classic Christmas poinsettia. Deep red outer petals, smaller ivory petals and dark forest-green leaves are outlined with a delicate metallic-gold finish, while a cluster of red and gold beads creates the sparkling center.
Add the hanging loop and the finished flower becomes a beautiful Christmas tree ornament, door decoration, gift topper or handmade holiday keepsake.
Materials
- Sport or DK cotton yarn – deep Christmas red 30–40 g
- Sport or DK cotton yarn – ivory / warm white 15–20 g
- Sport or DK cotton yarn – forest green 20–30 g
- Fine metallic crochet thread – gold small amount
- 2.5–3.0 mm crochet hook 1
- Yarn needle 1
- Scissors 1 pair
- Small red beads 5–7
- Small gold beads 8–12
- Strong sewing thread small amount
- Optional thin floral wire for shaping
Abbreviations – US Terms
MRmagic ringchchainsl stslip stitchscsingle crochethdchalf double crochetdcdouble crochettrtreble crochetincincreasest(s)stitch(es)FOfasten offFinished Size
Approximately 15–18 cm / 6–7 in across, depending on yarn, hook size and blocking.
The hanging loop adds approximately 6–8 cm / 2.5–3 in.
Construction
The ornament is assembled in layers:
- 8 large red outer petals
- 8 smaller red petals
- 5 ivory center petals
- 3 large forest-green leaves
- 1 circular crochet backing
- 1 decorative beaded center
- 1 hanging loop
The individual motifs are crocheted separately and sewn securely onto the backing circle.
Part 1 – Large Red Petals
Make 8 with deep-red yarn.
Ch 11.
Side 1
Starting in the second chain from hook:
sl st, sc, hdc, dc, dc, tr, tr, dc, hdc, sc.
Ch 2 at the tip.
Side 2
Working down the opposite side of the foundation chain:
sc, hdc, dc, tr, tr, dc, dc, hdc, sc, sl st.
Join at the base.
FO red, leaving a sewing tail.
Gold Edge – Large Petals
Join metallic-gold thread at the base of the petal.
Sl st loosely around the entire outer edge.
At the pointed tip, work:
sl st, ch 1, sl st
into the tip space to preserve the sharp poinsettia shape.
FO and weave in carefully.
Part 2 – Smaller Red Petals
Make 8.
Ch 8.
Starting in the second chain from hook:
sl st, sc, hdc, dc, tr, dc, sc.
Ch 2.
Work down the opposite side:
sc, dc, tr, dc, hdc, sc, sl st.
FO.
Add the same gold slip-stitch edging used on the large petals.
Part 3 – Ivory Inner Petals
Make 5 with ivory yarn.
Ch 7.
Starting in the second chain from hook:
sl st, sc, hdc, dc, hdc, sc.
Ch 2.
On the opposite side work:
sc, hdc, dc, hdc, sc, sl st.
FO.
Edge each ivory petal with metallic-gold thread using loose slip stitches.
Part 4 – Forest-Green Leaves
Make 3 large leaves.
Ch 12 with forest-green yarn.
Starting in the second chain from hook:
sl st, sc, hdc, dc, dc, tr, tr, dc, dc, hdc, sc.
Ch 2 at the tip.
Work down the opposite side:
sc, hdc, dc, dc, tr, tr, dc, dc, hdc, sc, sl st.
FO, leaving a long tail.
Gold Veins on the Leaves
Thread a yarn needle with metallic-gold thread.
Beginning at the base, embroider one straight central vein toward the pointed tip.
Add 3–4 short diagonal veins on each side.
Keep the stitches slightly loose so the leaf does not curl.
For extra sparkle, work a very fine gold slip-stitch edge around each leaf.
Part 5 – Crochet Backing Circle
Use forest-green yarn.
Round 1
MR, 6 sc.
6 sts.
Round 2
Inc around.
12 sts.
Round 3
Repeat [1 sc, inc] around.
18 sts.
Round 4
Repeat [2 sc, inc] around.
24 sts.
Round 5
Repeat [3 sc, inc] around.
30 sts.
Round 6
Repeat [4 sc, inc] around.
36 sts.
FO.
Part 6 – Assemble the Green Layer
Place the backing circle flat.
Arrange the 3 green leaves around the upper and side sections of the circle.
Allow the pointed ends to extend beyond the backing.
Sew the bases of the leaves securely to the circle.
Do not sew the entire leaf flat. Leaving the tips slightly free gives the ornament more dimension.
Part 7 – Assemble the Large Red Petals
Arrange the 8 large red petals evenly in a circular flower shape.
Overlap each petal slightly at its base.
The tips should radiate outward between and over the green leaves.
Sew each petal firmly through the backing circle.
Part 8 – Add the Smaller Red Layer
Place the 8 smaller red petals over the first layer.
Rotate this layer slightly so each small petal sits between two large petals.
Sew only the lower third of each petal to the backing.
Leave the upper sections free so the flower keeps its layered 3D appearance.
Part 9 – Add the Ivory Petals
Arrange the 5 ivory petals in a star-shaped flower at the center.
Overlap the bases slightly.
Sew them firmly through all previous layers and into the backing circle.
Shape the ivory tips upward very slightly.
Part 10 – Beaded Christmas Center
Thread a strong sewing needle with matching or transparent thread.
Begin by sewing 5–7 red beads close together at the center.
Add the gold beads around and between them to form a dense sparkling cluster.
Pass through each bead more than once so the center remains secure.
Knot the thread firmly on the back.
Part 11 – Hanging Loop
With metallic-gold yarn or sturdy gold cord:
Ch 35–45, depending on your preferred loop length.
Sl st back through every chain for a stronger cord.
FO, leaving two long tails.
Fold the cord into a loop.
Sew both ends securely to the upper back of the green backing circle.
Pass through several stitches before knotting.
Final Assembly Check
- Check that all three green leaves are secure.
- Spread the eight large red petals evenly.
- Position the smaller red petals between them.
- Shape the five ivory petals around the center.
- Check every bead individually.
- Make sure the hanging loop is strongly attached.
- Weave in all remaining yarn ends.
Blocking and Shaping
Lightly mist the crochet petals and leaves with water.
Arrange the ornament on a blocking mat.
Pin every large red petal into a sharp point.
Pin the ivory petals separately so their shapes remain visible.
Stretch the green leaves gently outward.
Allow the ornament to dry completely.
Once dry, gently bend the upper petals forward to restore the layered dimensional effect.
Optional Extra Stiffness
If you want the ornament to hold a very crisp shape, lightly stiffen only the backs of the petals and leaves.
You can also crochet around a very fine floral wire while adding the final gold edging.
Keep any wire completely enclosed inside the crochet stitches.
Color Variations
Traditional Christmas: deep red, ivory, forest green and antique gold.
White Christmas: ivory petals, champagne-gold edging and sage-green leaves.
Burgundy Elegance: burgundy, cream, dark olive and muted gold.
Vintage Christmas: brick red, oatmeal, moss green and bronze-gold.
Pink Christmas: dusty rose, cream, eucalyptus green and champagne.
Winter Blue: navy, icy blue, white and silver.
Ways to Use the Finished Poinsettia
- Christmas tree ornament
- Door or cabinet decoration
- Holiday gift topper
- Christmas garland centerpiece
- Handmade stocking decoration
- Holiday table setting accent
- Festive wall hanging
- Handmade keepsake gift
Care Instructions
Because the ornament contains beads and metallic thread, spot cleaning is recommended.
If necessary, gently wipe the crochet with a slightly damp cloth.
Do not machine wash or tumble dry.
Store the ornament flat in a box after Christmas to protect the pointed petals and beadwork.
Frequently Asked Questions
Yes. Replace the beads with small crochet bobbles or French knots worked in red and metallic-gold yarn.
Yes. Use sport or crochet-thread-weight yarn with a smaller hook and shorten each starting chain proportionally.
Your tension may be too tight or the gold edging may be pulling the edges inward. Work the edging loosely and block each petal before assembly.
For this highly dimensional version, separate petals give the cleanest result and make it easier to arrange the layers precisely.
Yes. Attach the ornament to ribbon around a wrapped gift. The recipient can remove it afterward and use it as a Christmas decoration.
Yes. Crochet several poinsettias in coordinating shades and use them across a Christmas tree, garland, wreath or holiday table.
The finished Crochet Christmas Poinsettia Ornament Pattern