Crochet Christmas Snowman Door Hanger Pattern
Beginner Friendly
Perfect for those just starting their crochet journey, with clear instructions and simple techniques
Single-Day Project
A satisfying project you can complete in a single afternoon or evening.
Handmade Gift
A beautiful keepsake — free forever. Read online or print at home.
About This Crochet Christmas Snowman Door Hanger Pattern
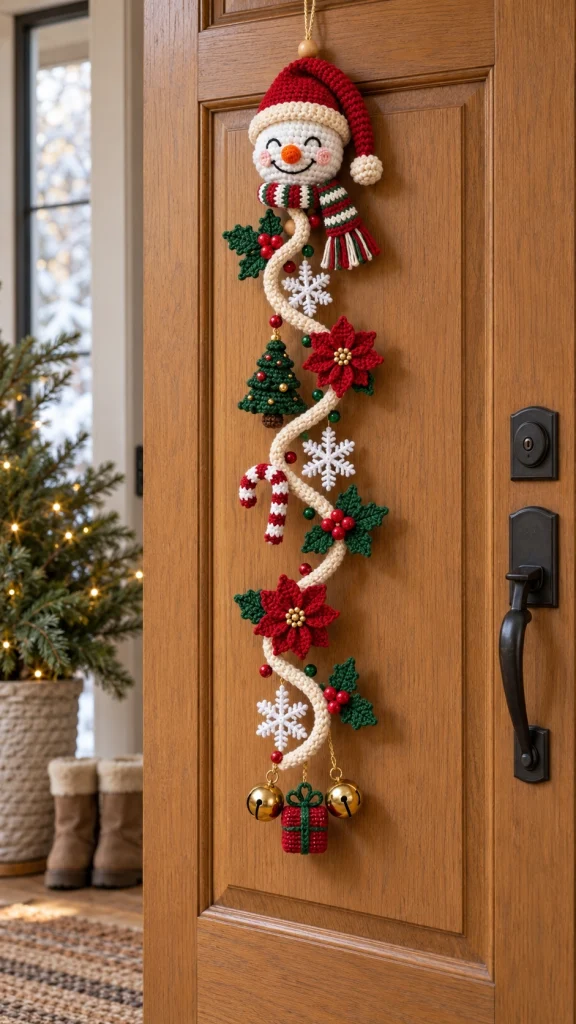
This crochet Christmas snowman door hanger pattern creates a long, whimsical holiday decoration inspired by the festive piece shown above. A smiling snowman sits at the top while a soft cream crochet spiral flows downward and carries tiny Christmas motifs including poinsettias, holly berries, snowflakes, a Christmas tree, candy cane and miniature present.
The design is perfect for a front door, interior door, entryway or narrow wall space. The long vertical shape makes it especially useful when you want Christmas décor that feels detailed and festive without using a large traditional wreath.
Materials
- White or warm cream yarn 100–130 g
- Christmas red yarn 60–80 g
- Dark green yarn 50–70 g
- Small amount orange yarn for nose
- Small amount black yarn for face
- Gold yarn or metallic thread optional
- 3.0–4.0 mm crochet hook 1
- Yarn needle 1
- Scissors 1 pair
- Small red, green and gold beads optional
- Small gold bells 2
- Wooden bead 1
- Light stuffing small amount
Abbreviations – US Terms
chchainsl stslip stitchscsingle crochethdchalf double crochetdcdouble crochettrtreble crochetincincreasedecdecreaseMRmagic ringFOfasten offFinished Size
Approximately 85–100 cm / 33–39 in long, depending on the length of the spiral and spacing of the ornaments.
Snowman head: approximately 11–13 cm / 4.5–5 in wide.
Part 1 – Snowman Head
Using white yarn:
R1: 6 sc in MR. (6)
R2: inc around. (12)
R3: [sc, inc] ×6. (18)
R4: [2 sc, inc] ×6. (24)
R5: [3 sc, inc] ×6. (30)
R6: [4 sc, inc] ×6. (36)
R7–12: sc around. (36)
R13: [4 sc, dec] ×6. (30)
R14: [3 sc, dec] ×6. (24)
Add a small amount of stuffing if you want the snowman head to appear dimensional.
R15: [2 sc, dec] ×6. (18)
R16: [sc, dec] ×6. (12)
FO and close.
Part 2 – Snowman Face
Embroider two curved closed eyes with black yarn.
For the smile, embroider a gentle curved black line across the lower half of the face.
Add two tiny pink circles for rosy cheeks.
Carrot Nose
Using orange yarn:
R1: 4 sc in MR.
R2: sc around.
R3: [sc, inc] ×2. (6)
R4: sc around.
FO and sew horizontally to the center of the face.
Part 3 – Red Santa Hat
Using red yarn:
R1: 6 sc in MR.
R2: sc around. (6)
R3: [2 sc, inc] ×2. (8)
R4: sc around.
R5: [3 sc, inc] ×2. (10)
R6: sc around.
R7: [4 sc, inc] ×2. (12)
R8: [2 sc, inc] ×4. (16)
R9: [3 sc, inc] ×4. (20)
R10: [4 sc, inc] ×4. (24)
R11: [5 sc, inc] ×4. (28)
Continue increasing if necessary until the hat fits over the snowman head.
Part 4 – Hat Brim & Pom-Pom
Join cream yarn around the bottom of the red hat.
Work 2 rounds of hdc evenly around.
FO.
For the pom-pom:
R1: 6 sc in MR.
R2: inc around. (12)
R3: sc around.
R4: dec around. (6)
Stuff lightly, close and sew to the tip of the hat.
Fold the hat naturally toward one side and tack it lightly to maintain the curved shape.
Part 5 – Striped Christmas Scarf
Using red, white and green yarn:
Ch 7.
Starting in second ch from hook, sc across. (6)
Continue in rows, changing colors every 2 rows:
Red → White → Green → White → Red
Continue until the scarf measures approximately 35–40 cm / 14–16 in.
FO.
Add short red, white and green tassels to both ends.
Wrap the scarf once around the snowman’s neck and allow one end to hang toward the right side.
Part 6 – Main Cream Spiral Garland
Using cream yarn:
Ch 150–180.
The exact length depends on how long you want the finished hanger.
Row 1
Starting in second ch from hook, work 2 sc in every chain.
The strip will begin curling naturally.
Row 2
Ch 1, turn.
Work 2 sc in each stitch for a stronger spiral.
FO leaving a long tail.
Part 7 – Holly Leaves
Make several dark green leaves.
Ch 11.
Starting in second ch:
sl st, sc, hdc, dc, tr, dc, hdc, sc, sl st.
Work down the opposite side of the foundation chain.
To create pointed holly edges, work small combinations of:
[sl st, ch 2, sl st]
around the outside.
FO leaving a sewing tail.
Group leaves in sets of 2–3.
Part 8 – Holly Berries
Using red yarn:
R1: 6 sc in MR.
R2: sc around.
FO and close tightly.
Make three berries for each holly cluster.
Sew them together at the center of the leaves.
Part 9 – Crochet Poinsettia
Make two large red poinsettias.
Center
Using red yarn:
6 sc in MR. Join.
Petals
For each petal:
Ch 7.
Starting in second ch:
sl st, sc, hdc, dc, hdc, sc.
Sl st into the next center stitch.
Repeat to create 6 petals.
For a fuller flower, make a second layer of 6 slightly smaller petals.
Add several small gold beads or embroidered French knots to the center.
Part 10 – Poinsettia Leaves
Using dark green yarn:
Ch 8.
Starting in second ch:
sl st, sc, hdc, dc, hdc, sc, sl st.
Repeat on opposite side.
Make 2–3 leaves per poinsettia.
Sew them behind the red petals.
Part 11 – Crochet Snowflakes
Make approximately 3 white snowflakes.
R1: 12 sc in MR. Join.
R2:
*Ch 6, sl st in second ch, sc in next ch, ch 3, sl st into same ch, sc down remaining chains, sl st into next 2 sts of center.*
Repeat around to create six branches.
FO and block firmly.
Part 12 – Mini Christmas Tree
Using dark green yarn:
Ch 2.
Row 1
2 sc in second ch. Ch 1, turn.
Row 2
2 sc in first st, 2 sc in last st. (4)
Row 3
Sc across.
Row 4
2 sc in first st, sc across, 2 sc in last st.
Continue increasing every second row until the tree reaches approximately 9–11 cm / 3.5–4.5 in.
Add small red and gold beads as ornaments.
Using brown yarn, crochet a small rectangular trunk and sew it beneath the tree.
Part 13 – Candy Cane
Using red and white yarn, crochet a narrow tube or cord while alternating colors every few rows.
A simple version:
Ch 35.
Starting in second chain, sl st back across.
Make one red cord and one white cord.
Twist the cords together tightly.
Curve the upper section into a candy-cane hook.
Secure the curve with several hidden sewing stitches.
Part 14 – Mini Christmas Gift
Using red yarn:
Ch 9.
Starting in second ch, sc across. (8)
Work approximately 8–10 rows to create a small square.
Make two identical squares.
Sew around three sides, lightly stuff, then close the final side.
Using green yarn, embroider one vertical and one horizontal ribbon across the present.
Create a small green bow and sew it at the top.
Part 15 – Decorative Christmas Beads
Small red and green crochet balls can be added between the larger ornaments.
R1: 6 sc in MR.
R2: sc around.
R3: dec around.
FO and close.
Alternatively, use lightweight craft beads.
Space them irregularly along the cream spiral rather than creating perfectly even rows.
Part 16 – Top Hanging Loop
Using gold, beige or cream yarn:
Ch 30–35.
Sl st into the first chain to form a loop.
FO securely.
Thread the loop through a wooden bead if desired.
Sew the loop firmly behind the snowman hat/head.
Part 17 – Attach the Snowman
Position the snowman at the very top of the hanger.
Sew the beginning of the cream spiral behind the lower section of the snowman.
Allow the first curve to move toward the left before returning toward the right.
The snowman should remain the visual focal point at the top.
Part 18 – Arrange the Decorations
Lay the entire spiral flat.
Arrange the motifs approximately in this order:
- Snowman with scarf
- Holly cluster
- White snowflake
- Mini Christmas tree
- Large red poinsettia
- White snowflake
- Candy cane
- Holly cluster
- Second red poinsettia
- Holly cluster
- Final white snowflake
- Gift and bells
Do not place every decoration directly in the center. Alternate motifs between the left and right sides of the spiral for a more natural cascading appearance.
Part 19 – Sew the Motifs
Use matching yarn to sew each motif to the spiral.
Attach heavier pieces through several stitches.
For poinsettias and holly leaves, sew primarily through the center so the outer petals and leaf tips remain slightly raised.
Secure snowflakes through the center and one or two branches.
Check the front frequently while sewing to make sure the spiral still flows naturally.
Part 20 – Bottom Bells & Gift
Attach two small gold bells to short gold chains or crochet cords.
Place the miniature red-and-green present between them.
Sew the three pieces securely to the final section of the cream spiral.
The bells should hang slightly lower than the present to create a balanced finish.
Final Assembly
Hang the decoration temporarily and inspect its shape.
Adjust the cream spiral until it creates smooth alternating curves.
Rotate any flowers, holly leaves or snowflakes that face sideways.
Make sure the snowman remains straight at the top.
Secure any sections that twist too much with hidden stitches.
Weave in all yarn ends carefully.
Color Variations
Classic Christmas: red, forest green, warm white and gold.
Vintage Christmas: burgundy, sage green, cream and antique gold.
Winter Wonderland: icy blue, white, silver and navy.
Gingerbread Christmas: cinnamon brown, cream, red and muted green.
Elegant Christmas: deep wine red, dark evergreen, ivory and champagne gold.
Pastel Christmas: dusty pink, mint, cream and soft gold.
Ways to Customize It
- Replace the snowman with a crochet Santa head.
- Add a tiny gingerbread man.
- Use crochet bells instead of metal bells.
- Add the family name on a small wooden tag.
- Replace the Christmas tree with a miniature stocking.
- Add more poinsettias for a fuller design.
- Make the spiral shorter for a kitchen cabinet decoration.
- Use only snowflakes and blue yarn for a winter version.
- Add warm-white micro fairy lights around the spiral.
- Make miniature matching ornaments for the Christmas tree.
Care Instructions
Spot clean whenever possible.
If washing is necessary, hand wash gently in cool water.
Do not twist or wring.
Lay flat on a towel and reshape every ornament while damp.
Allow to dry completely before hanging.
Remove metal bells or delicate embellishments before washing when possible.
Store flat or loosely rolled after Christmas to prevent the snowflakes and poinsettias from becoming crushed.
Frequently Asked Questions
Yes. Simply begin with fewer chains for the cream spiral and use fewer decorative motifs.
Yes. Crochet tiny red, green and gold balls instead. This also creates a completely handmade look.
Hang the piece before the final sewing stage and rotate the spiral into position. Add a few hidden stitches where necessary to control its direction.
Yes, but the finished hanger will become substantially larger. Increase the hook size to match your chosen yarn.
It is best suited to an indoor door or a protected covered entrance. Moisture and prolonged direct sunlight can affect the yarn and embellishments.
The individual motifs mostly use basic crochet stitches, but the number of pieces and final assembly make the complete project better suited to a confident beginner or intermediate crocheter.
The finished Crochet Christmas Snowman Door Hanger Pattern

