Crochet Christmas Woodland Wreath Pattern – Mushrooms, Leaves & Red Bow
Beginner Friendly
Perfect for those just starting their crochet journey, with clear instructions and simple techniques
Single-Day Project
A satisfying project you can complete in a single afternoon or evening.
Handmade Gift
A beautiful keepsake — free forever. Read online or print at home.
About This Crochet Christmas Woodland Wreath Pattern – Mushrooms, Leaves & Red Bow
Crochet Christmas Woodland Wreath Pattern – Cozy Handmade Holiday Decoration
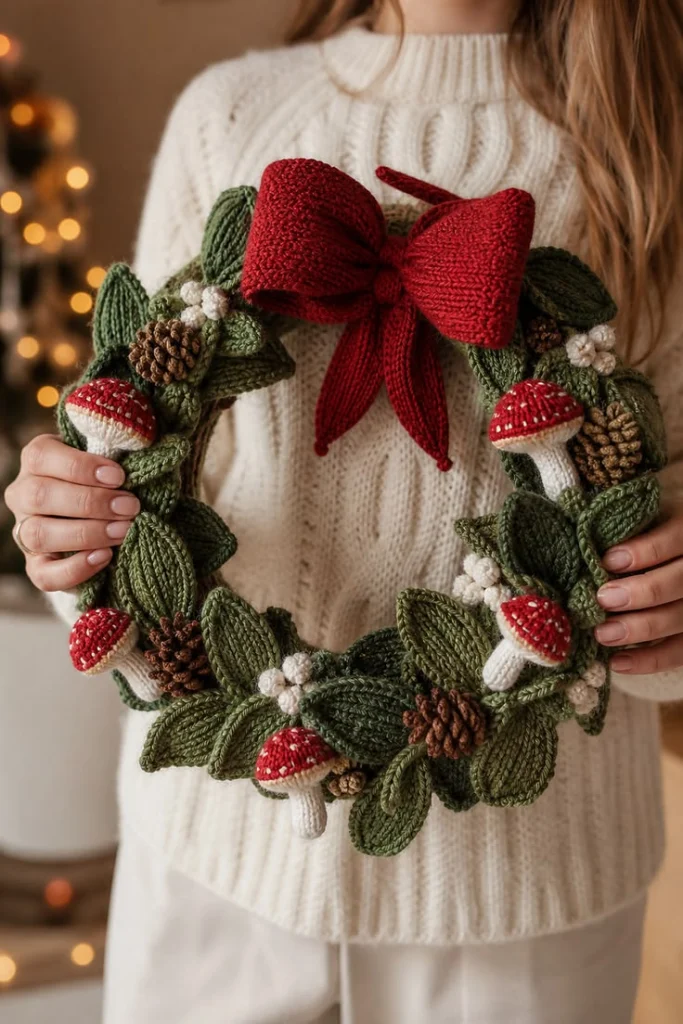
Bring the warmth of a woodland Christmas into your home with this beautiful crochet Christmas woodland wreath pattern. Featuring rich forest-green leaves, adorable red-and-white mushrooms, textured pinecones, delicate white berries and a large burgundy-red bow, this handmade decoration captures the charm of a traditional Christmas cottage.
Perfect for hanging on a door, above a fireplace or on a cozy living room wall, this festive crochet wreath combines natural woodland details with classic Christmas colors.
In this tutorial, you’ll learn how to create each decorative element separately and assemble them into a full, beautifully layered holiday wreath.
Materials You’ll Need
- Forest-green yarn 150 g
- Olive-green yarn 100 g
- Burgundy-red yarn 100 g
- Bright-red yarn 50 g
- Ivory-white yarn 50 g
- Dark-brown yarn 50 g
- Beige yarn 30 g
- 3.5 mm crochet hook 1
- 4 mm crochet hook 1
- Round wreath base, 35 cm 1
- Polyester stuffing small amount
- Yarn needle 1
- Stitch markers 2
- Scissors 1
- Strong sewing thread as needed
- Hanging ribbon or yarn loop 1
Crochet Abbreviations – US Terms
chchainsl stslip stitchscsingle crochethdchalf double crochetdcdouble crochettrtreble crochetinc2 sc in same stitchdecsingle crochet decreaseMRmagic ringFOfasten offPart 1 – Prepare the Wreath Base
Choose a sturdy circular wreath base measuring approximately 35 cm in diameter.
A foam wreath form, wrapped wire frame or tightly bundled natural-fiber base will work.
For a soft handmade appearance, cover the entire base with forest-green yarn before adding the decorative pieces.
Keep the wrapping close together so the original base does not show through.
Part 2 – Crochet the Green Base Cover
Using forest-green yarn and a 4 mm hook:
Row 1: Ch 16. Sc in the second chain from the hook and across. (15 sts)
Row 2: Ch 1, turn, sc in each stitch. (15 sts)
Rows 3 onward: Repeat Row 2 until the strip is long enough to wrap around the wreath form.
Adjust the starting chain count to match the thickness of your particular wreath base.
Wrap the crocheted strip around the base and sew the long edges together on the back.
Part 3 – Crochet the First Woodland Leaf
Using olive-green yarn and a 3.5 mm hook:
Row 1: Ch 13.
Row 2: Starting in the second chain from the hook, work 1 sc, 1 hdc, 7 dc, 1 hdc and 1 sc. Work 3 sc into the final chain to turn around the tip.
Continue along the opposite side of the foundation chain, mirroring the stitch sequence.
Join with a sl st and fasten off.
This creates a basic elongated leaf with a softly pointed end.
Part 4 – Add Raised Leaf Veins
Join a matching or slightly lighter green yarn at the base of the leaf.
Surface crochet a line of slip stitches along the center.
Add two or three short diagonal branches on each side using a yarn needle and chain embroidery.
These raised details give the leaves a more realistic textured appearance.
Part 5 – Create Different Leaf Sizes
For small leaves, begin with ch 9.
For medium leaves, begin with ch 13.
For large leaves, begin with ch 17.
Adjust the number of center dc stitches to suit each foundation length.
Make approximately:
- 10 large leaves
- 12 medium leaves
- 8 small leaves
Use forest green, olive green and muted moss green for natural variation.
Part 6 – Crochet Textured Ribbed Leaves
For the ribbed leaves visible throughout the wreath, crochet a narrow oval leaf using hdc stitches.
Work the second round in BLO where possible to create subtle raised ridges.
Alternatively, embroider several parallel veins along the leaf surface.
Make approximately 8–10 additional ribbed leaves.
Part 7 – Make the Red Mushroom Cap
Using bright-red yarn:
R1: 6 sc in MR. (6)
R2: Inc around. (12)
R3: (1 sc, inc) × 6. (18)
R4: (2 sc, inc) × 6. (24)
R5: (3 sc, inc) × 6. (30)
R6: Sc around in BLO. (30)
R7: Sc around. (30)
Fasten off, leaving a long tail for assembly.
Part 8 – Add the Mushroom’s White Spots
Thread a yarn needle with ivory-white yarn.
Embroider small white dots across the red mushroom cap.
Space them irregularly for a natural woodland appearance.
Use small French knots or short satin stitches.
Avoid placing every dot in a perfectly symmetrical arrangement.
Part 9 – Crochet the White Mushroom Stem
Using ivory yarn:
R1: 6 sc in MR. (6)
R2: Inc around. (12)
R3–R8: Sc around. (12)
Lightly stuff the stem with polyester filling.
Fasten off, leaving a long sewing tail.
Part 10 – Create the Mushroom Underside
Using cream yarn:
R1: 6 sc in MR. (6)
R2: Inc around. (12)
R3: (1 sc, inc) × 6. (18)
R4: (2 sc, inc) × 6. (24)
R5: (3 sc, inc) × 6. (30)
Fasten off.
Place the cream underside beneath the red cap and sew around the outer edge, adding a little stuffing before closing.
Part 11 – Assemble the Mushroom
Position the stuffed white stem in the center of the cream underside.
Sew firmly using the long yarn tail.
Shape the red cap gently into a rounded dome.
Make approximately 5 mushrooms for the wreath.
Vary their sizes slightly for a more natural woodland effect.
Part 12 – Crochet the Pinecone Foundation
Using dark-brown yarn:
R1: 6 sc in MR. (6)
R2: Inc around. (12)
R3: (1 sc, inc) × 6. (18)
R4–R8: Sc around. (18)
R9: (1 sc, dec) × 6. (12)
Stuff lightly.
R10: Dec around. (6)
Close the opening and fasten off.
Part 13 – Add Pinecone Scales
Join brown yarn near the bottom of the pinecone.
Work small overlapping shell shapes using:
(Sl st, ch 2, 2 dc, ch 2, sl st) in selected stitches.
Repeat around the pinecone in staggered rows.
Allow the shell edges to overlap slightly.
Make approximately 4–5 pinecones.
Part 14 – Crochet Small White Berries
Using ivory-white yarn:
R1: 6 sc in MR. (6)
R2: Inc around. (12)
R3: Sc around. (12)
R4: Dec around. (6)
Stuff lightly and close.
Make approximately 18–24 berries.
Part 15 – Create Berry Clusters
Arrange three or four white berries into each small cluster.
Sew them together with matching yarn.
Leave a long tail for attaching each cluster to the wreath.
Make approximately 6 clusters.
Part 16 – Crochet the Large Red Bow
Using burgundy-red yarn and a 4 mm hook:
Row 1: Ch 31. Sc in the second chain from the hook and across. (30 sts)
Rows 2–16: Ch 1, turn, sc across.
Fasten off.
Fold both short ends toward the center and sew them together.
Pinch the middle to form two large bow loops.
Part 17 – Create the Bow Center
Using burgundy yarn:
Row 1: Ch 7. Sc across. (6 sts)
Rows 2–8: Ch 1, turn, sc across.
Wrap this small rectangle tightly around the center of the bow.
Sew the ends together at the back.
Adjust the loops until both sides appear full and balanced.
Part 18 – Crochet the Hanging Bow Tails
Make two matching tails.
Ch 9.
Row 1: Sc in the second chain and across. (8 sts)
Continue in rows until each tail measures approximately 15 cm.
Decrease near the final rows to create pointed ends.
Attach both tails behind the bow center.
Part 19 – Prepare the Decoration Layout
Lay the wreath base flat on a large table.
Arrange the large leaves first, pointing them in slightly different directions.
Fill gaps with medium and small leaves.
Position the mushrooms and pinecones around the wreath.
Leave the upper center free for the large red bow.
Part 20 – Attach the Large Leaves
Begin sewing the large leaves to the wreath base.
Overlap neighboring leaves slightly.
Alternate between olive green, moss green and forest green.
Keep the inner circular opening visible.
Angle some leaves outward to create depth.
Part 21 – Add the Smaller Leaves
Place smaller leaves between the large ones.
Use them to cover visible areas of the base.
Layer some leaves above others to create a lush, natural texture.
Secure each leaf at its base while leaving the pointed tips slightly free.
Part 22 – Attach the Mushrooms
Position the mushrooms at different points around the wreath.
Place some upright and others at slight angles.
Use the long yarn tails to sew the stems securely into the green base.
Allow the red caps to remain visible above the leaves.
Part 23 – Add Pinecones and Berry Clusters
Arrange the pinecones between the mushrooms.
Distribute them evenly without making the design perfectly symmetrical.
Add white berry clusters to brighten the darker green sections.
Secure all pieces firmly with yarn or strong sewing thread.
Part 24 – Attach the Large Christmas Bow
Position the burgundy bow at the top center of the wreath.
Allow the pointed tails to hang naturally toward the circular opening.
Sew the bow securely to the wreath base.
Adjust the loops so they remain rounded and full.
Part 25 – Create the Hanging Loop
Using burgundy or forest-green yarn, ch 35.
Sl st back along the chain for reinforcement.
Fold the cord into a loop.
Sew both ends securely to the back of the wreath at the top.
Test the loop to ensure it supports the full weight of the decoration.
Part 26 – Final Woodland Arrangement
Hold the wreath upright and inspect the overall shape.
Adjust the leaves so they frame the circular opening evenly.
Reposition any mushrooms hidden behind larger leaves.
Fill remaining gaps with additional small leaves or white berries.
Make sure the red bow remains the main focal point.
Part 27 – Final Finishing
Weave in all loose yarn ends.
Trim any excess threads.
Gently shape the mushroom caps and bow loops.
Check that every decorative element is securely attached.
Your handmade crochet Christmas woodland wreath is ready to display!
Creative Color Variations
Classic Woodland Christmas: forest green, olive green, burgundy, ivory and brown.
Snowy Forest: sage green, cream, soft gray and muted red.
Rustic Cottage: moss green, terracotta, beige and chocolate brown.
Elegant Christmas: deep emerald, burgundy, champagne and ivory.
Natural Winter: eucalyptus green, oatmeal, white and warm brown.
Care and Storage Instructions
Dust the wreath gently with a soft brush.
Spot clean with a lightly damp cloth if necessary.
Avoid soaking the wreath, especially if using a foam or wire base.
Keep away from direct flames and excessive moisture.
Store flat in a large box between holiday seasons.
Use tissue paper to support the bow and mushroom shapes.
Frequently Asked Questions
This project is best for intermediate crocheters. However, beginners can complete it by making the individual decorations one at a time and practicing the basic stitches first.
Yes. You can use a sturdy wire wreath frame, a wrapped rope ring or a crocheted stuffed circular tube.
Approximately 30–40 leaves create a full appearance for a 35 cm wreath. The exact number depends on their size and how closely you overlap them.
Yes, provided the door is sheltered from rain and direct weather exposure. Cotton and acrylic yarn decorations are best displayed indoors or on a protected porch.
Absolutely. Small crochet bells, stars, holly leaves, miniature ornaments or snowflakes can replace the mushrooms while keeping the woodland-inspired design.
Use firm crochet tension and consider adding a thin flexible support inside the bow loops. You can also lightly block the bow before attaching it.
Yes. Use a 20–25 cm wreath base, smaller leaves and mushrooms, and reduce the bow dimensions proportionally.
The finished Crochet Christmas Woodland Wreath Pattern – Mushrooms, Leaves & Red Bow