Crochet Christmas Wreath Pattern with Poinsettias, Pinecones & Bells
Beginner Friendly
Perfect for those just starting their crochet journey, with clear instructions and simple techniques
Single-Day Project
A satisfying project you can complete in a single afternoon or evening.
Handmade Gift
A beautiful keepsake — free forever. Read online or print at home.
About This Crochet Christmas Wreath Pattern with Poinsettias, Pinecones & Bells
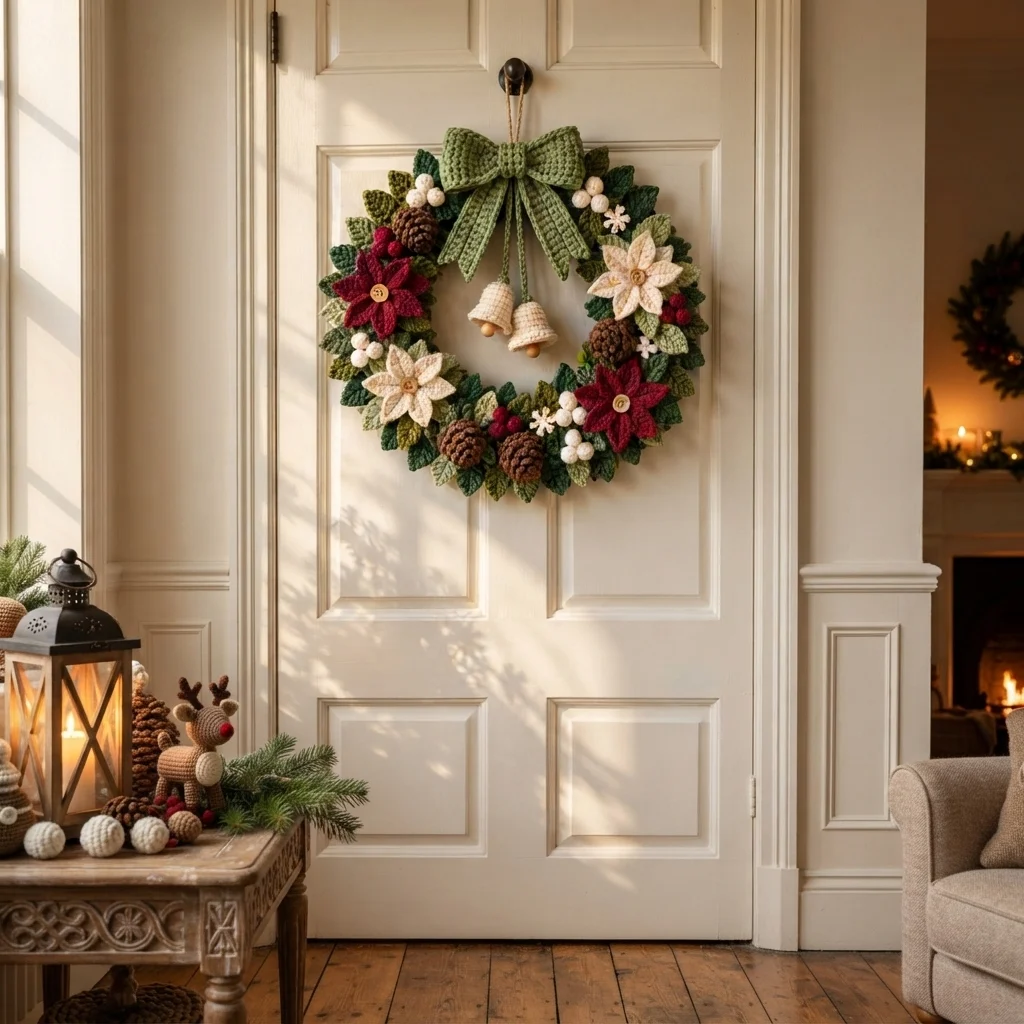
This crochet Christmas wreath pattern creates a warm, traditional holiday decoration made almost entirely from yarn. Layered leaves in several shades of green form the full wreath base, while deep red and cream poinsettias, crochet pinecones, berries and tiny snowflakes add beautiful handmade detail.
The oversized sage-green crochet bow is the focal point at the top, with two little cream bells hanging into the center. The finished wreath looks lovely on a front door, above a fireplace or as part of a cozy Christmas wall display.
Materials
- Worsted #4 yarn – dark forest green 200-250 g
- Worsted #4 yarn – medium olive green 150-200 g
- Worsted #4 yarn – light sage green 150-200 g
- Worsted #4 yarn – deep Christmas red 100-150 g
- Worsted #4 yarn – warm cream 100-150 g
- Worsted #4 yarn – medium brown 80-100 g
- 3.5 mm crochet hook 1
- 4.0 mm crochet hook 1
- Foam or wrapped wreath ring 35-40 cm
- Wooden buttons 4
- Wooden beads for bell clappers 2
- Yarn needle 1
- Scissors 1 pair
- Stitch markers optional
Abbreviations
MRmagic ringchchainsl stslip stitchscsingle crochethdchalf double crochetdcdouble crochettrtreble crochetincincreasedecdecreaseststitchstsstitchesFOfasten offFinished Size
- Wreath: approximately 42-46 cm across
- Large poinsettias: approximately 10-12 cm
- Pinecones: approximately 6-8 cm
- Bow: approximately 25-28 cm across
- Bells: approximately 6 cm tall
Wreath Base
You can use a foam wreath ring or any sturdy circular wreath form. Covering it with yarn first prevents gaps from showing between the crochet leaves.
- Wrap dark green yarn tightly around the entire wreath form.
- Keep each wrap close to the previous one so the base is completely covered.
- Tie securely at the back.
- Hide the yarn ends underneath the wrapped strands.
Large Crochet Leaves
Make the leaves in dark green, olive and sage. Slight variations in size will make the wreath look more natural.
Leaf Pattern
- Ch 12.
- Starting in the 2nd ch from hook: sl st, sc, hdc, dc, tr, tr, dc, hdc, sc, sl st.
- Work 3 sc into the final chain.
- Continue along the opposite side of the foundation chain.
- Work sl st, sc, hdc, dc, tr, tr, dc, hdc, sc, sl st.
- Join with sl st.
- FO leaving a long tail for sewing.
Make approximately 35-45 leaves in mixed green shades.
Pointed Holly-Style Leaves
Add several pointed leaves around the flowers to create extra texture.
- Ch 13.
- Sc in 2nd ch from hook.
- Hdc in next st.
- Dc in next 2 sts.
- Tr in next 3 sts.
- Dc in next 2 sts.
- Hdc, then sc.
- Work 3 sc into the final chain.
- Repeat along the opposite side.
- For the pointed texture, work small ch-2 picots evenly around the outer edge.
- FO.
Large Poinsettia Flowers
Make two deep red poinsettias and two warm cream poinsettias.
Flower Center
- Make a MR.
- Work 8 sc into the ring.
- Pull closed and join.
First Layer of Petals
- *Ch 6.
- Starting in 2nd ch: sc, hdc, dc, tr, dc.
- Sl st into the next center stitch.*
- Repeat around to create 8 pointed petals.
Second Layer
- Working behind the first petals, join yarn around a center post.
- *Ch 7.
- Starting in 2nd ch: sc, hdc, dc, tr, tr, dc.
- Sl st around the next center post.*
- Repeat around.
Sew a small wooden button securely into the center of each flower.
Crochet Pinecones
Make approximately 4-5 brown pinecones.
- With brown yarn, ch 25.
- Work 3 dc into the 3rd ch from hook.
- Work 3 dc into every remaining chain.
- The strip will naturally curl into a spiral.
- Roll the spiral tightly from one end.
- Shape it into a tapered pinecone.
- Use the yarn tail to stitch through the center several times.
- Secure firmly at the back.
Red Berry Clusters
Make small red crochet balls to fill spaces between the larger decorations.
One Berry
- MR, 6 sc. (6)
- Inc around. (12)
- Sc around. (12)
- Dec around. (6)
- Add a tiny amount of stuffing or yarn scraps.
- Close the opening.
Group the berries in clusters of three.
Cream Berry Clusters
Repeat the same berry pattern using cream yarn. Make approximately 12-15 individual cream berries and arrange them in small clusters around the wreath.
Mini Crochet Snowflakes
- MR.
- *Ch 4.
- Sl st into 2nd ch from hook.
- Ch 2.
- Sl st back into MR.*
- Repeat 6 times.
- Pull ring closed.
- FO and block lightly.
Make 3-5 tiny cream snowflakes.
Large Sage Crochet Bow
The oversized bow at the top gives this wreath its distinctive handmade look.
Main Bow Strip
- With sage yarn, ch 18.
- Sc in 2nd ch from hook and across. (17)
- Ch 1, turn.
- Sc across.
- Repeat until the strip measures approximately 55-60 cm.
- FO.
Form the Bow
- Bring both ends of the strip toward the center, overlapping slightly.
- Stitch the overlapping ends together.
- Pinch the center firmly.
- Wrap yarn around the center several times.
Center Band
- Ch 9.
- Sc across for approximately 10-12 rows.
- Wrap this small rectangle around the pinched bow center.
- Sew securely at the back.
Bow Tails
Make two long sage-green strips.
- Ch 13.
- Sc across.
- Continue in rows until each strip measures approximately 25-30 cm.
- FO.
- Fold or trim the lower ends into a pointed shape.
- Sew both tails behind the bow.
Crochet Christmas Bells
Make two small cream bells to hang from the center of the bow.
Bell Pattern
- MR, 6 sc. (6)
- Inc around. (12)
- *Sc, inc* around. (18)
- Sc around for 5 rounds.
- *2 sc, inc* around. (24)
- Sc around.
- Work one final round of reverse sc or regular sc for a firm rim.
- FO.
Bell Clapper
- Thread a wooden bead onto a strong strand of yarn.
- Pass the yarn through the top center of the bell.
- Secure it so the bead hangs just below the opening.
Bell Hanging Cords
- Ch approximately 35-45 with sage yarn.
- FO.
- Attach one end to a cream bell.
- Secure the opposite end behind the bow.
- Make the second cord slightly shorter for a natural staggered look.
Assembling the Wreath
Arrange everything before permanently attaching the pieces.
- Place the large sage bow at the top center.
- Arrange the green leaves around the entire wreath, overlapping them heavily.
- Alternate dark, medium and light green leaves.
- Position one red poinsettia on the upper-left side.
- Place one cream poinsettia below it.
- Place another cream poinsettia on the upper-right side.
- Add the second red poinsettia toward the lower-right side.
- Position the brown pinecones between the flowers.
- Add red and cream berry clusters to fill smaller gaps.
- Add the tiny snowflakes sparingly.
- Sew each piece securely to the wrapped wreath base.
- Attach the two bells beneath the center of the bow.
Suggested Color Palette
- Bow: muted sage green
- Main leaves: forest green, olive and sage
- Flowers: burgundy red and warm ivory
- Pinecones: medium chocolate brown
- Berries: burgundy and cream
- Bells: warm cream
- Buttons: natural wood
Alternative Christmas Color Ideas
- Traditional: forest green + bright red + cream
- Vintage: olive + burgundy + antique ivory
- Neutral: sage + cream + caramel brown
- Snowy: white + silver gray + sage
- Elegant: dark green + wine red + champagne
Hanging Loop
- Cut two or three long strands of strong yarn.
- Pass them around the top of the wreath base behind the bow.
- Tie securely.
- Create a loop large enough for your door hook.
- Hide the knot behind the bow.
Finishing
- Weave in all visible yarn ends.
- Check every flower, pinecone and berry cluster.
- Shape the leaves with your fingers.
- Gently steam-block the bow and flower petals if your yarn allows it.
- Arrange the hanging bells so they sit at slightly different heights.
- Fluff the leaves around the outer and inner edges.
Frequently Asked Questions
Yes. You can use a wire wreath frame, wrapped cardboard ring or another firm circular base. The base should be strong enough to support all the crochet decorations without bending.
Yes, although using several green shades creates more depth and helps the individual leaves remain visible once they overlap.
No. You can crochet small circular centers, use beads or embroider the flower centers instead.
The crochet bell itself is decorative. Adding a small wooden or metal bead inside gives it movement, while a real miniature jingle bell can be used if you want an audible sound.
Yes. Use a smaller wreath base and reduce the number of leaves, berries and pinecones. The flower and bow patterns can remain the same or be made with thinner yarn and a smaller hook.
Yes. Leave off the hanging loop and bells, place the wreath flat and use the center opening for a battery-operated candle, vase or other holiday decoration.
The finished Crochet Christmas Wreath Pattern with Poinsettias, Pinecones & Bells

