Crochet Fall Door Hanging Pattern – Pumpkins, Leaves & Pinecones
Beginner Friendly
Perfect for those just starting their crochet journey, with clear instructions and simple techniques
Single-Day Project
A satisfying project you can complete in a single afternoon or evening.
Handmade Gift
A beautiful keepsake — free forever. Read online or print at home.
About This Crochet Fall Door Hanging Pattern – Pumpkins, Leaves & Pinecones
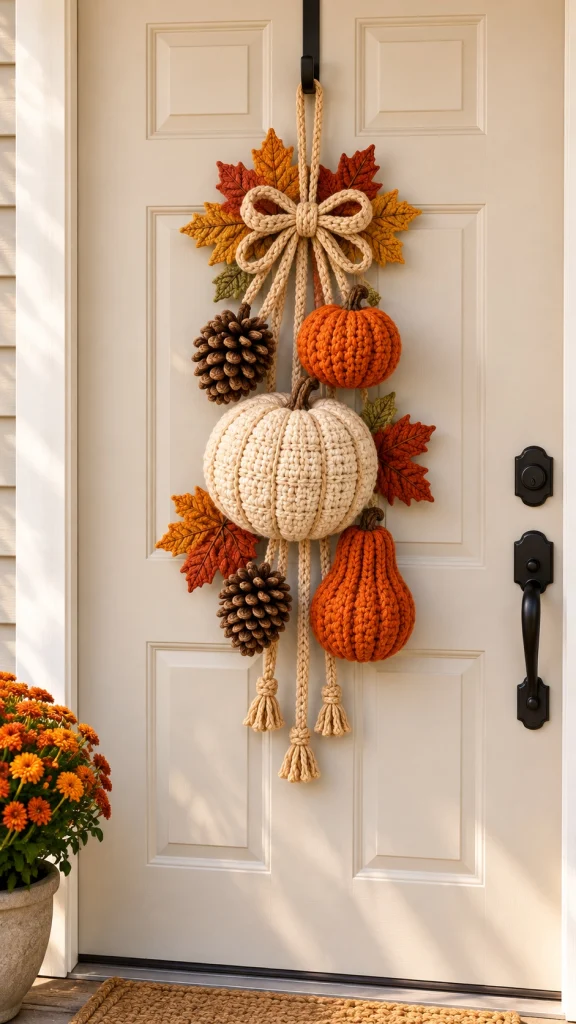
This crochet fall door hanging pattern creates a warm autumn decoration filled with handmade texture and classic seasonal colors. Instead of a traditional round wreath, this design hangs vertically from the door and combines crochet pumpkins, autumn leaves, pinecones, a large decorative bow and long braided cords finished with tassels.
The centerpiece is a large ivory pumpkin surrounded by smaller orange pumpkins and a tall ribbed crochet gourd. Rust, mustard and olive leaves frame the arrangement while two pinecones add natural woodland texture.
Hang it on a front door, interior door, entryway hook or covered porch for a cozy handmade autumn look.
Materials
- Ivory / cream worsted yarn 200–250 g
- Burnt orange yarn 150–180 g
- Mustard yarn 50 g
- Rust yarn 50 g
- Olive green yarn 40 g
- Dark brown yarn 50 g
- Tan / natural yarn for bow and cords 120–150 g
- 4.0–4.5 mm crochet hook 1
- Polyester fiberfill 250–350 g
- Yarn needle 1
- Stitch markers 4
- Scissors 1 pair
- Strong thread or yarn for assembly as needed
- Optional floral wire for shaping leaves
Abbreviations – US Terms
MRmagic ringchchainsl stslip stitchscsingle crochethdchalf double crochetdcdouble crochettrtreble crochetBLOback loop onlyinc2 sc in same stitchdecsingle crochet decreaseFOfasten offFinished Size
The complete hanging measures approximately 65–75 cm / 26–30 in long from the upper hanging loop to the lowest tassel.
At the widest point, the leaf and bow arrangement measures approximately 30–35 cm / 12–14 in.
The large ivory pumpkin measures approximately 20–22 cm / 8–9 in across.
Part 1 – Large Ivory Pumpkin
Using ivory yarn:
Ch 31.
Row 1
Sc in 2nd ch from hook and in each ch across. Ch 1, turn. 30 sts.
Rows 2–42
Sc BLO in each stitch across. Ch 1, turn.
The BLO stitches create the deep vertical ribs visible on the finished pumpkin.
FO, leaving a long tail.
Part 2 – Shaping the Large Pumpkin
Fold the rectangle so the first and last rows meet.
Using the long yarn tail, sew the short edges together.
Thread yarn around one open edge and pull tightly to close.
Turn the pumpkin right side out.
Stuff firmly with fiberfill while keeping the shape rounded rather than completely spherical.
Gather the second opening and pull closed.
Secure firmly.
Part 3 – Sculpting the Pumpkin Ribs
Thread a long strand of ivory yarn through the center of the pumpkin.
Wrap the yarn around the outside following one rib.
Pull gently until a deep groove forms.
Repeat around the pumpkin approximately 6–8 times.
Keep each section approximately equal in width.
Knot securely underneath.
Part 4 – Large Pumpkin Stem
Using dark brown yarn:
R1: MR, 6 sc. (6)
R2–7: sc around. (6)
Stuff very lightly.
FO leaving a sewing tail.
Sew the stem firmly into the center top of the ivory pumpkin.
Part 5 – Small Orange Pumpkin
Using burnt orange yarn:
Ch 21.
Row 1: sc in 2nd ch from hook and across. (20)
Rows 2–30: sc BLO across.
FO with a long tail.
Join the short sides, gather the bottom, stuff firmly and close the top.
Use a long strand of orange yarn to create 6 pumpkin sections.
Add a small brown stem.
Part 6 – Tall Crochet Gourd
Using burnt orange yarn:
Ch 27.
Row 1: sc in 2nd ch from hook and across. (26)
Rows 2–34: sc BLO across.
Join the first and last rows.
Gather the bottom tightly.
Stuff the lower section generously and use slightly less stuffing near the top to create a pear-shaped silhouette.
Close the top.
Wrap matching yarn vertically around the gourd 6–8 times to create deep ribs.
Part 7 – Gourd Stem
Using brown yarn:
R1: MR, 5 sc. (5)
R2–8: sc around.
FO and sew to the top of the gourd.
Bend the stem slightly while sewing for a more natural handmade appearance.
Part 8 – Crochet Maple Leaves
Make approximately 8–10 leaves using rust, mustard, burnt orange and olive yarn.
Ch 13.
Starting in 2nd ch from hook:
sl st, sc, hdc, dc, tr, dc, hdc, sc.
Work the remaining stitches to form the pointed outer section.
Rotate the work and crochet along the opposite side of the foundation chain.
Mirror the stitches to create the second half of the leaf.
Part 9 – Leaf Lobes
To create the maple-like silhouette, work several pointed sections around the outer edge:
*sc, hdc, dc, tr, ch 2, sl st into 2nd ch, tr, dc, hdc, sc*
Repeat the pointed sequence where needed to form approximately 5 main lobes.
Sl st to finish.
FO leaving a sewing tail.
Part 10 – Leaf Veins
Using dark brown or matching yarn, surface crochet or embroider one central vein from the stem toward the tip.
Add smaller diagonal veins toward each lobe.
This extra detail makes the leaves look much more dimensional when displayed on the door.
Part 11 – Crochet Pinecones
Make 2 pinecones using dark brown yarn.
R1: MR, 6 sc. (6)
R2: inc around. (12)
R3: (sc, inc) around. (18)
R4–9: sc around.
R10: (sc, dec) around. (12)
Stuff lightly.
R11: dec around. (6)
Close and FO.
Part 12 – Pinecone Scales
Join brown yarn around the pinecone body.
Work small textured scales over the surface:
*sl st, ch 3, 2 dc in same stitch, ch 1, sl st into next stitch.*
Continue in a spiral around the pinecone.
Stagger each row of scales so they overlap slightly.
Repeat until the entire pinecone is covered.
Part 13 – Large Crochet Bow
Using tan / natural yarn:
Ch 81.
Sl st into the first chain to form a large loop, being careful not to twist.
Rounds 1–3: sc around.
FO.
Flatten the loop so two equal bow loops form on either side.
Part 14 – Bow Tails
Make 4 long decorative tails.
For each tail:
Ch 45–55.
Sl st or sc back along the chain.
FO.
For thicker tails, make a second row of sc along the opposite side.
Arrange the tails so they fall naturally behind the pumpkins.
Part 15 – Bow Center
Ch 10.
Sc in 2nd ch from hook and across.
Work approximately 5–6 rows.
Wrap the rectangle tightly around the center of the flattened bow.
Sew securely at the back.
Part 16 – Braided Hanging Loop
Cut 6 strands of tan yarn approximately 100 cm / 39 in long.
Divide into three groups.
Braid tightly until the cord measures approximately 35–40 cm / 14–16 in.
Fold in half to create the hanging loop.
Sew both ends securely behind the bow and leaf cluster.
Part 17 – Long Hanging Cords
Create 3–5 cords of different lengths.
Suggested finished lengths:
- 35 cm / 14 in
- 42 cm / 16.5 in
- 48 cm / 19 in
- 55 cm / 21.5 in
Use crochet chains, Romanian cords or simple braids.
The slightly different lengths create the cascading appearance of the finished decoration.
Part 18 – Crochet Tassels
Wrap tan yarn approximately 20–25 times around a piece of cardboard measuring about 8 cm / 3 in.
Tie securely at the top.
Cut the opposite end.
Wrap yarn several times around the tassel approximately 1.5 cm below the top.
Knot securely and trim the bottom evenly.
Make 3 tassels.
Part 19 – Upper Leaf Arrangement
Lay the large bow flat.
Position several crochet leaves behind it in a fan shape.
Use:
- 2 mustard leaves
- 2 rust leaves
- 2 burnt orange leaves
- 1–2 olive leaves
Allow the pointed leaf tips to extend beyond the bow.
Sew only the centers and lower sections of the leaves so their edges remain dimensional.
Part 20 – Attaching the Large Pumpkin
Position the large ivory pumpkin slightly below the center of the arrangement.
Run strong yarn through the back of the pumpkin several times.
Secure it to at least two hanging cords rather than only one.
This prevents the heavier centerpiece from twisting when the decoration hangs vertically.
Part 21 – Attaching the Small Pumpkins
Position the small round orange pumpkin toward the upper right side.
Place the tall orange gourd toward the lower right side.
Leave enough space between the pieces so the large ivory pumpkin remains the visual centerpiece.
Sew each pumpkin securely through several stitches on the back.
Part 22 – Attaching the Pinecones
Place one pinecone toward the upper left side.
Position the second pinecone below the large ivory pumpkin.
Sew through the center core rather than the decorative scales.
This keeps the textured scales loose and dimensional.
Part 23 – Adding Lower Leaves
Arrange additional rust, mustard and olive leaves around the pumpkins.
Tuck some leaves partially behind the large pumpkin and gourd.
Allow others to extend outward.
Avoid placing every leaf at exactly the same angle—the asymmetry gives the piece a natural autumn arrangement.
Part 24 – Final Assembly
Place the complete decoration on a flat surface.
Check that the weight is balanced on both sides.
Reinforce every heavy element with additional stitches.
Hide all yarn tails behind the decoration.
Attach the tassels to the lowest hanging cords.
Gently shape the bow loops, leaves and pumpkins with your hands.
Suggested Color Palette
Main pumpkin: warm ivory.
Small pumpkins: burnt pumpkin orange.
Bow and cords: natural cream or light oatmeal.
Pinecones: chocolate brown.
Leaves: mustard, rust, burnt orange and muted olive.
Stems: dark brown.
This palette creates the warm farmhouse autumn appearance of the finished door hanging.
Alternative Color Ideas
Neutral Fall: ivory, camel, taupe, chocolate and sage.
Classic Autumn: pumpkin orange, mustard, burgundy, olive and brown.
Modern Farmhouse: cream, muted terracotta, sage and walnut brown.
Soft Autumn: dusty peach, oatmeal, moss and warm beige.
Dark Cottage: burgundy, forest green, burnt orange and deep brown.
Where to Display It
- Front door
- Interior entryway door
- Covered porch
- Kitchen door
- Wall hook
- Fireplace surround
- Entryway console area
- Thanksgiving dining room wall
Care Instructions
Because this decoration contains stuffed pieces, spot cleaning is recommended.
Use a damp cloth with a small amount of mild detergent.
Do not heavily soak the pumpkins or pinecones.
Allow the decoration to air dry completely before storing.
Store it flat or loosely wrapped in tissue paper so the leaves and bow do not become crushed.
Frequently Asked Questions
The individual pieces use mostly basic stitches, but the project is best suited to an adventurous beginner or intermediate crocheter because it requires shaping, stuffing and assembling several separate components.
Yes. Reduce both the starting chain and the number of BLO rows. Keep the rectangle approximately proportional so the pumpkin remains full and rounded after gathering.
Yes. Cotton creates excellent stitch definition, especially for the leaves and pumpkins. Acrylic yarn produces a slightly softer and lighter decoration.
It is best on an interior door or a covered porch protected from rain and strong direct weather. Yarn and stuffing can retain moisture if exposed outdoors.
Attach the heavier pumpkins to two points instead of a single cord. Several hidden stitches through the back of each pumpkin will help keep the front facing outward.
Yes. Replace them with additional leaves, small pumpkins, crochet acorns or berry clusters.
Yes. Keep the warm orange, cream, mustard and brown palette and add crochet acorns or small berry clusters for an even more traditional Thanksgiving look.
The finished Crochet Fall Door Hanging Pattern – Pumpkins, Leaves & Pinecones

