Crochet Floral Wall Hanging Pattern
Beginner Friendly
Perfect for those just starting their crochet journey, with clear instructions and simple techniques
Single-Day Project
A satisfying project you can complete in a single afternoon or evening.
Handmade Gift
A beautiful keepsake — free forever. Read online or print at home.
About This Crochet Floral Wall Hanging Pattern
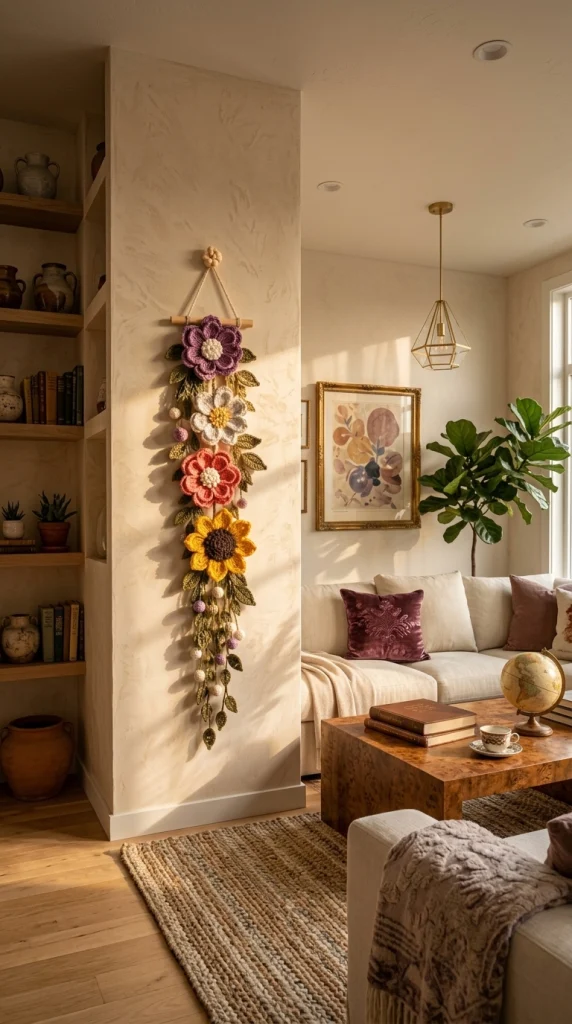
This crochet floral wall hanging pattern creates a long cascading arrangement of dimensional flowers, textured leaves, berries and trailing greenery inspired by the photographed piece. Deep purple, soft ivory, coral and golden sunflower blooms are arranged vertically beneath a small wooden dowel, giving the decoration the look of a handmade hanging bouquet.
The design uses several separately crocheted elements rather than a flat appliqué construction. Each large flower has layered petals, the sunflower has a textured dark center, and the greenery combines individual leaves, vines and small berry-like accents. Expect approximately 10-14 hours of crochet and assembly, depending on how much shaping and blocking you give the individual motifs.
This is an advanced decorative project for crocheters who enjoy detailed floral work and careful assembly. The finished hanging works beautifully on a narrow wall, beside a bookcase, in an entryway or as a soft botanical accent in a cozy living room.
Materials
- DK cotton yarn in deep purple approximately 35 g
- DK cotton yarn in ivory approximately 35 g
- DK cotton yarn in coral/rust approximately 35 g
- DK cotton yarn in golden yellow approximately 40 g
- DK cotton yarn in dark brown approximately 20 g
- DK cotton yarn in mustard/olive green approximately 70 g
- DK cotton yarn in cream and muted mauve small amounts for berries
- 3.5 mm crochet hook main motifs
- 3.0 mm crochet hook firmer vines and berries
- Wooden dowel approximately 22-25 cm long
- Strong cotton cord for hanging loop
- Floral wire optional, for shaping leaves and stems
- Yarn needle for assembly
- Stitch markers as needed
- Scissors 1 pair
- Blocking mat and pins recommended
Abbreviations
MRmagic ringchchainsl stslip stitchscsingle crochethdchalf double crochetdcdouble crochettrtreble crochetinc2 sc in the same stitchdecsingle crochet decreaseBLOback loop onlyFLOfront loop onlyFOfasten offLarge Purple Layered Flower
- With cream yarn, make an MR.
- Round 1: Work 6 sc in MR. Join with sl st. (6)
- Round 2: Inc in each st around. Join. (12)
- Round 3: Working in FLO, *ch 3, 3 dc in next st, ch 3, sl st in next st*. Repeat 6 times to create 6 small center petals.
- Change to deep purple and work into the unused back loops of Round 2.
- Round 4: *Ch 5, sl st in next back loop*. Repeat around to create 12 petal foundations.
- Round 5: In each ch-5 loop work sc, hdc, 3 dc, hdc, sc.
- Round 6: Working behind the petals, *ch 7, sl st around the base between petals*. Repeat 12 times.
- Round 7: In each ch-7 loop work sc, hdc, dc, 3 tr, dc, hdc, sc.
- FO leaving a long tail for assembly.
- Shape the outer petals outward while keeping the cream center slightly raised.
Ivory Daisy Flower
- With golden yellow yarn, make an MR.
- Round 1: 6 sc in MR. (6)
- Round 2: Inc around. (12)
- Round 3: *Sc, inc*. Repeat around. (18)
- Change to ivory yarn.
- Round 4: *Ch 7, sl st in next st*. Repeat around to form 18 petal loops.
- Round 5: In each loop work sc, hdc, 3 dc, hdc, sc.
- FO and leave a long sewing tail.
- Steam-block lightly, pulling the petals into an open daisy shape.
Coral Layered Flower
- With cream yarn, make an MR.
- Round 1: 6 sc in MR. (6)
- Round 2: Inc in each st. (12)
- Round 3: *Ch 4, 2 dc in next st, ch 4, sl st in next st*. Repeat 6 times.
- Change to coral/rust yarn.
- Round 4: Working behind the first petals, *ch 6, sl st around the base between petals*. Repeat 6 times.
- Round 5: In each ch-6 loop work sc, hdc, 4 dc, hdc, sc.
- Round 6: Working behind Round 5, *ch 8, sl st between petals*. Repeat 6 times.
- Round 7: In each ch-8 loop work sc, hdc, dc, 4 tr, dc, hdc, sc.
- FO leaving a long tail.
Golden Sunflower
- With dark brown yarn, make an MR.
- Round 1: 6 sc in MR. (6)
- Round 2: Inc around. (12)
- Round 3: *Sc, inc*. Repeat around. (18)
- Round 4: *2 sc, inc*. Repeat around. (24)
- Round 5: *3 sc, inc*. Repeat around. (30)
- Round 6: Work 30 sc in BLO to create a defined outer edge. (30)
- Change to golden yellow yarn.
- Round 7: Working in the unused front loops from Round 6, *ch 8, sl st in next loop*. Repeat around. (30 petal loops)
- Round 8: In each ch-8 loop work sc, hdc, dc, 3 tr, dc, hdc, sc.
- Round 9: Working behind the first petal layer, *ch 9, sl st between the next two petals*. Repeat around. (30 loops)
- Round 10: In each loop work sc, hdc, 2 dc, 3 tr, 2 dc, hdc, sc.
- FO leaving a long tail.
Large Pointed Leaves – Make 12-16
- With olive green yarn, ch 13.
- Row 1: Sc in second ch from hook, hdc, dc in next 3 sts, tr in next 2 sts, dc in next 3 sts, hdc, 3 sc in final ch.
- Continue down the opposite side of the foundation chain: hdc, dc in next 3 sts, tr in next 2 sts, dc in next 3 sts, hdc, sc.
- Join with sl st at the base.
- Edging: Ch 1 and sc evenly around, working (sc, ch 2, sc) into the tip to sharpen the point.
- Surface detail: Sl st from the base to the tip along the foundation chain to create the central vein.
- FO leaving a long tail.
Small Leaves – Make 16-20
- Ch 9 with olive or mustard-green yarn.
- Sc in second ch, hdc, dc in next 2 sts, tr, dc, hdc, 3 sc in final ch.
- Continue along opposite side: hdc, dc, tr, dc in next 2 sts, hdc, sc.
- Join with sl st.
- Sl st along the center chain to emphasize the vein.
- FO leaving a sewing tail.
Crochet Berries – Make 14-18
- Use cream, muted purple or soft pink yarn.
- Round 1: 6 sc in MR. (6)
- Round 2: Inc around. (12)
- Rounds 3-4: Sc around. (12)
- Round 5: Dec around. (6)
- Add a tiny amount of stuffing before closing.
- Cut yarn and thread through the remaining 6 stitches.
- Pull closed and secure.
- Leave a long tail for attaching the berry to a vine.
Main Trailing Vines – Make 5
- With olive yarn, ch between 70 and 110 depending on the desired finished length.
- Starting in second ch from hook, sl st into every chain for a firm vine.
- At irregular intervals, ch 8-12, turn and sl st back along the branch chain before continuing along the main vine.
- Make each vine a different length to create the tapered cascading shape.
- FO leaving a long attachment tail.
Leafy Side Vines – Make 4
- Ch 55 with olive green yarn.
- Sl st in second ch and next 5 ch.
- *Ch 8 for a branch, work a Small Leaf onto the branch end, sl st back down the branch, then sl st in next 7 sts of main chain.*
- Repeat from * to * until 5-6 leaves have been distributed along the vine.
- Alternate the direction of the leaves as you work.
- FO and leave a long tail.
Small Decorative Buds – Make 8
- Round 1: With purple, cream or coral yarn, make 6 sc in MR. (6)
- Round 2: Inc around. (12)
- Round 3: Sc around. (12)
- Round 4: *Sc, dec*. Repeat around. (8)
- Lightly stuff.
- Round 5: Dec around. (4)
- Close the remaining opening and leave a long tail.
Top Hanging Cord
- Cut approximately 80 cm of strong cotton cord or crochet a chain approximately 80 cm long.
- Fold the cord in half to find the center.
- Tie or sew each end securely to the wooden dowel approximately 2 cm from each end.
- Adjust until the dowel hangs horizontally.
- Secure the knots with several hidden stitches if using crocheted cord.
Flower Support Strips
- Make 4 narrow support cords by chaining 30-45 stitches and slip stitching back along each chain.
- Attach one support cord behind each large flower.
- Arrange the purple flower at the top, followed by the ivory flower, coral flower and sunflower.
- Leave approximately 4-7 cm between the main flowers so the surrounding leaves remain visible.
- Attach the upper end of every support strip firmly around the wooden dowel.
Finishing
Lay the four large flowers in a vertical line, with the purple bloom at the top and the sunflower toward the lower portion of the hanging. Arrange the largest green leaves behind each flower before sewing them in place. Allow the leaves to point outward rather than straight down so the arrangement develops a natural bouquet shape.
Position the long vines behind the flowers and let them extend progressively farther toward the bottom. Sew small leaves, buds and stuffed berries along these vines, concentrating more details around the flowers and leaving more open space near the lowest tips. Attach all components securely to the central support cords rather than relying on individual flower stitches to carry the weight.
Finally, attach the entire arrangement to the wooden dowel and add the hanging cord. Hold the piece upright before securing the final knots so you can correct any twisting. Lightly steam-block the leaves and petals once more while the wall hanging is flat, then allow it to dry completely before hanging.
Tips for Success
- Use cotton yarn with good stitch definition so the layered petals and leaf veins remain crisp.
- Block the leaves individually and pin their tips into shape before assembly.
- Place the darkest colors near the top and center, then distribute small matching accents farther down the vines to visually connect the arrangement.
- Sew leaves behind the flowers at several points rather than only at their bases; this prevents them from folding forward after the piece is hung.
- Hang the unfinished arrangement temporarily before adding the berries so you can see where small accents are actually needed.
Common Mistakes to Avoid
- Making every vine the same length: Use several different lengths to create the tapered cascading silhouette shown in the inspiration.
- Attaching flowers only through one stitch: Sew each large flower at several points around its center so it stays flat against the arrangement.
- Overcrowding the bottom: Keep the lower vines lighter and more open so the hanging finishes in delicate trailing points.
- Skipping blocking: Unblocked petals and leaves can curl inward and hide the layered details. Shape each motif before assembly.
- Using a weak top cord: The completed piece contains many motifs, so use sturdy cotton cord and secure it firmly to both ends of the dowel.
Ways to Customize This Pattern
- Create a spring version using blush pink, lavender, cream and fresh sage green.
- For a stronger autumn look, replace the purple flower with burgundy and use rust, mustard, olive and warm cream throughout.
- Add more sunflowers and shorten the vines for a wider farmhouse-style wall decoration.
- Replace some berries with small crochet acorns for an autumn woodland version.
- Use a natural branch instead of a wooden dowel for a more rustic botanical appearance.
Frequently asked questions
Build the arrangement around several strong central support cords and attach the large flowers at multiple points. Before finishing, hang the piece temporarily and adjust the vines until the weight is balanced on both sides.
Yes. Shorten the main vines and place the four flowers closer together. For a compact version around 50 cm long, reduce each vine by approximately 20-30 chains and leave only 2-4 cm between the large flowers.
Wire is optional. Cotton leaves hold their shape well after blocking, but thin floral wire can be stitched discreetly along the back of the larger leaves if you want to position them more precisely.
Do not press the petals completely flat when blocking. Shape the inner petals slightly upward and the outer petals outward. Layered petal rounds should overlap naturally around the raised centers.
Yes, but keep the decoration protected from rain and prolonged direct sunlight. For a door version, use washable cotton yarn and secure every motif more firmly because the hanging will move whenever the door opens.
The finished Crochet Floral Wall Hanging Pattern

