Crochet Flower Bag Pattern – Floral Summer Shoulder Bag
Beginner Friendly
Perfect for those just starting their crochet journey, with clear instructions and simple techniques
Single-Day Project
A satisfying project you can complete in a single afternoon or evening.
Handmade Gift
A beautiful keepsake — free forever. Read online or print at home.
About This Crochet Flower Bag Pattern – Floral Summer Shoulder Bag
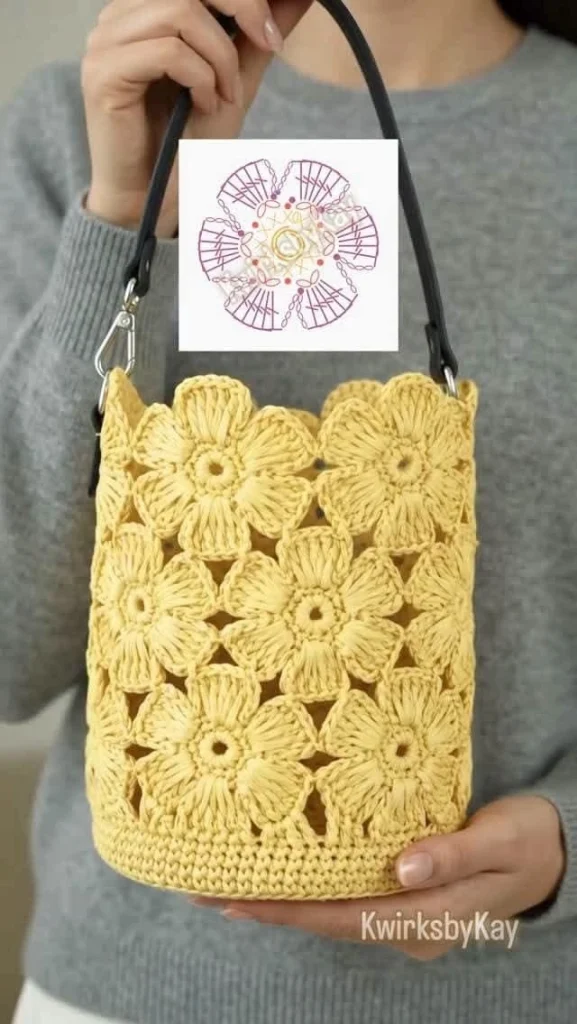
This crochet flower bag pattern creates a beautiful handmade shoulder bag covered with large six-petal crochet flowers. The open spaces between the motifs give the bag a light, summery look, while the tightly crocheted bottom keeps the shape sturdy enough for everyday use.
The original design looks especially pretty in soft butter yellow, but you can easily make it in cream, sage, dusty pink, terracotta or any color that matches your wardrobe.
Materials
- DK or light worsted cotton yarn 250–350 g
- 3.0–3.5 mm crochet hook 1
- Yarn needle 1
- Scissors 1 pair
- Stitch markers 4–6
- 2 metal D-rings optional
- 2 swivel clasps optional
- Shoulder strap – leather or faux leather 1
- Cotton fabric for lining optional
- Magnetic snap optional
Abbreviations – US Terms
MRmagic ringchchainsl stslip stitchscsingle crochethdchalf double crochetdcdouble crochettrtreble crochetyoyarn overst(s)stitch(es)FOfasten offFinished Size
Approximately 25 cm wide × 30 cm tall / 10 × 12 in, excluding the shoulder strap.
The size is easy to adjust by adding or removing flower motifs.
Construction Overview
The bag is made in four main sections:
- Crochet individual six-petal flower motifs.
- Join the flowers into a rectangular openwork body.
- Crochet a dense oval or rounded base.
- Add the upper edge, side attachment points and shoulder strap.
For a bag close to the pictured proportions, make approximately 12–14 full flower motifs, plus smaller joining sections where necessary.
Part 1 – Six-Petal Flower Motif
Make enough motifs for the front and back of the bag.
Round 1 – Flower Center
Make a MR.
Ch 1, work 12 sc into the ring.
Pull the ring closed and join with sl st to the first sc.
12 sts.
Round 2 – Petal Foundations
Repeat around:
[ch 4, skip 1 st, sl st in next st]
You should have 6 chain loops.
Part 2 – Create the Puffy Petals
Each petal is worked into one ch-4 loop.
Into the first loop work:
sc, hdc, 5 dc, hdc, sc.
Repeat the same sequence in each of the remaining five loops.
Join with sl st.
You should now have a clear six-petal flower.
Part 3 – Add Height to the Petals
For a more dimensional flower, work one surface round around each petal.
Join yarn at the base of a petal.
Work:
sl st, sc, hdc, dc across the center stitches, hdc, sc, sl st.
Repeat around all six petals.
FO and weave in the ends.
Part 4 – Joining Loops
The flowers are connected at their petal tips rather than enclosed inside traditional granny-square borders.
Join yarn to one petal tip.
Work:
ch 3, sc into the next petal tip, ch 3
and continue around.
These small chain spaces become the joining points between neighboring flowers.
Part 5 – Arrange the Flower Panel
Lay the motifs flat before joining them.
Arrange them so neighboring flowers slightly overlap visually while still leaving small diamond-shaped spaces between the petals.
A useful layout is approximately:
3 flowers across × 4 flowers high for each main section, adjusting the arrangement according to your motif size.
The bag should taper slightly toward the top rather than forming a perfectly rigid rectangle.
Part 6 – Join-As-You-Go Method
When working the joining loops of a new flower, connect it to the neighboring motif.
Instead of working a complete ch-3:
ch 1, sl st into the corresponding loop of the neighboring flower, ch 1.
Continue to the next petal.
Join each touching flower at two adjacent points whenever possible.
This keeps the panel stable while preserving the decorative open spaces.
Part 7 – Filling the Small Gaps
Small spaces will naturally appear where several flowers meet.
Join yarn into one joining loop.
Work:
ch 3, sc into the next neighboring loop
around the opening.
For a larger gap, work:
[sc, ch 2, sc]
into each corner connection.
Keep these joins loose enough that the flower panel remains flat.
Part 8 – Crochet the Bag Base
The bottom of the bag is worked much more densely than the flower section.
Ch 31.
Round 1
Starting in the second chain from hook, sc across.
Work 3 sc into the final chain.
Continue along the opposite side of the foundation chain.
Work 2 additional sc into the starting end.
Join or continue spirally.
Rounds 2–6
Sc around, increasing evenly at both rounded ends.
Continue until the oval base measures approximately 24–26 cm / 9.5–10 in long.
Part 9 – Build the Solid Lower Band
Once the base reaches the correct size, stop increasing.
Work 6–10 rounds of sc evenly around.
This creates the sturdy solid section visible at the bottom of the finished bag.
The band should measure approximately 5–7 cm / 2–2.75 in high.
Part 10 – Attach the Flower Body
Position the completed flower panel around the upper edge of the solid base.
Use stitch markers to secure the center front, center back and both sides.
Join with matching yarn.
Work sc through both the flower-panel joining loops and the upper edge of the base.
Distribute the motifs evenly so the bag does not gather excessively.
Part 11 – Side Seams
If you created separate front and back flower panels, place them with matching edges together.
Join the side flower loops using slip stitches or single crochet.
Keep the seam flexible.
Turn the bag right side out after joining.
Part 12 – Upper Edge
Join yarn anywhere along the top opening.
Round 1
Sc evenly around, placing stitches into flower tips and joining loops.
Round 2
Sc around.
Round 3
Work another round of sc, decreasing a few stitches evenly if the opening feels too wide.
FO.
Part 13 – Strap Attachment Tabs
Mark one attachment point on each side of the bag.
Join yarn at the first marked section.
Work approximately 6 sc.
Turn and continue in rows for approximately 5–6 cm / 2–2.5 in.
Wrap the tab around a metal D-ring and sew the end firmly back to the bag.
Repeat on the opposite side.
Part 14 – Shoulder Strap
For the clean contrast shown in the inspiration, attach a ready-made leather or faux-leather shoulder strap using swivel clasps.
A strap approximately 55–70 cm / 22–28 in works well for a shoulder bag.
For a crossbody version, use approximately 100–120 cm / 39–47 in.
Optional Crochet Strap
If you prefer an entirely handmade bag:
Ch 7.
Starting in the second chain, work 6 sc.
Turn, ch 1, 6 sc.
Repeat until the strap reaches your preferred length.
Work one final round of slip stitches around the entire strap for additional strength.
Sew firmly to the side tabs.
Optional Fabric Lining
A lining is strongly recommended if you plan to carry small items because of the decorative spaces between the flowers.
- Trace the finished bag body onto folded cotton fabric.
- Add approximately 1.5 cm / ⅝ in seam allowance.
- Cut two pieces.
- Sew the sides and bottom together.
- Fold the upper raw edge inward.
- Insert the lining into the crochet bag.
- Hand sew it just below the upper crochet edge.
Optional Closure
Add a magnetic snap to the fabric lining for an invisible closure.
You can also crochet a small loop at the center back and sew a decorative wooden button to the front.
Final Shaping
Lightly wet-block the flower section.
Use your fingers to open every petal and define the six-petal flower shapes.
Do not stretch the solid bottom excessively.
Stuff the bag lightly with towels while drying so it keeps its rounded bucket shape.
Color Ideas
Butter Yellow: soft warm yellow for a cheerful summer look.
Natural Cream: elegant, minimal and easy to style.
Sage Green: soft botanical cottage style.
Dusty Rose: feminine vintage-inspired finish.
Terracotta: warm boho look for autumn.
Mixed Flowers: use cream centers with pink, lavender, peach and sage petals.
Ways to Customize the Bag
- Make every flower a different color.
- Add wooden beads to the strap attachments.
- Add a crochet flower charm.
- Use bamboo handles instead of a shoulder strap.
- Add a drawstring lining.
- Make the body taller for a market bag.
- Reduce the flower count for a small handbag.
- Add a long strap for a crossbody version.
Care Instructions
Hand wash gently in cool water with mild detergent.
If using a leather or faux-leather strap, remove it before washing whenever possible.
Press excess water out gently without twisting.
Reshape the flowers and dry the bag flat or lightly stuffed.
Do not tumble dry.
Frequently Asked Questions
The exact number depends on yarn thickness and motif size. For a medium shoulder bag, approximately 12–24 motifs may be required depending on the arrangement and whether the motifs cover both sides individually.
An adventurous beginner can make the individual flowers, but joining the motifs and shaping the bag are easier if you already know basic crochet stitches and how to work in the round.
Cotton bags naturally relax with weight. Use firm tension, a smaller hook and a fabric lining to reduce stretching.
Yes, but small objects may slip through the open spaces between the flower motifs. A lining also helps the bag keep its shape.
Yes. Use thicker yarn and a larger hook, but remember that larger motifs will reduce the number needed for the bag.
Absolutely. A multicolor version is especially pretty for spring and summer. Keep the bottom and joining color consistent if you want the finished design to feel cohesive.
The finished Crochet Flower Bag Pattern – Floral Summer Shoulder Bag