Crochet Halloween Pumpkin & Ghost Wreath Pattern
Beginner Friendly
Perfect for those just starting their crochet journey, with clear instructions and simple techniques
Single-Day Project
A satisfying project you can complete in a single afternoon or evening.
Handmade Gift
A beautiful keepsake — free forever. Read online or print at home.
About This Crochet Halloween Pumpkin & Ghost Wreath Pattern
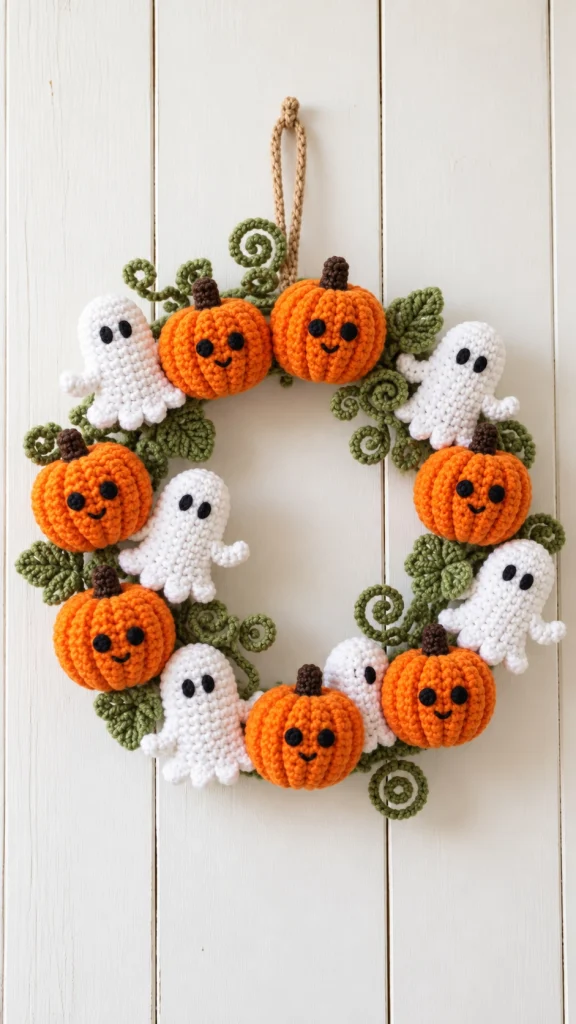
This crochet Halloween wreath pattern combines plump smiling pumpkins, adorable little ghosts, textured green leaves and curly vines into a cheerful handmade decoration that feels festive without being scary.
The wreath is built around a sturdy crochet-covered ring and decorated with individual amigurumi pieces. The bright pumpkin orange, creamy white and muted olive green create a warm Halloween palette that looks beautiful against a light wooden door, farmhouse wall or cozy entryway.
The dimensional pumpkins and ghosts are attached at slightly different angles so the finished wreath feels full, playful and handmade.
Materials
- Orange worsted / aran yarn 180–220 g
- White or soft cream yarn 130–160 g
- Olive / moss green yarn 120–150 g
- Dark brown yarn 30–40 g
- Black yarn small amount
- 3.5–4.0 mm crochet hook 1
- Fiberfill stuffing approx. 150 g
- 30–35 cm wreath ring 1
- Yarn needle 1
- Stitch markers 4
- Scissors 1 pair
- Strong sewing thread optional
Abbreviations – US Terms
MRmagic ringchchainsl stslip stitchscsingle crochethdchalf double crochetdcdouble crochetincincreasedecdecreaseBLOback loop onlyFOfasten offFinished Size
Approximately 38–42 cm / 15–16.5 in across when completely decorated.
Large pumpkins: approximately 8–9 cm / 3–3.5 in wide.
Ghosts: approximately 9–11 cm / 3.5–4.25 in tall.
The exact finished size depends on your yarn tension and wreath base.
Part 1 – Crochet Cover for the Wreath Base
Using olive green yarn:
Ch 18.
Row 1
Sc in second ch from hook and across. (17)
Rows 2 onward
Ch 1, turn, sc across. (17)
Continue until the strip is long enough to wrap completely around your wreath ring.
Do not fasten off until you test the fit.
Wrap the strip around the ring and sew the long edges together around the base.
Join the beginning and ending edges securely.
Part 2 – Large Crochet Pumpkin
Make approximately 6–7 pumpkins.
Using bright pumpkin-orange yarn:
R1: 6 sc in MR. (6)
R2: inc around. (12)
R3: [sc, inc] ×6. (18)
R4: [2 sc, inc] ×6. (24)
R5: [3 sc, inc] ×6. (30)
R6: [4 sc, inc] ×6. (36)
R7–12: sc around. (36)
R13: [4 sc, dec] ×6. (30)
R14: [3 sc, dec] ×6. (24)
R15: [2 sc, dec] ×6. (18)
Stuff firmly.
R16: [sc, dec] ×6. (12)
R17: dec around. (6)
FO, leaving a long tail.
Part 3 – Shape the Pumpkin Ribs
Thread the long orange tail onto a yarn needle.
Insert the needle through the center bottom and bring it through the center top.
Wrap the yarn tightly around the outside of the pumpkin and pass through the center again.
Repeat approximately 6 times, spacing the wraps evenly.
Pull gently after each wrap.
This creates the deep vertical pumpkin grooves visible in the finished wreath.
Secure the yarn underneath.
Part 4 – Pumpkin Stem
Using dark brown yarn:
R1: 6 sc in MR. (6)
R2–5: sc around. (6)
FO leaving a sewing tail.
Stuff very lightly or leave unstuffed.
Sew vertically into the center top of the pumpkin.
Part 5 – Pumpkin Eyes
Using black yarn:
R1: 6 sc in MR.
Sl st to first stitch and FO.
Make 2 eyes for each pumpkin.
Sew them onto the front approximately 2–3 stitches apart.
Alternatively, embroider the eyes directly using several tight black stitches.
Part 6 – Pumpkin Smile
Using black yarn and a yarn needle, embroider a small curved smile beneath the eyes.
Use approximately 3–4 short stitches rather than one long loose strand.
Add a tiny upward stitch at each end if you want the cheerful smiling expression shown in the reference.
Part 7 – Crochet Ghost Body
Make approximately 5–6 ghosts.
Using white yarn:
R1: 6 sc in MR. (6)
R2: inc around. (12)
R3: [sc, inc] ×6. (18)
R4: [2 sc, inc] ×6. (24)
R5–12: sc around. (24)
Begin stuffing the head and upper body.
R13: [2 sc, dec] ×6. (18)
Continue stuffing lightly.
R14: sc around. (18)
Part 8 – Ghost Wavy Bottom
To create the little scalloped ghost base:
*sl st in next st, 4 dc in next st, sl st in next st.*
Repeat around.
FO and weave in the end.
The lower edge should form several soft rounded points rather than a perfectly straight edge.
Part 9 – Ghost Arms
Make two for each ghost.
Using white yarn:
Ch 6.
Starting in second ch from hook:
sc 5.
FO leaving a sewing tail.
Sew one arm to each side of the body.
Curve the arms slightly upward so the ghosts appear to be waving.
Part 10 – Ghost Eyes
Using black yarn:
Embroider two small oval eyes onto the upper front of each ghost.
Work several vertical stitches in the same position to create the rounded oval shape.
Keep the eyes slightly uneven between different ghosts for a cute handmade expression.
Part 11 – Textured Crochet Leaf
Using olive green yarn:
Ch 12.
Starting in second ch from hook:
sl st, sc, hdc, dc, tr, tr, dc, hdc, sc, sl st.
Work around the opposite side of the foundation chain using the same sequence.
Sl st at the base.
FO leaving a sewing tail.
Surface crochet or embroider a chain line through the center to create the raised central vein.
Make approximately 14–18 leaves.
Part 12 – Larger Leaf Variation
For several larger leaves:
Ch 15.
Starting in second ch:
sl st, sc, hdc, dc, dc, tr, tr, dc, dc, hdc, sc, sl st.
Repeat along the opposite side.
FO.
Use these larger leaves behind the pumpkins to create depth.
Part 13 – Curly Crochet Vines
Using olive green yarn:
Ch 25–35.
Work 3 sc in each chain all the way back.
The strip will naturally curl into a spiral.
FO leaving a long tail.
Make approximately 10–14 curls in different lengths.
Part 14 – Prepare the Decorations
Before sewing anything permanently, place the wreath flat on a table.
Arrange all pumpkins, ghosts, leaves and vines around the ring.
Alternate the orange pumpkins and white ghosts so neither color becomes concentrated in one area.
Place leaves underneath the characters to hide the wreath base.
Tuck curled vines into empty spaces.
Part 15 – Suggested Layout
For a balanced wreath similar to the reference:
- Place 2 pumpkins across the upper center.
- Add 1 ghost to the upper left.
- Add 1 ghost to the upper right.
- Place 1 pumpkin on each side.
- Add 2–3 ghosts through the lower half.
- Place 3 pumpkins across the lower and side sections.
- Fill every remaining gap with leaves and spiral vines.
Do not make the spacing perfectly symmetrical. Slight irregularity gives the wreath its playful handmade character.
Part 16 – Attach the Leaves
Sew the leaves onto the wreath base first.
Overlap some leaves so the green foundation is mostly hidden.
Attach only the center vein and base of each leaf where possible.
Leave the outer edges slightly free so the foliage remains dimensional.
Part 17 – Attach the Pumpkins
Position each pumpkin over the foliage.
Using its yarn tail or strong matching thread, sew through the back of the pumpkin and around the covered wreath base several times.
Pull firmly.
Check the front frequently to make sure the pumpkin remains upright.
Secure the thread at the back.
Part 18 – Attach the Ghosts
Place the ghosts between the pumpkins.
Angle some slightly left or right instead of positioning every ghost perfectly vertical.
Sew through the back of the ghost body and into the wreath base.
Leave the arms free so they remain visible.
Part 19 – Add the Spiral Vines
Tuck the base of each spiral underneath a pumpkin, ghost or leaf.
Sew only the first 1–2 cm of the vine to the wreath.
Leave most of the spiral free.
Arrange some curls around the outside edge and several toward the open center of the wreath.
Part 20 – Hanging Loop
Using tan, brown or olive yarn:
Ch 55.
Starting in second ch from hook, sl st across.
For a stronger loop, work a second identical cord and hold both together.
Fold into a loop.
Sew both ends securely around the top of the wreath base.
Wrap yarn around the attachment point several times before fastening off.
Part 21 – Final Shaping
Hang the wreath vertically.
Rotate any pumpkins that have shifted sideways.
Gently pull the ghosts forward so they are not hidden by foliage.
Spread the leaves around the edges.
Shape every spiral vine with your fingers.
Check the wreath from several steps away and fill any visible gaps with an additional leaf or curl.
Color Variations
Classic Halloween: pumpkin orange + white + olive + black.
Vintage Halloween: burnt orange + cream + mustard + moss green.
Pastel Halloween: peach + ivory + sage + lavender.
Spooky: black + orange + purple + acid green.
Neutral Farmhouse: cream pumpkins + beige ghosts + muted olive foliage.
Kids’ Halloween: bright orange + pure white + apple green.
Ways to Customize Your Wreath
- Add tiny crochet bats between the vines.
- Replace several pumpkins with miniature candy corn.
- Add little witch hats to two of the ghosts.
- Embroider different expressions on the pumpkins.
- Add a crochet bow at the bottom.
- Use glow-in-the-dark yarn for the ghosts.
- Add small crochet acorns for an autumn-Halloween mix.
- Make tiny purple berries to fill small spaces.
- Add a wooden “BOO” sign inside the wreath.
- Make matching mini pumpkin ornaments from the same pattern.
Care Instructions
Spot clean whenever possible.
If deeper cleaning is necessary, gently hand wash removable crochet pieces in cool water.
Do not wring or twist.
Press gently between towels and reshape while damp.
Allow every component to dry completely before hanging again.
Store the wreath flat in a large box so the pumpkins and ghosts are not crushed.
Frequently Asked Questions
Approximately 6–7 medium pumpkins create the full look shown here. You can use fewer pumpkins and add extra ghosts or leaves if preferred.
Five to six ghosts work well for a wreath around 38–42 cm across.
After stuffing and closing the pumpkin, wrap a long strand of orange yarn around the outside and through the center several times. Pull each strand gently until visible sections form.
Yes. A wire wreath frame, rattan ring or other firm circular base can be covered with crochet and used instead.
Yes. Stop increasing at 18 stitches instead of 24 and work fewer straight rounds before creating the scalloped lower edge.
It is best used indoors or on a covered porch protected from rain. Moisture and prolonged direct sunlight can affect the yarn, stuffing and shape.
Sew each pumpkin and ghost through several points on its back rather than attaching it with a single stitch. A rigid wreath base also helps support the weight.
The finished Crochet Halloween Pumpkin & Ghost Wreath Pattern

