Crochet Poinsettia Christmas Curtain Tieback Pattern
Beginner Friendly
Perfect for those just starting their crochet journey, with clear instructions and simple techniques
Single-Day Project
A satisfying project you can complete in a single afternoon or evening.
Handmade Gift
A beautiful keepsake — free forever. Read online or print at home.
About This Crochet Poinsettia Christmas Curtain Tieback Pattern
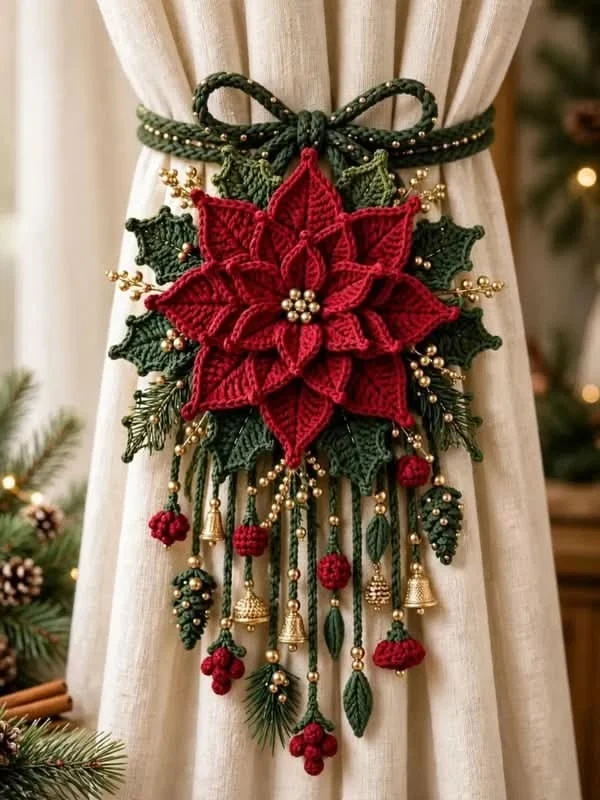
This crochet poinsettia curtain tieback pattern creates an elegant handmade Christmas decoration featuring a dramatic layered poinsettia surrounded by deep green foliage and delicate hanging ornaments.
The centerpiece is attached to a crocheted green tie cord that wraps around the curtain and finishes in a decorative bow. Small berries, leaves, pinecones, gold beads and miniature bells hang underneath for a rich traditional Christmas look.
Materials
- DK / Light #3 cotton yarn in burgundy red 100-120 g
- DK / Light #3 cotton yarn in forest green 120-150 g
- DK / Light #3 cotton yarn in dark green 50 g
- Gold embroidery thread or fine metallic yarn small amount
- 3.0 mm crochet hook 1
- 2.5 mm crochet hook optional for small details
- Small gold beads 25-35
- Gold pearl beads for flower center 7-9
- Miniature gold bells 4-6
- Yarn needle 1
- Scissors 1 pair
- Floral wire optional
- Stitch markers 2-4
Abbreviations
MRmagic ringchchainsl stslip stitchscsingle crochethdchalf double crochetdcdouble crochettrtreble crochetdtrdouble treble crochetincincreasedecdecreaseststitchstsstitchesFOfasten offFinished Measurements
- Main poinsettia: approximately 17-19 cm / 6.5-7.5 in
- Green foliage section: approximately 22-24 cm wide
- Hanging section: approximately 20-25 cm long
- Total decoration: approximately 32-38 cm long
- Curtain tie cord: approximately 70-85 cm
Main Poinsettia – Center
Using burgundy yarn, make a MR.
R1: ch 1, work 12 sc into MR. Pull closed and join with sl st. (12 sc)
R2: *ch 5, sl st into next st*. Repeat around to create 12 foundation loops.
FO.
Large Poinsettia Petals – Make 8
Join burgundy yarn into one foundation loop.
Petal: ch 9.
Starting in second ch from hook work:
sc, hdc, dc, tr, dtr, tr, dc, hdc.
Work 2 sc into the foundation loop.
Continue along the opposite side of the chain:
hdc, dc, tr, dtr, tr, dc, hdc, sc.
Sl st into the same foundation loop.
Repeat to create 8 large pointed petals.
Medium Poinsettia Petals – Make 7
Using burgundy yarn, ch 8.
Starting in second ch from hook:
sc, hdc, dc, tr, tr, dc, hdc.
Work 3 sc into the final chain.
Continue along the opposite side:
hdc, dc, tr, tr, dc, hdc, sc.
FO leaving a long sewing tail.
Make 7.
Small Inner Petals – Make 6
Ch 6.
Starting in second ch from hook work:
sc, hdc, dc, tr, dc.
Work 3 sc into the final chain.
Continue along opposite side:
dc, tr, dc, hdc, sc.
FO leaving a sewing tail.
Make 6.
Assembling the Poinsettia
- Lay the large petal layer flat.
- Arrange the 7 medium petals over the gaps between the large petals.
- Sew each medium petal securely at the center only.
- Arrange the 6 small petals in the center.
- Sew them in place while keeping the pointed ends free.
- Gently curve the petals upward with your fingers.
Golden Flower Center
Sew 7-9 small gold pearl beads into the center of the poinsettia.
Place one bead in the middle and arrange the remaining beads closely around it.
Pass the sewing thread through each bead several times so the center is secure.
Large Holly Leaves – Make 7-9
Using dark green yarn, ch 13.
Starting in second ch from hook:
sc, hdc, dc, tr, tr, dc, hdc, sc.
Along the final section create the pointed tip with:
ch 2, sl st into second ch from hook.
Continue along the opposite side of the foundation chain using the same stitch sequence.
Join at the base.
Holly Leaf Edging
Work around each leaf:
*sc, ch 2, sl st into first ch, sc in next 2 sts*
Repeat around to create the slightly pointed holly-style edge.
FO leaving a long tail.
Long Pointed Leaves – Make 5-7
Using forest green yarn, ch 10.
Starting in second chain:
sl st, sc, hdc, dc, tr, dc, hdc, sc, sl st.
Ch 2 at the tip.
Work the same sequence down the opposite side.
FO.
Small Red Berries
Using burgundy yarn, make a MR.
R1: 6 sc into MR. (6)
R2: 2 sc in each st. (12)
R3: sc around. (12)
R4: sc2tog around. (6)
Add a tiny amount of stuffing if desired.
Close the opening and FO.
Make approximately 10-14 berries.
Berry Clusters
Group the berries in sets of 3.
Thread their yarn tails together and knot securely.
Attach each cluster to a short green crocheted cord.
Leave several berry clusters for the hanging section.
Mini Crochet Pinecones – Make 3-4
Using dark green yarn, ch 16.
Work 3 dc into each chain across.
The strip will naturally curl into a spiral.
Roll the spiral tightly into a small cone shape.
Sew through the base several times to secure it.
Add several tiny gold beads around the outside if desired.
Decorative Hanging Cords
Create approximately 9-11 cords in different lengths.
For each cord:
Ch between 18 and 40, depending on the desired length.
Sl st back through every chain.
FO leaving long tails for assembly.
Vary the lengths so the finished decoration has a cascading shape.
Gold Bead Details
Thread small gold beads onto several of the hanging cords.
Use approximately 2-5 beads per cord.
Secure each bead with a tiny knot underneath so it stays in position.
Do not make every cord identical—the irregular placement creates a richer handmade appearance.
Bell Hangers
Attach miniature gold bells to approximately 4-6 hanging cords.
Pass the cord through the top loop of the bell.
Tie securely and weave the end back through several crochet stitches.
Leaf Hangers
Attach individual pointed green leaves to several cords.
Place them at different heights.
For a more detailed look, embroider a narrow line of lighter green or gold thread along the center vein.
Pinecone Hangers
Attach one small crochet pinecone to the end of a hanging cord.
Add 2-3 small gold beads immediately above the pinecone.
Repeat with the remaining pinecones.
Green Backing Cluster
Arrange the large holly leaves behind the poinsettia in a circular fan.
Place the longest leaves at the top and sides.
Place shorter leaves underneath the flower.
Overlap the leaf bases by approximately 2-3 cm.
Sew all leaf bases firmly together.
Adding the Hanging Decorations
- Lay the foliage cluster face down.
- Arrange the longest cords near the center.
- Place shorter cords toward both sides.
- Alternate bells, berries, leaves and pinecones.
- Sew every cord securely to the back of the foliage cluster.
- Knot the yarn tails several times.
- Trim only after checking that every ornament is secure.
Attaching the Main Flower
Center the layered burgundy poinsettia over the green foliage.
Sew through the flower center and the bases of several inner petals.
Do not sew the outer tips flat.
The free petal edges create the dimensional appearance.
Gold Sprig Accents
Cut several short pieces of thin floral wire.
Thread small gold beads onto each wire.
Twist the ends together to form tiny berry-like branches.
Insert approximately 6-8 sprigs around the outer foliage.
Secure the wire ends completely behind the crochet work.
Curtain Tie Cord
Using dark green yarn, ch approximately 150-170, or until the chain comfortably wraps around your curtain.
Beginning in second chain from hook, sl st across the entire chain.
For a thicker cord, work a second row of sc back across.
Second Tie Cord
Make a second identical cord.
Lay both cords together and gently twist them.
Sew the center of the doubled cord firmly to the back of the foliage cluster.
Decorative Top Bow
Using forest green yarn, ch approximately 90.
Sl st back through each chain.
FO.
Form two generous loops and two short tails.
Wrap a separate crocheted strip around the center several times.
Sew the bow directly above the poinsettia.
Optional Gold Bow Edging
Thread a yarn needle with fine metallic gold yarn.
Work small running stitches along the outside edges of the green bow.
Keep the gold detail subtle rather than covering the crochet stitches.
Attaching to the Curtain
- Gather the curtain gently at the desired height.
- Place the poinsettia decoration at the front.
- Wrap the green tie cords around the back of the curtain.
- Bring the cords together behind or beside the curtain.
- Tie securely with a bow or simple knot.
- Adjust the poinsettia so it faces forward.
- Separate the hanging ornaments so each detail remains visible.
Final Shaping
Gently pull the poinsettia petals apart.
Curve the largest petals slightly backward and the smaller petals slightly forward.
Spread the holly leaves around the flower.
Straighten the hanging cords and rotate the bells so they face outward.
Final Finishing
- Weave in all visible yarn ends.
- Check every bead and bell attachment.
- Lightly steam the leaves without flattening them.
- Shape each poinsettia petal by hand.
- Separate the berry clusters.
- Arrange the gold accents evenly.
- Allow the decoration to cool completely before hanging.
Frequently Asked Questions
Yes. Add a small hanging loop to the back and use the entire piece as a Christmas wall, door or cabinet decoration.
Yes. Use a 2.0-2.5 mm hook with thinner cotton yarn, or remove the largest outer petal layer.
Yes. Replace the metallic details with small crochet berries, leaves, flowers or miniature crochet balls for an entirely yarn-based version.
Burgundy red, forest green and antique gold create the traditional look shown here. Cream and sage can create a softer farmhouse version, while white and gold can create a more neutral Christmas design.
Use cotton yarn with good stitch definition, sew only the bases of the petals, and avoid flattening the flower during blocking.
Yes. Make two identical decorations for curtains on opposite sides of a window. Reverse the direction of the top bows if you want the pair to look symmetrical.
The finished Crochet Poinsettia Christmas Curtain Tieback Pattern