Crochet Poinsettia Flowers – Christmas Decoration Pattern
Beginner Friendly
Perfect for those just starting their crochet journey, with clear instructions and simple techniques
Single-Day Project
A satisfying project you can complete in a single afternoon or evening.
Handmade Gift
A beautiful keepsake — free forever. Read online or print at home.
About This Crochet Poinsettia Flowers – Christmas Decoration Pattern
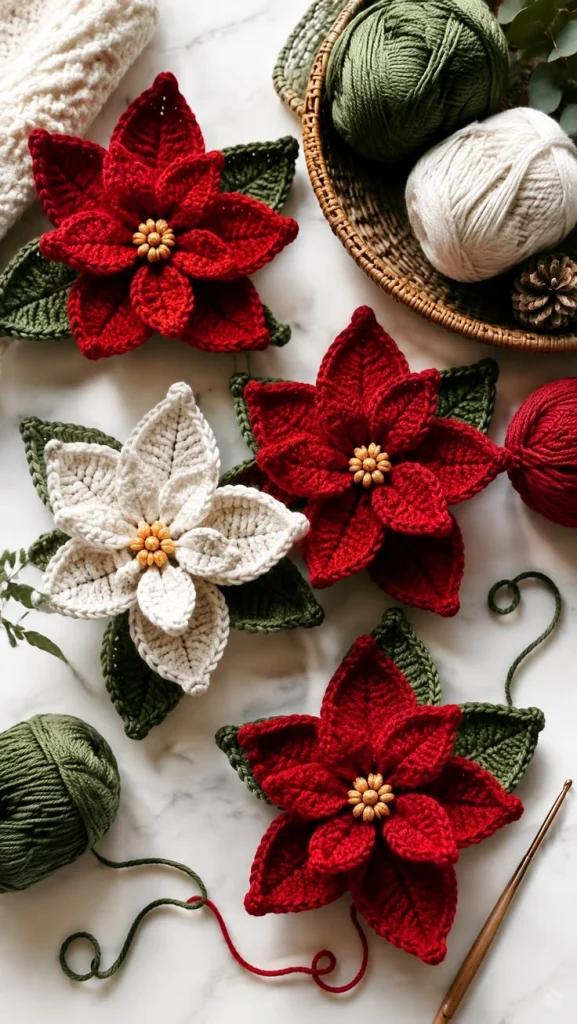
These crochet poinsettia flowers are a beautiful handmade decoration for Christmas. Each flower is built in layers to create the full, dimensional petals shown in the inspiration, with pointed dark-green leaves peeking out from behind and a cluster of warm golden buds in the center.
Make the classic version in rich Christmas red, crochet an elegant ivory poinsettia, or combine both colors for wreaths, garlands, table arrangements, gift toppers and holiday decorations.
Materials
- Worsted / Medium #4 cotton yarn – deep Christmas red 40-50 g
- Worsted / Medium #4 cotton yarn – ivory or warm white 40-50 g
- Worsted / Medium #4 cotton yarn – dark forest green 30-40 g
- Golden yellow yarn or small gold beads for centers small amount
- 3.5 mm crochet hook 1
- Yarn needle 1
- Scissors 1 pair
- Stitch markers optional
- Floral wire optional
Abbreviations
MRmagic ringchchainsl stslip stitchscsingle crochethdchalf double crochetdcdouble crochettrtreble crochetststitchstsstitchesFOfasten offFinished Size
- Large poinsettia: approximately 18-20 cm / 7-8 in across
- Flower center: approximately 2-3 cm across
- Large petal: approximately 7-8 cm long
- Small petal: approximately 5-6 cm long
- Leaf: approximately 8-9 cm long
Flower Construction
Each poinsettia is made from:
- 6 large outer petals
- 6 smaller inner petals
- 5-6 dark green leaves
- 1 cluster of golden center buds
The petals are crocheted individually and sewn together in overlapping layers. This creates much more dimension than working the entire flower flat in one round.
Part 1 – Large Outer Petal
Using red or ivory yarn:
Foundation
Ch 13.
Row 1
Starting in the second ch from hook:
sl st in first ch,
sc in next ch,
hdc in next 2 ch,
dc in next 3 ch,
tr in next 3 ch,
dc in next ch,
5 dc in final ch.
Do not turn.
Continue working along the opposite side of the foundation chain:
dc in next ch,
tr in next 3 ch,
dc in next 3 ch,
hdc in next 2 ch,
sc in next ch,
sl st in final ch.
FO leaving a long sewing tail.
Part 2 – Add the Raised Petal Ridge
For the beautiful center vein visible on each petal, place the petal right side up.
Join matching yarn near the base.
Surface crochet a line of slip stitches directly up the center of the petal toward the tip.
FO.
This raised ridge gives each petal the structured, almost leaf-like appearance shown in the finished flowers.
Part 3 – Make the Large Petals
Repeat Parts 1-2 until you have:
6 large petals.
Arrange them in a circle with the pointed ends facing outward.
Overlap the base of each petal slightly over the previous one.
Do not sew permanently yet.
Part 4 – Small Inner Petal
Using the same flower color:
Foundation
Ch 10.
Row 1
Starting in second ch from hook:
sl st in first ch,
sc in next ch,
hdc in next 2 ch,
dc in next 2 ch,
tr in next 2 ch,
5 dc in final ch.
Continue down the opposite side:
tr in next 2 ch,
dc in next 2 ch,
hdc in next 2 ch,
sc in next ch,
sl st in final ch.
FO leaving a long tail.
Part 5 – Add the Inner Petal Ridge
Join matching yarn at the base of the small petal.
Surface sl st along the center until you reach the tip.
FO.
Repeat until you have 6 small petals.
Part 6 – Crochet the Green Leaves
Using dark forest green:
Foundation
Ch 14.
Row 1
Starting in second ch from hook:
sl st,
sc,
hdc in next 2 sts,
dc in next 3 sts,
tr in next 4 sts,
dc in next st,
5 dc in final ch.
Continue down the opposite side of the chain:
dc,
tr in next 4 sts,
dc in next 3 sts,
hdc in next 2 sts,
sc,
sl st.
FO leaving a long sewing tail.
Part 7 – Define the Leaves
Join green yarn at the base of each leaf.
Surface crochet slip stitches along the center to create a raised vein.
For additional texture, gently pinch the leaf lengthwise after finishing.
Make 5 or 6 leaves for each poinsettia.
Part 8 – Assemble the Green Leaf Layer
Lay the leaves on your work surface with their points facing outward.
Overlap their bases to create a loose circle.
Using green yarn and a yarn needle, stitch through all leaf bases several times.
Pull firmly enough to hold them together but do not gather the leaves tightly.
Knot securely.
Part 9 – Assemble the Large Petal Layer
Arrange the 6 large petals over the green leaves.
Place each petal between two leaves so some green remains visible around the flower.
Overlap the bases of the petals by approximately 1-2 cm.
Using matching yarn, sew through all six petal bases.
Secure firmly.
Part 10 – Add the Small Petal Layer
Place the 6 smaller petals on top of the large petals.
Rotate this layer slightly so each small petal sits between two large petals rather than directly over them.
This creates the rich layered effect.
Sew securely through the center.
Part 11 – Golden Crochet Bud Center
Using golden yellow yarn, make approximately 8-10 tiny buds.
Each Bud
Make MR.
Work 6 sc into ring.
Pull ring tightly closed.
Sl st to first sc.
FO leaving a sewing tail.
Roll the tiny circle slightly between your fingers to create a rounded bud.
Part 12 – Assemble the Golden Center
Arrange the small golden buds tightly in the center of the poinsettia.
Sew them individually through the center of both petal layers.
Cluster them closely rather than spacing them evenly.
The center should look like a small group of raised golden berries.
Part 13 – Shape the Petals
Once the flower is completely assembled:
- Lift each small petal slightly upward.
- Leave the large outer petals flatter.
- Pinch each petal gently along its center ridge.
- Curve the pointed tips slightly upward.
- Pull the green leaves outward from behind the flower.
This shaping creates the dimensional appearance rather than a completely flat appliqué.
Part 14 – Red Poinsettia Version
For the classic Christmas version:
- Large petals – deep Christmas red
- Small petals – deep Christmas red
- Leaves – dark forest green
- Center – warm gold
A slightly darker red yarn creates an elegant traditional Christmas look.
Part 15 – Ivory Poinsettia Version
For the softer neutral version:
- Large petals – warm ivory
- Small petals – warm ivory
- Leaves – dark olive or forest green
- Center – warm gold
Avoid pure optic white if you want the warm handmade look shown in the inspiration.
Part 16 – Optional Wire Reinforcement
If the poinsettias will be used in a wreath or standing arrangement, you can reinforce the leaves and large petals.
Cut thin floral wire slightly shorter than the finished petal.
Place the wire along the underside center.
Using matching yarn and a needle, whip stitch around the wire.
This allows you to bend and position each petal individually.
Part 17 – Make a Hanging Ornament
To turn one poinsettia into a Christmas ornament:
Ch approximately 30 with green, cream or red yarn.
Sl st into the first ch to create a hanging loop.
FO leaving a long tail.
Sew the loop securely to the back center of the flower.
The flower can then be hung from a Christmas tree, door handle or decorative hook.
Part 18 – Make a Christmas Garland
Make approximately 7-10 poinsettias, alternating red and ivory.
Using green yarn, ch until the garland reaches your desired length.
Attach a flower approximately every 20-25 cm.
Add crochet leaves, wooden beads or small bells between the flowers if desired.
Part 19 – Use as a Wreath Decoration
Make 3-5 poinsettias in different sizes.
Arrange them slightly off-center on a crochet or evergreen wreath.
Place the largest red flower first.
Add ivory flowers beside it.
Fill gaps with green crochet leaves and berries.
Sew or wire each flower securely to the wreath base.
Part 20 – Gift Topper Version
For smaller flowers suitable for Christmas presents, use:
- DK / Light #3 yarn
- 2.5-3.0 mm hook
- 5 large petals
- 5 small petals
The finished flower will measure approximately 10-12 cm across.
Tie it to a wrapped present with twine or ribbon instead of a disposable bow.
Part 21 – Table Decoration
These flowers can also be used individually as Christmas table decorations.
Place one beside each napkin, arrange several around candles, or scatter red and ivory flowers along an evergreen table runner.
For table use, leave off the hanging loop and keep the back as flat as possible.
Part 22 – Final Blocking
- Place the finished poinsettia on a blocking mat.
- Arrange all outer petals evenly.
- Pin only the tips of the large petals and leaves.
- Lightly mist with water.
- Allow to dry completely.
- Remove the pins.
- Lift the inner petals again with your fingers to restore dimension.
Color Ideas
- Traditional Christmas: deep red + forest green + gold
- Classic neutral: ivory + forest green + gold
- Vintage Christmas: burgundy + olive + antique gold
- Winter white: ivory + sage + champagne
- Rustic: cranberry + moss green + wooden bead center
- Elegant: wine red + dark emerald + metallic gold
Finishing Checklist
- Make 6 large petals.
- Add the raised center ridge to each petal.
- Make 6 smaller petals.
- Make 5-6 green leaves.
- Assemble the green leaf layer.
- Sew on the large petals.
- Rotate and attach the smaller petal layer.
- Add the golden center buds.
- Shape every petal individually.
- Weave in all yarn tails.
- Block only the outer layer.
- Add a hanging loop if desired.
Frequently Asked Questions
Use two separate layers of petals and rotate the inner layer so its petals sit between the outer petals. After assembly, lift the smaller petals and gently pinch the center ridge of every petal.
A small amount of curling helps create a natural flower shape. If they curl excessively, your tension may be too tight. Try going up 0.5 mm in hook size.
Yes. The easiest method is to use DK or sport-weight yarn with a smaller hook while keeping the same construction.
If you use washable yarn and no wire or delicate beads, gently hand wash them in cool water and reshape while drying. Wired flowers are better spot-cleaned.
They work beautifully on Christmas wreaths, garlands, tree ornaments, stockings, gift wrapping, table settings, bags and holiday wall decorations.
Yes. Small gold or wooden beads create a beautiful raised center and can be used instead of crocheted buds.
Three large poinsettias create a simple focal cluster, while five to seven flowers give a fuller arrangement. Mixing red and ivory flowers adds contrast without making the wreath look too busy.
The finished Crochet Poinsettia Flowers – Christmas Decoration Pattern

