Crochet Pumpkin Door Hanger Pattern
Beginner Friendly
Perfect for those just starting their crochet journey, with clear instructions and simple techniques
Single-Day Project
A satisfying project you can complete in a single afternoon or evening.
Handmade Gift
A beautiful keepsake — free forever. Read online or print at home.
About This Crochet Pumpkin Door Hanger Pattern
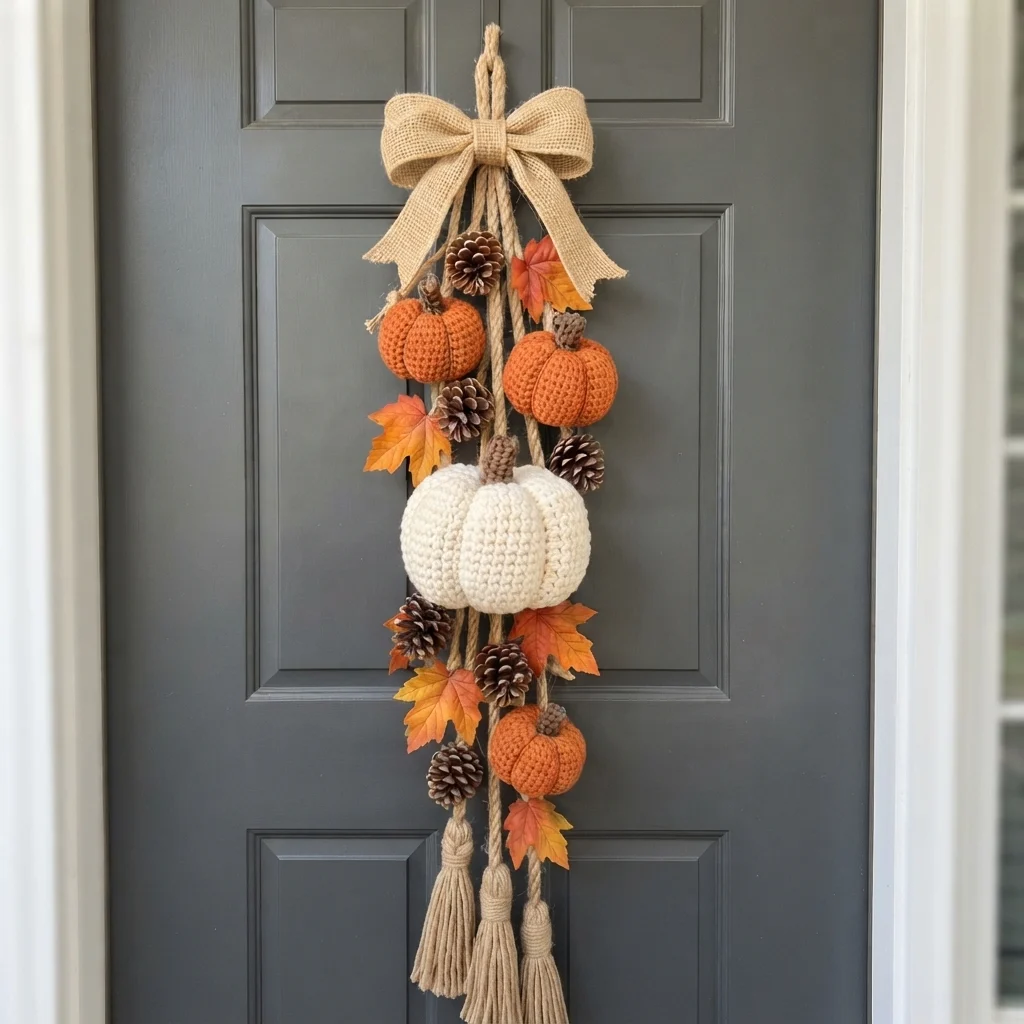
This crochet pumpkin door hanger pattern creates a warm, rustic fall decoration featuring four handmade pumpkins in different sizes, natural rope, pinecones, autumn leaves and three long tassels.
The centerpiece is a large creamy white crochet pumpkin, surrounded by three smaller burnt-orange pumpkins. The pieces hang at different heights from rustic cords and are finished with a large burlap-style bow at the top.
It is a beautiful handmade alternative to a traditional fall wreath and works especially well on a front door, entryway wall or covered porch.
Materials
- Burnt orange worsted yarn approximately 150-180 g
- Cream / ivory worsted yarn approximately 120-150 g
- Brown yarn small amount for stems
- 4.0 mm crochet hook main pumpkins
- 3.5 mm crochet hook stems
- Polyester fiberfill approximately 250-300 g
- Natural jute rope approximately 4-5 m
- Wide burlap ribbon approximately 1-1.5 m
- Pinecones 6-8 small pieces
- Artificial autumn maple leaves 8-12 pieces
- Strong sewing thread or floral wire for assembly
- Yarn needle 1
- Hot glue optional for decorative pieces
- Scissors 1 pair
Abbreviations
chchainsl stslip stitchscsingle crochethdchalf double crochetBLOback loop onlyinc2 sc in same stitchdecsingle crochet 2 togetherFOfasten offSmall Orange Pumpkin
Make 2.
- With burnt orange yarn, ch 19.
- Row 1: Hdc in second ch from hook and across. Turn.
- Row 2: Ch 1, hdc in BLO across. Turn.
- Repeat Row 2 until the rectangle measures approximately 25-27 cm long.
- Do not cut a very short yarn tail. Leave approximately 60 cm for assembly.
The finished pumpkin should measure approximately 10-12 cm wide after stuffing.
Medium Orange Pumpkin
Make 1.
- Ch 23 with burnt orange yarn.
- Row 1: Hdc in second ch from hook and across.
- Row 2: Ch 1, hdc BLO across.
- Repeat Row 2 until the rectangle measures approximately 31-33 cm long.
- Leave a long tail for sewing.
This pumpkin should finish approximately 13-15 cm wide.
Large Cream Pumpkin
Make 1.
- With cream yarn, ch 29.
- Row 1: Hdc in second ch from hook and across.
- Row 2: Ch 1, hdc BLO across.
- Repeat Row 2 until the rectangle measures approximately 40-43 cm long.
- Leave a long yarn tail.
The large cream pumpkin should measure approximately 19-21 cm wide after shaping.
Turning Each Rectangle Into a Pumpkin
- Fold the rectangle so the first and last rows meet.
- Use the long yarn tail to whip stitch the two short edges together.
- You now have a ribbed crochet tube.
- Run the yarn needle through the stitches around one open end.
- Pull firmly to cinch the opening completely closed.
- Secure with several knots.
- Turn the tube so the seam sits neatly inside.
- Fill generously with polyester fiberfill.
- Do not overstuff—the pumpkin should remain soft enough to shape.
- Run yarn through the remaining open edge.
- Pull tightly and close the opening.
Creating Deep Pumpkin Sections
- Thread a long piece of matching yarn through a yarn needle.
- Insert the needle through the center bottom of the pumpkin.
- Bring it out through the center top.
- Wrap the yarn around the outside of the pumpkin, following one rib.
- Insert again through the bottom and pull firmly.
- Repeat around the pumpkin approximately 6-8 times.
- Space the wraps evenly.
- Pull each strand enough to create pronounced pumpkin sections.
- Knot securely underneath.
This extra shaping gives the pumpkins the rounded segmented appearance shown in the finished decoration.
Crochet Pumpkin Stems
Make 4.
- With brown yarn, make a magic ring.
- Round 1: Work 6 sc into the ring.
- Rounds 2-6: Sc around without increasing.
- For the large pumpkin, continue for another 2 rounds.
- Add a tiny amount of stuffing if desired.
- FO leaving a long sewing tail.
- Sew the stem securely into the center top of each pumpkin.
Main Hanging Ropes
- Cut 3 pieces of natural jute rope approximately 100-110 cm long.
- Fold all three ropes near the top to create a hanging loop.
- Secure the folded section tightly with thinner jute cord.
- Allow the three main ropes to hang separately below the loop.
- Trim them to slightly different finished lengths.
The staggered lengths create the cascading arrangement of pumpkins and decorations.
Attaching the Large Cream Pumpkin
- Position the large cream pumpkin slightly above the center of the hanger.
- Pass one main rope behind the pumpkin.
- Use strong yarn or floral wire to secure the pumpkin to the rope.
- Add a second hidden attachment through the back of the pumpkin.
- Make sure the pumpkin faces forward and does not rotate freely.
Attaching the Orange Pumpkins
- Place 2 smaller orange pumpkins near the upper section.
- Position them at slightly different heights.
- Place the remaining orange pumpkin below the large cream pumpkin.
- Secure every pumpkin independently to one of the ropes.
- Use at least 2 attachment points per pumpkin.
- Hide knots behind the crochet pieces.
Adding Pinecones
- Choose 6-8 lightweight pinecones.
- Wrap floral wire tightly around the base of each pinecone.
- Twist the wire ends together.
- Attach the pinecones between the pumpkins.
- Place some individually and others in small clusters.
- Keep the largest pinecones near the middle section.
Adding Autumn Leaves
- Select leaves in burnt orange, amber, rust and golden tones.
- Arrange them between the pumpkins and pinecones.
- Angle some leaves toward the sides to create width.
- Attach the stems using floral wire or strong thread.
- Keep the leaves slightly loose so the arrangement remains natural.
Large Burlap Bow
- Cut approximately 80-100 cm of wide burlap ribbon.
- Create 2 large loops of equal size.
- Pinch the center firmly.
- Wrap a smaller strip of burlap around the center.
- Secure the back using strong thread or floral wire.
- Cut 2 ribbon tails approximately 25-30 cm long.
- Attach the tails behind the bow.
- Trim the ends diagonally.
- Attach the finished bow directly beneath the hanging loop.
Three Bottom Tassels
Make 3.
- Wrap natural jute or thick beige yarn around a 15 cm piece of cardboard approximately 25-30 times.
- Slide a separate cord underneath the wrapped strands.
- Tie securely at the top.
- Remove the strands from the cardboard.
- Wrap another piece of cord approximately 2 cm below the top.
- Knot securely.
- Cut through the loops at the bottom.
- Trim the strands evenly.
- Repeat for the remaining tassels.
Attaching the Tassels
- Attach one tassel to the end of each main hanging rope.
- Position the center tassel slightly lower than the two side tassels.
- Secure each tassel with a strong double knot.
- Wrap additional jute around the attachment point to conceal the knot.
- Trim all tassels evenly.
Recommended Layout
- Top: large burlap bow and hanging loop.
- Upper left: small orange pumpkin.
- Upper right: medium orange pumpkin.
- Upper middle: pinecones and fall leaves.
- Center: large cream crochet pumpkin.
- Lower section: remaining orange pumpkin.
- Between pumpkins: pinecones and maple leaves.
- Bottom: three long rustic tassels.
Final Assembly
- Hang the unfinished decoration temporarily on a door or wall hook.
- Check the overall balance before permanently securing every element.
- Rotate the pumpkins until their best sides face forward.
- Adjust the ropes so the pumpkins hang at different heights.
- Fill empty spaces with small pinecones or autumn leaves.
- Check that the large cream pumpkin remains the visual centerpiece.
- Secure loose decorations with floral wire.
- Trim visible thread ends.
- Fluff the burlap bow.
- Comb and trim the tassels.
Tips for Success
- Use ribbed stitches: BLO half double crochet creates beautiful pumpkin grooves.
- Do not overstuff: Slightly softer pumpkins are easier to shape.
- Reinforce the large pumpkin: It carries more weight and needs at least two secure attachment points.
- Choose lightweight decorations: Heavy pinecones can pull the hanger forward.
- Use outdoor-safe materials: If hanging outside, choose synthetic leaves and weather-resistant ribbon.
- Stagger the pieces: Different heights create a much fuller cascading look.
- Test before gluing: Arrange everything first and secure permanently only after you like the composition.
Ways to Customize Your Pumpkin Door Hanger
- Use sage green, cream and terracotta pumpkins for a softer farmhouse palette.
- Replace the burlap bow with a plaid autumn ribbon.
- Add wooden beads between the pumpkins.
- Use all cream pumpkins for a neutral fall look.
- Add small crocheted acorns.
- Replace artificial leaves with crochet maple leaves.
- Add tiny sunflowers between the pinecones.
- Use cinnamon sticks as rustic pumpkin stems.
- Make the bottom tassels in three different autumn colors.
Frequently Asked Questions
The finished decoration is approximately 75-90 cm long depending on the rope lengths, tassels and pumpkin placement.
Yes, but using different sizes creates more depth and makes the cascading arrangement visually interesting.
Yes. Crochet maple or oak leaves can replace the artificial leaves for a completely handmade version.
It works best on a covered porch protected from rain. Cotton and natural jute can absorb moisture, so prolonged exposure to wet weather should be avoided.
Worsted or Aran-weight yarn works particularly well because it produces pumpkins that are structured but still soft enough to shape.
Secure each pumpkin to the rope at two separate points on its back instead of using only one central attachment.
Yes. Replace them with crochet acorns, wooden beads, miniature yarn balls or additional autumn leaves.
The finished Crochet Pumpkin Door Hanger Pattern

