Beginner Friendly
Perfect for those just starting their crochet journey, with clear instructions and simple techniques
Single-Day Project
A satisfying project you can complete in a single afternoon or evening.
Handmade Gift
A beautiful keepsake — free forever. Read online or print at home.
About This Crochet Snowman Coasters
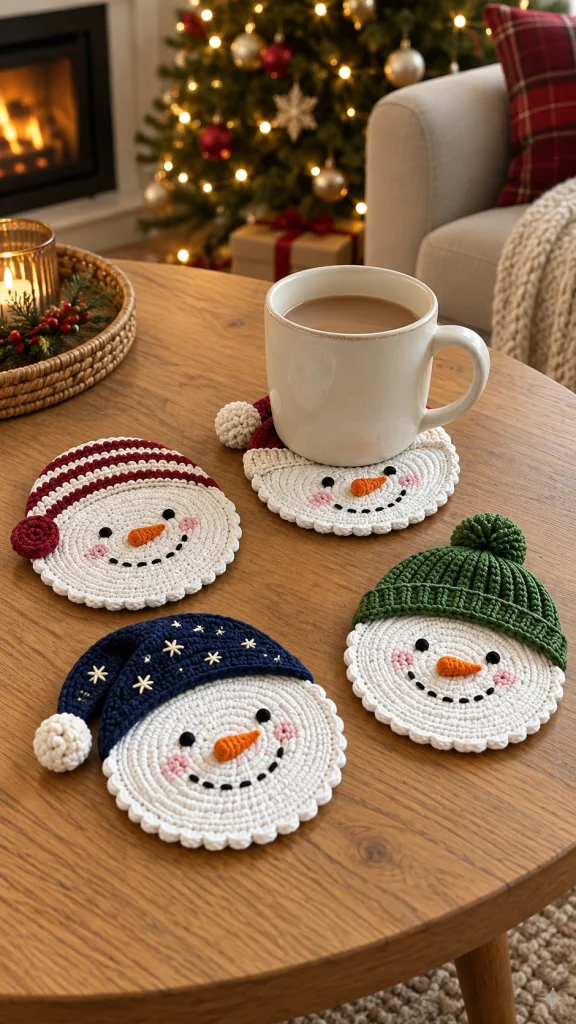
These crochet snowman coasters are such a sweet little project for the Christmas season. Each coaster has the same cheerful snowman face but a different winter hat, so you can make a whole matching-but-not-identical set.
Use them under coffee mugs, hot chocolate, tea or Christmas drinks, or bundle four together with ribbon for an adorable handmade holiday gift.
Materials
- DK / Light Worsted #3 cotton yarn – white 40-50 g
- Deep red yarn small amount
- Forest green yarn small amount
- Navy blue yarn small amount
- Cream yarn small amount
- Orange yarn small amount
- Black yarn small amount
- Soft pink yarn small amount
- 3.5 mm crochet hook 1
- Yarn needle 1
- Stitch markers optional
- Scissors 1 pair
Abbreviations
MRmagic ringchchainsl stslip stitchscsingle crochethdchalf double crochetdcdouble crochetincincreaseststitchstsstitchesFOfasten offFinished Size
- Snowman face: approximately 11-12 cm / 4.5 in diameter
- With hat: approximately 13-14 cm / 5-5.5 in
- Recommended thickness: approximately 4-5 mm
Part 1 – Crochet the Snowman Face
Using white yarn:
Round 1
Make a MR.
Work 6 sc into MR.
Join with sl st.
6 sts.
Round 2
Ch 1.
Work 2 sc in each st around.
Join.
12 sts.
Round 3
Ch 1.
*Sc in next st, inc in next st.*
Repeat around.
18 sts.
Round 4
*Sc in next 2 sts, inc.*
Repeat around.
24 sts.
Round 5
*Sc in next 3 sts, inc.*
Repeat around.
30 sts.
Round 6
*Sc in next 4 sts, inc.*
Repeat around.
36 sts.
Round 7
*Sc in next 5 sts, inc.*
Repeat around.
42 sts.
Round 8
*Sc in next 6 sts, inc.*
Repeat around.
48 sts.
Round 9
*Sc in next 7 sts, inc.*
Repeat around.
54 sts.
Part 2 – Scalloped Snow Edge
Continue with white yarn.
Round 10
*Skip 1 st, work 5 dc into next st, skip 1 st, sl st into next st.*
Repeat around the visible lower and side edges of the snowman.
If you plan to attach a hat over the upper portion, you may leave approximately 18-20 stitches at the top without scallops.
FO and weave in the ends.
Part 3 – Eyes
Using black yarn:
Position the eyes approximately 2-2.5 cm apart in the upper half of the face.
Make several small satin stitches in the same spot to form each round eye.
Alternatively, crochet two tiny circles:
Each Eye
MR, 5 sc into ring.
Sl st to first sc.
FO.
Sew securely onto the face.
Part 4 – Carrot Nose
Using orange yarn:
Row 1
Ch 7.
Row 2
Starting in second ch from hook:
Sl st, sc, hdc, dc, dc, 2 dc in final ch.
FO leaving a long tail.
Shape the piece into a small pointed carrot and sew horizontally between the eyes and mouth.
Part 5 – Rosy Cheeks
Using soft pink yarn, embroider several small stitches on each side of the face.
Keep the cheeks approximately level with the lower part of the carrot nose.
For a softer appearance, use only 3-4 short stitches per cheek.
Part 6 – Snowman Smile
Using black yarn, create a curved dotted smile underneath the carrot nose.
Make approximately 7-9 small French knots or short embroidered stitches, following a gentle upward curve.
Keep the dots slightly separated so they resemble little pieces of coal.
Hat Option 1 – Christmas Red & Cream Striped Hat
This version creates the cozy striped hat shown on the red snowman coaster.
Using deep red yarn:
Row 1
Ch 31.
Sc in second ch from hook and across.
30 sts.
Rows 2-3
Ch 1, turn.
Sc across.
Change to cream.
Rows 4-5
Sc across.
Change to red.
Rows 6-7
Sc across.
Continue alternating two rows red and two rows cream while decreasing 1 stitch at each end every second row.
Continue until approximately 6-8 stitches remain.
FO.
Sew the lower edge of the hat across the upper section of the snowman face.
Red Pom-Pom
Using red yarn:
Round 1
MR, 6 sc.
Round 2
Inc around.
12 sts.
Round 3
Sc around.
Round 4
Dec around.
Lightly stuff with yarn scraps.
Close the opening and sew the pom-pom onto the tip of the hat.
Hat Option 2 – Navy Winter Night Hat
Using navy blue yarn, follow the same basic hat construction as the red striped hat, but work the entire hat in navy.
Make the hat slightly longer so the tip naturally falls toward one side.
Snowflake Details
Using cream yarn, embroider small star-shaped snowflakes across the navy section.
For each snowflake:
- Make one short vertical stitch.
- Add one horizontal stitch across the center.
- Add two diagonal stitches.
- Secure the yarn on the back.
Space the snowflakes irregularly for a natural snowy-night effect.
Cream Pom-Pom
Make the pom-pom using cream yarn following the same mini pom-pom instructions.
Sew it securely to the tip of the navy hat.
Hat Option 3 – Forest Green Beanie
This version creates the textured green winter hat.
Using forest green yarn:
Row 1
Ch 13.
Sc in second ch from hook and across.
12 sts.
Rows 2-32
Ch 1, turn.
Sc in BLO across.
This creates a ribbed rectangle.
Join the first and final rows together with sl sts to create a tube.
Thread yarn through the stitches along one end and pull tightly closed.
Flatten the lower edge slightly and sew it across the upper section of the snowman face.
Green Pom-Pom
Make a small forest-green pom-pom and sew it onto the top center of the beanie.
Gently shape the hat so the ribbing remains visible.
Hat Option 4 – Simple Cream Winter Hat
For a neutral farmhouse version, crochet the striped-hat pattern entirely in warm cream.
Add a cream pom-pom and optional beige or gold embroidered snowflakes.
Assembly
- Block the white crochet circle so it lies completely flat.
- Attach the chosen hat across the upper edge.
- Sew on both black eyes.
- Center and attach the orange carrot nose.
- Add two soft pink cheeks.
- Embroider the curved coal smile.
- Adjust the scalloped border.
- Weave in every loose end securely.
Optional Double-Layer Coaster
If you want a thicker, more absorbent coaster, crochet a second plain white circle following Rounds 1-9.
Place the two circles wrong sides together.
Join them around the edge with sc.
Then work the scalloped border through both layers.
This creates a sturdier coaster and hides the embroidery threads inside.
Make the Complete Set
For a set similar to the inspiration, make four snowmen:
- Red & cream striped hat with red pom-pom.
- Navy snowflake hat with cream pom-pom.
- Forest green ribbed beanie with green pom-pom.
- Cream winter hat with neutral details.
Keep the snowman faces identical so the different hats become the main feature of the collection.
Color Variations
- Traditional: red + forest green + cream
- Winter: navy + white + silver
- Farmhouse: oatmeal + cream + sage
- Vintage: dusty rose + burgundy + ivory
- Pastel: blush pink + mint + baby blue
- Elegant: deep green + champagne + cream
Gift Set Idea
Stack four finished snowman coasters together and tie them with a velvet or gingham ribbon.
Add a small handmade tag and pair them with a Christmas mug, hot cocoa mix or tea for a cozy handmade holiday gift.
Finishing Tips
- Steam-block or lightly wet-block each coaster.
- Shape the snowman face into an even circle.
- Make sure the hat lies flat against the coaster.
- Keep the carrot nose small enough that it does not interfere with the mug.
- Secure all embroidery ends on the back.
- Allow the coaster to dry completely before use.
Frequently Asked Questions
Cotton is usually the most practical choice because it is absorbent, durable and gives the stitches good definition.
Yes. The basic snowman circle uses simple increases and single crochet. The hats and embroidered details add a little extra practice but can be completed one step at a time.
Yes. Continue the circle increase sequence by adding one additional single crochet between increases on each new round.
You can, especially if the coasters are mainly decorative. For regular drink coasters, cotton is generally more absorbent and heat-friendly.
Yes, if your chosen yarn is washable. Follow the care instructions on the yarn label and reshape the coasters while damp.
Yes. Make the snowman circles smaller, add a hanging loop behind the hat and use them as flat Christmas tree ornaments.
The finished Crochet Snowman Coasters

