Crochet Spiral Christmas Tree Hanging Ornaments
Beginner Friendly
Perfect for those just starting their crochet journey, with clear instructions and simple techniques
Single-Day Project
A satisfying project you can complete in a single afternoon or evening.
Handmade Gift
A beautiful keepsake — free forever. Read online or print at home.
About This Crochet Spiral Christmas Tree Hanging Ornaments
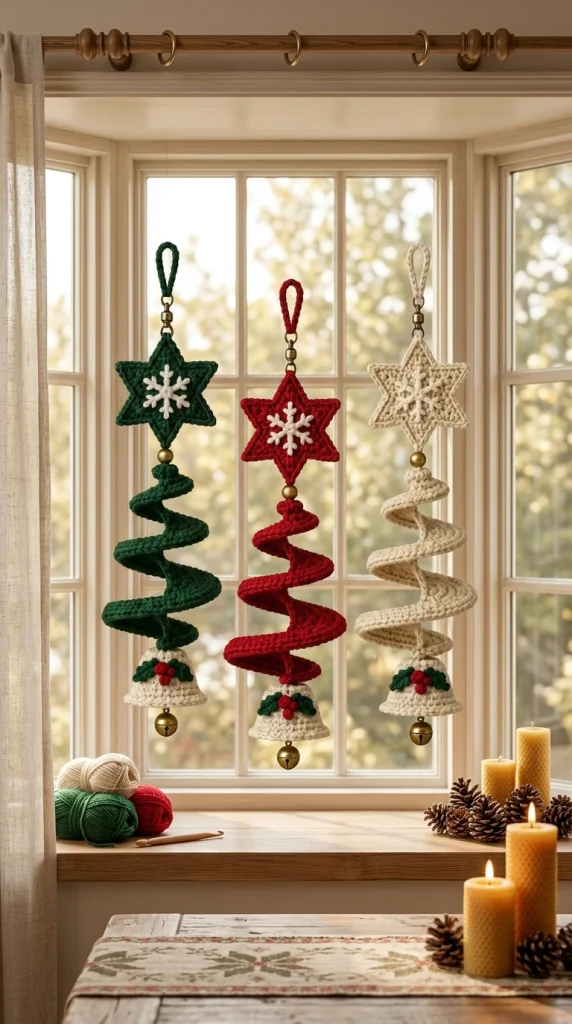
These crochet spiral Christmas tree ornaments make beautiful handmade decorations for windows, doors and cozy holiday interiors. Each hanging ornament combines a crochet star, delicate snowflake, wooden bead, dramatic spiral Christmas tree and tiny bell decorated with holly leaves and berries.
Make the design in traditional forest green, festive red or soft winter cream. Hung together, the three colors create a charming handmade Christmas display.
Materials
- DK / Light Worsted #3 cotton yarn – forest green 40-50 g
- DK / Light Worsted #3 cotton yarn – Christmas red 40-50 g
- DK / Light Worsted #3 cotton yarn – warm cream 40-50 g
- Small amount of white yarn for snowflakes 10 g
- 3.5 mm crochet hook 1
- Wooden beads, approximately 12-15 mm 3
- Small gold jingle bells 3
- Small swivel clasps or lobster clasps 3
- Yarn needle 1
- Scissors 1 pair
- Stitch markers optional
- Fabric stiffener or diluted PVA glue optional
Abbreviations
MRmagic ringchchainsl stslip stitchscsingle crochethdchalf double crochetdcdouble crochettrtreble crochetststitchstsstitchesspspacereprepeatFOfasten offFinished Measurements
- Total hanging length: approximately 42-48 cm / 16.5-19 in
- Star: approximately 11-13 cm / 4.25-5 in
- Spiral tree: approximately 23-27 cm / 9-10.5 in
- Mini bell: approximately 5-6 cm / 2-2.4 in
- Hanging loop: approximately 8-10 cm / 3-4 in
Part 1 – Crochet Star
Make one star in the main color of each ornament.
Round 1
Make a MR.
Ch 3, work 9 dc into MR.
Sl st to top of beginning ch-3.
10 dc total.
Round 2
Ch 1.
Work 2 sc in each stitch around.
Sl st to first sc.
20 sc total.
Round 3 – Form the Five Star Points
*Sl st in next st.
In next st work:
(sc, hdc, dc, tr, ch 2, tr, dc, hdc, sc).
Sl st in next 2 sts.*
Repeat from * to * around until you have 5 points.
Sl st to beginning.
FO.
Star Border
For the red and green stars, use the same main color for a thick monochrome edge.
For the cream star, continue with cream.
Join yarn at the base of any point.
Work sc evenly around the entire star.
At the very tip of each point work:
(sc, ch 2, sc).
Sl st to close.
FO and weave in ends.
Part 2 – Crochet Snowflake
Using white or cream yarn, make a MR.
Round 1
Ch 1.
Work 12 sc into MR.
Sl st to first sc.
Round 2
*Ch 6.
Sl st in 2nd ch from hook.
Ch 3, sl st back into same chain.
Ch 4, sl st back into same chain.
Continue sl st down remaining chains.
Sl st into next 2 sts of center.*
Repeat until you have 6 snowflake arms.
FO.
Attach the Snowflake
Center the snowflake on the front of the crochet star.
Using matching white yarn, sew the center securely to the star.
Add one or two tiny stitches near the ends of each snowflake arm so the motif lies flat while keeping its delicate raised appearance.
Part 3 – Hanging Loop
Using the same color as the star, ch 35-40.
Sl st back along the entire chain for a stronger cord.
FO leaving a long tail.
Fold the cord into a loop.
Thread it through the swivel clasp and sew both ends securely behind the top star point.
Part 4 – Spiral Christmas Tree
The spiral is created from a long crocheted strip with strong increases. Once finished, the strip naturally curls into the dramatic Christmas-tree spiral.
Foundation
Using the same main color as the star, ch 75.
Row 1
Work 2 dc in 4th ch from hook.
Work 3 dc in every chain across.
The strip will immediately begin curling.
Row 2 – Create a Fuller Spiral
Ch 3 and turn.
Work:
*2 dc in next st, 1 dc in next st.*
Repeat across.
FO leaving a long tail.
Allow the strip to coil naturally.
Shape the Spiral into a Tree
Lay the spiral vertically.
Keep the upper coils smaller and gradually spread the lower coils wider.
The silhouette should resemble a stylized Christmas tree:
- Narrow at the top
- Medium through the center
- Wide at the bottom
Thread a long strand of matching yarn vertically through the center of the spiral.
Secure the yarn through several coils while maintaining approximately 3-5 cm between each level.
Attach the Wooden Bead
Thread one wooden bead onto the center cord between the star and spiral.
The bead acts as a decorative spacer and helps the spiral hang freely.
Secure the upper end of the spiral below the bead.
Part 5 – Mini Crochet Bell
Using cream yarn, make a MR.
Round 1
Work 6 sc into MR.
6 sts.
Round 2
2 sc in each st around.
12 sts.
Round 3
*Sc in next st, 2 sc in next st.*
Repeat around.
18 sts.
Rounds 4-7
Sc in every stitch around.
Bell Flare
Round 8
*Sc in next 2 sts, 2 sc in next st.*
Repeat around.
Round 9
Work 2 hdc in every stitch around.
This creates the flared lower edge.
Round 10
Sc evenly around.
Sl st to first sc.
FO.
Part 6 – Holly Leaves
Using forest green yarn, ch 8.
Starting in 2nd ch from hook work:
sl st, sc, hdc, dc, hdc, sc.
In last chain work (sc, ch 2, sc).
Continue along opposite side:
sc, hdc, dc, hdc, sc, sl st.
FO.
Make 2 leaves for each bell.
Holly Berries
Using red yarn, make MR.
Work 6 sc into MR.
Pull tightly closed.
Sl st to first sc.
FO leaving a sewing tail.
Make 3 berries per bell.
Decorate the Bell
Arrange two green leaves near the upper front edge of the cream bell.
Sew them securely.
Position three red berries between the leaves.
Sew each berry firmly in place.
Add the Gold Jingle Bell
Cut approximately 20 cm of strong yarn.
Thread it through the center of the crochet bell.
Attach a small gold jingle bell underneath.
Pull the yarn upward through the center and secure firmly.
The metal bell should hang slightly below the crochet bell so it can move freely.
Final Assembly
- Place the crochet star at the top.
- Attach the hanging loop and clasp.
- Thread one wooden bead below the star.
- Attach the upper end of the spiral below the bead.
- Shape the spiral into progressively wider coils.
- Attach the decorated cream bell beneath the final coil.
- Make sure the gold jingle bell hangs freely at the bottom.
Forest Green Version
Use:
- Forest green star
- White snowflake
- Natural wooden bead
- Forest green spiral
- Cream bell
- Green holly leaves
- Red berries
- Gold jingle bell
Christmas Red Version
Use:
- Deep Christmas red star
- White snowflake
- Natural wooden bead
- Red spiral
- Cream bell
- Green holly leaves
- Red berries
- Gold jingle bell
Winter Cream Version
Use:
- Warm cream star
- White or slightly lighter cream snowflake
- Natural wooden bead
- Warm cream spiral
- Cream bell
- Green holly leaves
- Red berries
- Gold jingle bell
Optional Stiffening
If your cotton yarn is soft, lightly stiffen the star and spiral.
Mix fabric stiffener according to the manufacturer’s instructions.
Apply a small amount to the back of the star.
Pin the five points into shape.
For the spiral, shape each coil around a cylindrical object or position it manually while drying.
Allow everything to dry completely before final assembly.
Alternative Color Ideas
- Burgundy + cream + antique gold
- Sage green + ivory + natural wood
- Dusty blue + white + silver
- Forest green + beige + brass
- All cream with natural wooden beads
- Red + forest green + cream for a traditional Christmas set
Where to Hang Them
- In front of a sunny Christmas window
- From a curtain rod
- On interior door handles
- Along a staircase garland
- From fireplace mantel hooks
- On wall pegs
- As handmade Christmas gifts
Final Finishing
- Weave in all visible yarn ends.
- Block the stars so all five points are symmetrical.
- Check that each snowflake is centered.
- Adjust the spiral coils from narrow to wide.
- Secure the wooden bead.
- Check the holly leaves and berries.
- Test that the gold bell moves freely.
- Hang the ornament and make final spacing adjustments.
Frequently Asked Questions
The spiral depends on strong increases. Working three double crochets into each foundation chain creates the initial curl. If your strip remains flat, check that you are placing all three stitches into every chain.
Do not leave every coil the same width. Keep the upper coils compact and gradually spread each lower coil farther outward. A vertical center thread can hold the levels in position.
Yes. Begin the spiral with approximately 50-60 chains instead of 75, or remove several coils before attaching the bottom bell.
Yes, although cotton produces a firmer shape. If using soft acrylic, lightly stiffen the star and spiral after crocheting.
No. It is decorative. You can replace it with a wooden bead, crochet pom-pom or tassel.
Yes, but the full-size version is quite long. For a Christmas tree, reduce the star, spiral and bell dimensions to create a smaller lightweight version.
The finished Crochet Spiral Christmas Tree Hanging Ornaments

