Crochet Spiral Christmas Tree Ornaments with Wooden Beads
Beginner Friendly
Perfect for those just starting their crochet journey, with clear instructions and simple techniques
Single-Day Project
A satisfying project you can complete in a single afternoon or evening.
Handmade Gift
A beautiful keepsake — free forever. Read online or print at home.
About This Crochet Spiral Christmas Tree Ornaments with Wooden Beads
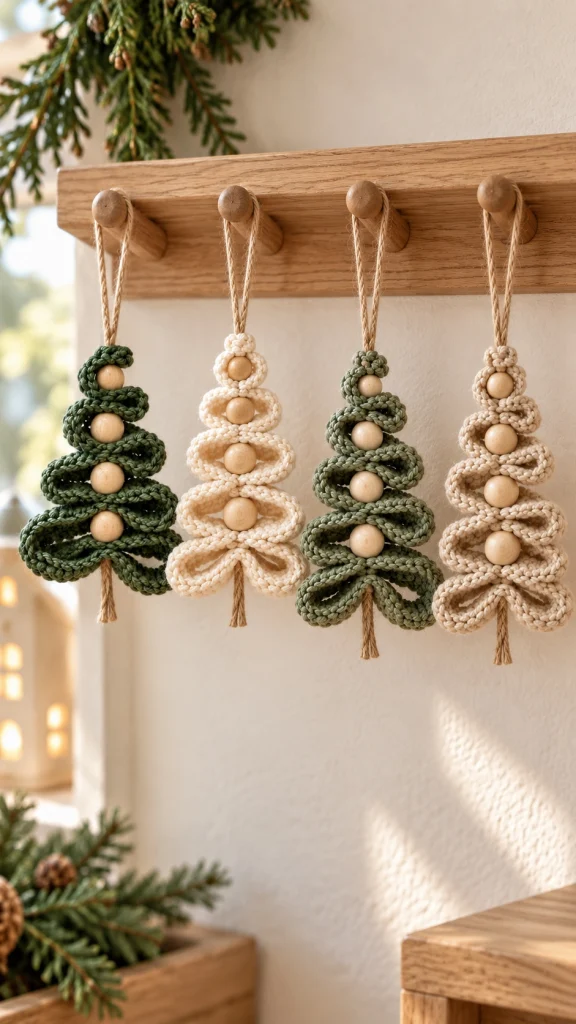
These crochet spiral Christmas tree ornaments combine soft crochet loops with natural wooden beads to create a simple, elegant Christmas tree shape. They are quick to make and look beautiful in traditional forest green, warm cream, sage or natural beige.
Use them as Christmas tree ornaments, cabinet decorations, gift toppers, garland pieces or small handmade holiday gifts. The wooden beads give the design a warm Scandinavian-inspired finish while the crochet loops create the recognizable layered tree silhouette.
Materials
- Worsted / Aran #4 cotton or cotton-blend yarn 15-20 g per ornament
- 4 mm crochet hook 1
- Natural wooden beads, approximately 18-20 mm 4
- Natural jute cord or strong cotton cord 45-55 cm
- Yarn needle 1
- Scissors 1 pair
- Stitch marker optional
Abbreviations
chchainsl stslip stitchscsingle crochethdchalf double crochetststitchstsstitchesreprepeatFOfasten offFinished Size
- Tree body: approximately 13-15 cm / 5-6 in tall
- Tree width: approximately 9-11 cm / 3.5-4.25 in at the widest point
- Hanging loop: approximately 8-10 cm / 3-4 in
- Total length: approximately 20-23 cm / 8-9 in including loop
Tree Construction
The ornament is made from one long crocheted cord. The cord is folded into progressively smaller loops, then wooden beads are threaded between the layers to hold the Christmas tree shape together.
You can make the tree slightly wider or narrower simply by changing the size of each loop.
Crochet the Long Cord
Using your chosen yarn color:
Step 1
Ch 105.
Step 2
Starting in the 2nd ch from hook, work 1 sc in each ch across.
You should have approximately 104 sc.
Step 3
Ch 1 and turn.
Work 1 sl st loosely in each sc across.
FO, leaving a tail approximately 15 cm long.
Optional Thicker Cord
For a chunkier tree like the ornaments shown, you can make the cord slightly thicker.
After completing the first row of sc:
Ch 1, turn and work 1 sc in each stitch across instead of slip stitches.
This produces a wider, more substantial crochet strip.
Prepare the Hanging Cord
Cut approximately 50 cm of jute or strong cotton cord.
Fold it in half.
The folded end will become the hanging loop.
Thread both loose ends through a yarn needle with a large eye, or tape the ends together temporarily to make threading easier.
Form the Bottom Tree Loop
Lay the crochet cord flat on your work surface.
Find its center.
Create the largest loop at the bottom, approximately 9-11 cm wide.
Bring the hanging cord through:
- One side of the crochet strip
- The center wooden bead
- The opposite side of the crochet strip
Pull gently until the first large loop sits neatly around the bead.
Second Tree Layer
Fold the crochet strip upward to create another loop slightly smaller than the first.
The second loop should measure approximately 7-8 cm wide.
Thread both strands of hanging cord through the crochet strip and add the second wooden bead.
Pull gently to hold the layer in position.
Third Tree Layer
Create another loop approximately 5-6 cm wide.
Thread the hanging cord through both sides of the crochet strip.
Add the third wooden bead.
Adjust the loop so it sits centered above the previous layer.
Top Tree Layer
Use the remaining crochet strip to form the smallest loop.
This final loop should measure approximately 3-4 cm wide.
Thread the cord through both sides and add the fourth wooden bead.
The four layers should now gradually decrease in width from bottom to top.
Shape the Spiral Tree
Place the ornament flat.
Gently pull each crochet loop outward.
Arrange them from largest to smallest:
- Bottom loop: 9-11 cm
- Second loop: 7-8 cm
- Third loop: 5-6 cm
- Top loop: 3-4 cm
The wooden beads should form a straight vertical line through the center.
Once you are happy with the shape, gently tighten the hanging cord.
Secure the Top
Bring both strands of the jute cord together directly above the final wooden bead.
Tie a secure double knot approximately 8-10 cm above the bead.
This creates the hanging loop.
Trim any uneven cord ends if necessary.
Add the Tree Trunk
Cut a short piece of jute approximately 8 cm long.
Fold it in half.
Attach it to the center of the lowest crochet loop using a lark’s head knot.
Trim the ends so approximately 2-3 cm remain visible beneath the tree.
Separate the fibers slightly for a soft rustic finish.
Green Christmas Tree Version
Use deep forest green or muted evergreen yarn.
Pair it with unfinished natural wooden beads and jute cord.
This creates the most traditional Christmas version and looks beautiful against light walls or natural wood.
Cream Christmas Tree Version
Use warm ivory, oatmeal or natural cotton yarn.
Keep the beads unfinished for a soft neutral look.
This version works especially well with Scandinavian, farmhouse and minimalist Christmas decor.
Sage Green Version
Use muted sage or olive-green cotton yarn.
Combine it with pale wooden beads and natural jute.
The softer green makes the ornament suitable for both Christmas decorating and winter decor.
How to Make a Set of Four
For a coordinated set like the inspiration:
- Tree 1: deep forest green
- Tree 2: warm ivory
- Tree 3: muted sage green
- Tree 4: natural beige
Use identical wooden beads and jute hanging loops on all four ornaments to keep the collection cohesive.
Assembly Check
- Check that all four wooden beads are centered.
- Arrange the crochet loops from largest to smallest.
- Make sure both sides of every loop are approximately equal.
- Tighten the central cord gently.
- Secure the hanging loop with a double knot.
- Add the small jute trunk.
- Weave in the crochet yarn tails.
- Steam lightly if the loops need shaping.
Optional Decorations
The minimalist trees look beautiful as they are, but you can also personalize them with:
- Tiny red wooden beads
- Mini gold bells
- Small crochet stars
- Wooden star toppers
- Embroidered gold thread
- Small red bows
- Mini pom-poms
- Personalized wooden name beads
Where to Use Them
- Christmas tree ornaments
- Wall hooks
- Cabinet knobs
- Christmas garlands
- Fireplace mantels
- Gift wrapping
- Holiday place settings
- Christmas market gifts
- Door handles
- Winter window decorations
Finishing
- Weave in all yarn ends.
- Trim the jute trunk evenly.
- Center each wooden bead.
- Shape every crochet loop with your fingers.
- Lightly steam the crochet if necessary.
- Allow the ornament to cool completely before hanging.
Frequently Asked Questions
Yes. The crochet itself uses basic chains, single crochet and slip stitches. Most of the design comes from folding and assembling the finished cord.
Yes. You can replace the wooden beads with crocheted balls, felt balls, large decorative beads or small knots between each tree layer.
Make a longer crochet cord and increase the width of each loop. Add an extra bead and fifth loop if you want a taller tree.
The center cord may be too loose or the yarn may be very soft. Tighten the center cord slightly and use cotton or another structured yarn for better definition.
Yes. Chunky yarn creates a larger, softer ornament. Increase the bead size so the proportions remain balanced.
Finished handmade ornaments can be wonderful additions to craft-market or holiday collections. Check any applicable local selling, labeling and product-safety requirements for your area.
The finished Crochet Spiral Christmas Tree Ornaments with Wooden Beads

