Elegant Crochet Lace Christmas Ornament Pattern
Beginner Friendly
Perfect for those just starting their crochet journey, with clear instructions and simple techniques
Single-Day Project
A satisfying project you can complete in a single afternoon or evening.
Handmade Gift
A beautiful keepsake — free forever. Read online or print at home.
About This Elegant Crochet Lace Christmas Ornament Pattern
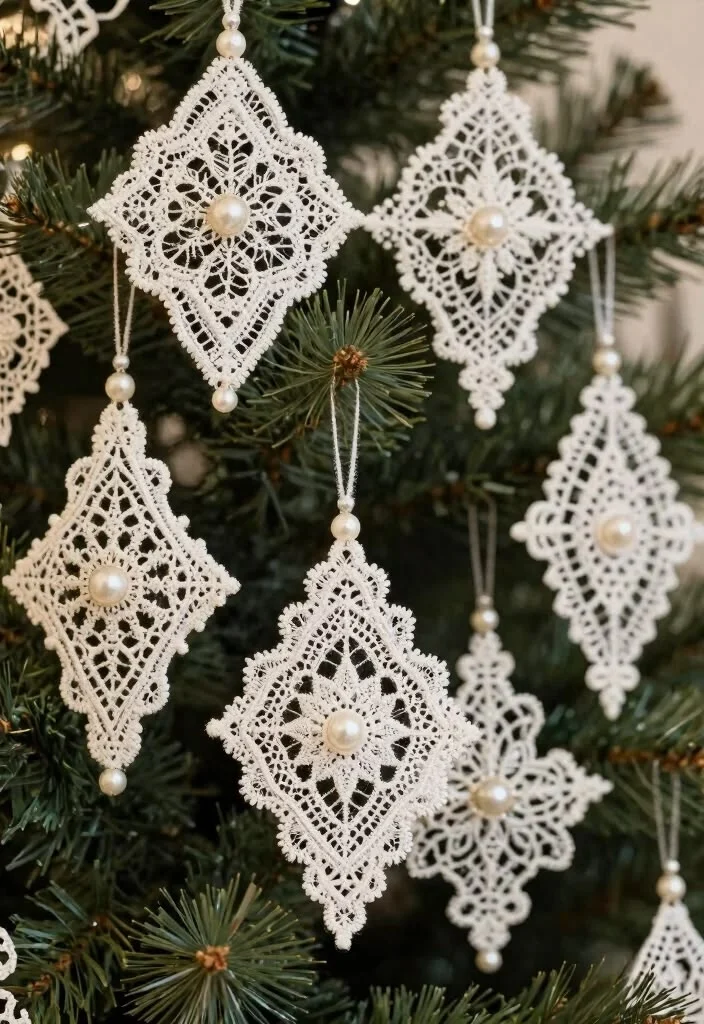
This crochet lace Christmas ornament pattern creates an elegant diamond-shaped decoration inspired by delicate vintage lace. Worked with fine white crochet thread, the ornament features an open center, decorative arches, tiny picot edging and a pearl bead that gives the finished piece a beautiful heirloom appearance.
Make one as a special tree ornament or crochet several to create a coordinated collection. The design looks especially pretty against deep green Christmas branches where the open lace stitches remain clearly visible.
Materials
- White or ivory crochet cotton thread #10 20-30 g
- 1.75 mm crochet hook 1
- Large pearl bead, 8-12 mm 1 per ornament
- Small pearl beads, 4-6 mm 1-3 optional
- White hanging cord or crochet thread 20-25 cm
- Yarn needle 1
- Scissors 1 pair
- Fabric stiffener or diluted PVA glue optional
- Blocking pins and mat recommended
Abbreviations
MRmagic ringchchainsl stslip stitchscsingle crochethdchalf double crochetdcdouble crochettrtreble crochetspspacepicotch 3, sl st into first chFOfasten offFinished Size
Approximately 10-12 cm / 4-4.75 in tall after blocking, excluding the hanging loop and bottom pearl.
Center Ring
Using white crochet thread, make a MR.
R1: Ch 3 (counts as dc), work 15 dc into MR. Pull ring closed. Sl st into top of beginning ch-3. (16 dc)
R2: Ch 1, sc in same st, *ch 5, skip 1 dc, sc in next dc*. Repeat from * around. Finish with ch 5 and sl st into first sc. (8 ch-5 spaces)
Creating the Lace Petals
R3: Sl st into first ch-5 sp.
Work into each ch-5 sp:
(sc, hdc, 3 dc, hdc, sc).
Repeat in every ch-5 sp around.
Sl st into first sc.
You should now have 8 small lace petals around the center.
Openwork Round
R4: Sl st to the center dc of the first petal.
*Ch 7, sc into center dc of next petal.*
Repeat around.
Finish with ch 7 and sl st into starting point. (8 ch-7 spaces)
R5: Into each ch-7 sp work:
(sc, ch 3, dc, ch 2, dc, ch 3, sc).
Repeat around and join with sl st.
Beginning the Diamond Shape
The next rounds transform the circular center into the elongated diamond shape.
Mark four evenly spaced points around the motif. These become the top, right, bottom and left points.
R6: Work sc stitches and ch-3 spaces around the motif. At each marked point work:
(dc, ch 3, tr, ch 3, dc)
into the same space.
Continue evenly around and join with sl st.
Diamond Lace Round
R7: Ch 1.
Work *sc in next available sp, ch 4* along each side.
At each corner point work:
(sc, ch 5, tr, ch 5, sc).
Continue around all four sides.
Sl st to join.
Decorative Outer Lace
R8: Sl st into the first ch-4 sp.
In each regular ch-4 sp work:
(sc, ch 3, sc).
At each diamond point work:
(sc, ch 3, dc, ch 5, dc, ch 3, sc).
Repeat around.
Join with sl st.
Fine Picot Border
R9: Work sc evenly around the entire ornament.
Approximately every 3-4 stitches, make one picot:
Ch 3, sl st into first ch.
Continue sc stitches between picots.
At each of the four diamond tips, make a slightly larger:
Ch 5 picot.
Sl st to first sc and FO.
Creating the Extended Bottom Point
Join white thread to the bottom diamond point.
R1: Ch 5.
Work 3 tr into the same corner space.
Ch 5 and turn.
R2: Sc into first tr, ch 3, sc into next tr, ch 3, sc into next tr.
FO.
This creates the delicate elongated point at the bottom of the ornament.
Top Hanging Point
Join thread to the top diamond point.
Ch 8.
Sl st back into the same point to create a small attachment loop.
FO and weave in the ends carefully.
Adding the Center Pearl
Thread a yarn needle with strong white sewing thread or matching crochet thread.
Position one large pearl bead directly in the center of the ornament.
Pass the needle through the center stitches several times.
Secure firmly on the back.
The pearl should sit flat against the lace without pulling the center out of shape.
Bottom Pearl Drop
Cut approximately 15 cm of white thread.
Attach it to the lowest point of the ornament.
Thread one small pearl bead onto the strand.
Position the pearl approximately 1-2 cm beneath the lace point.
Knot securely underneath the pearl and trim the excess thread.
Hanging Loop
Cut approximately 20-25 cm of fine white cord or matching crochet thread.
Fold it in half.
Pass the folded end through the small crochet loop at the top of the ornament.
Pull the two loose ends through the folded loop and tighten gently.
Tie the ends together to create the tree hanger.
For an extra elegant finish, slide a small pearl bead onto the hanging cord before tying the final knot.
Blocking the Ornament
- Lightly dampen the completed crochet ornament.
- Place it on a blocking mat.
- Pin the top and bottom points first.
- Stretch and pin the left and right points evenly.
- Arrange the lace arches symmetrically.
- Pin the small picots so they remain visible.
- Allow the ornament to dry completely before removing the pins.
Making a Matching Ornament Set
For a coordinated Christmas tree, make several ornaments using the same basic construction but vary the final rounds.
Variation 1: Work the full diamond pattern for a large ornament.
Variation 2: Stop after R7 and add a picot border for a smaller ornament.
Variation 3: Replace the diamond points with rounded ch-5 arches for a softer snowflake-inspired design.
Variation 4: Use ivory thread with champagne-colored pearls for a warmer vintage look.
Finishing
- Weave in every loose thread on the back of the ornament.
- Trim excess ends carefully.
- Check that the center pearl is secure.
- Gently reshape each point.
- Add the hanging loop.
- Hang the ornament and make any final adjustments to the lace.
Frequently Asked Questions
Yes, but the result will be larger and less delicate. Crochet thread #10 gives the fine lace appearance shown in this style of ornament.
Blocking may be enough if you use mercerized cotton. A small amount of fabric stiffener is helpful when you want the diamond points to remain especially crisp.
Absolutely. The lace motif can be used on its own, or the center can be decorated with a tiny crochet flower instead.
Ivory, champagne, soft gold, deep red and forest green all work beautifully. White with pearl accents creates the most traditional lace-inspired appearance.
Yes. They can be attached to gifts, hung in windows, added to a Christmas garland or used as delicate handmade decorations on a holiday table.
Use the same hook, thread and tension for every motif, then block each ornament using the measurements of the first finished piece as your guide.
The finished Elegant Crochet Lace Christmas Ornament Pattern

