Floral Granny Square Crochet Bedspread Pattern
Beginner Friendly
Perfect for those just starting their crochet journey, with clear instructions and simple techniques
Single-Day Project
A satisfying project you can complete in a single afternoon or evening.
Handmade Gift
A beautiful keepsake — free forever. Read online or print at home.
About This Floral Granny Square Crochet Bedspread Pattern
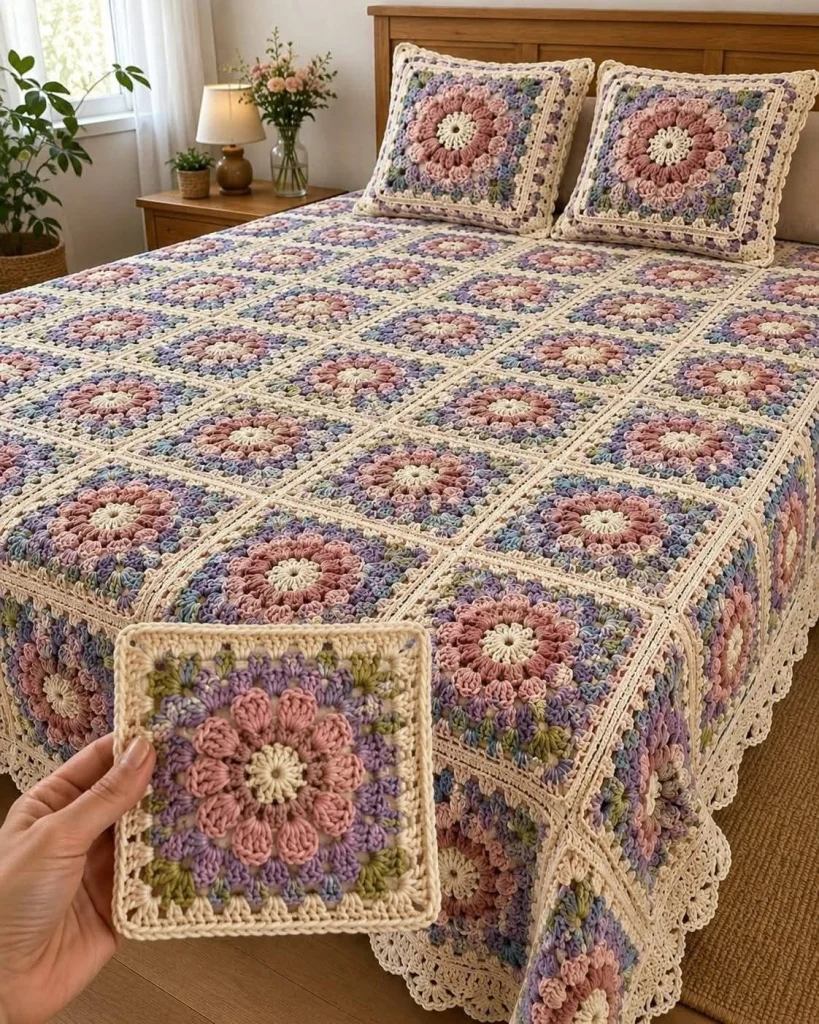
This floral granny square crochet bedspread pattern creates a romantic, heirloom-style blanket made from repeating raised flower squares. Dusty pink petals form the focal flower, surrounded by lavender, soft blue and sage-green details, while warm ivory frames every square and gives the finished bedspread its delicate vintage look.
The same floral square is repeated across the entire blanket, joined neatly with ivory yarn and finished with a wide decorative crochet lace border. Two matching pillow covers can be made from enlarged versions of the same motif.
Materials
- DK #3 cotton or cotton-blend yarn – ivory large quantity
- DK #3 yarn – dusty pink main flower color
- DK #3 yarn – lavender secondary color
- DK #3 yarn – soft blue accent color
- DK #3 yarn – sage / olive green leaf accent
- 3.5-4 mm crochet hook 1
- Yarn needle 1
- Scissors 1 pair
- Blocking mats and pins recommended
Abbreviations
MRmagic ringchchainsl stslip stitchscsingle crochethdchalf double crochetdcdouble crochettrtreble crochetspspaceFOfasten offSuggested Finished Sizes
Throw: approximately 125 x 160 cm / 49 x 63 in
Twin: approximately 170 x 220 cm / 67 x 87 in
Full / Double: approximately 200 x 230 cm / 79 x 91 in
Queen: approximately 230 x 250 cm / 91 x 98 in
King: approximately 270 x 260 cm / 106 x 102 in
These measurements include the decorative outer border and can be adjusted easily.
Floral Granny Square
Each square is worked from the center outward. The flower is dimensional, while the outer rounds gradually transform it into a flat square.
Begin with ivory yarn.
Round 1: Make MR, ch 3 and work 15 dc into the ring. Join with sl st to top of beginning ch-3. Pull ring closed.
Fasten off.
Round 2 – Dusty Pink Petals
Join dusty pink yarn in any stitch.
Ch 2, 3 dc in same stitch, ch 2, sl st in same stitch.
Sl st into next stitch.
Repeat the petal sequence around to create a full ring of raised petals.
Fasten off.
Round 3 – Raised Flower Layer
Join dusty pink behind the first layer of petals.
Ch 3, sc around the base between the next two petals.
Repeat around to create loops behind the first petals.
Into each loop work:
sc, hdc, 3 dc, hdc, sc.
This forms the larger dimensional petals visible in the finished square.
Fasten off.
Round 4 – Lavender
Join lavender yarn between two pink petals.
Work 3 dc, ch 1 into each space around.
Keep the stitches behind the raised pink petals so the flower remains dimensional.
Join and fasten off.
Round 5 – Sage Green Accents
Join sage-green yarn in any ch-1 space.
Work:
2 dc, ch 1, 2 dc in the first space.
In the next space work 3 dc.
Alternate around.
The green stitches should appear as small leaf-like accents between the lavender sections.
Fasten off.
Round 6 – Soft Blue
Join soft-blue yarn.
Work 3 dc in each available space around.
At four evenly spaced points work:
3 dc, ch 2, 3 dc.
These four corners begin converting the round flower into a square.
Round 7 – Form the Square
Continue with soft blue or change to lavender for a softly blended look.
Work 3 dc into each space along the sides.
At every corner:
3 dc, ch 2, 3 dc.
Join and fasten off.
Round 8 – Ivory Frame
Join ivory yarn in any corner.
Work:
3 dc, ch 2, 3 dc in the corner.
Continue with 3 dc in each space across the side.
Repeat around all four sides.
Join.
Round 9 – Ivory Openwork
Continue with ivory.
Ch 4, skip 2 stitches, sc in next stitch.
Repeat across each side.
At each corner work:
sc, ch 3, sc.
Join.
Round 10 – Final Square Border
Ch 1.
Work sc in every stitch and chain space.
Place 3 sc in each corner ch-3 space.
Join and fasten off.
Block the Squares
- Gently wet each finished square.
- Press out excess water without twisting.
- Pin each square to the same measurement.
- Keep all four corners square.
- Allow the motifs to dry completely.
A finished square of approximately 15-17 cm / 6-6.7 in works well for this design.
Planning the Bedspread
Lay the blocked squares on the bed before joining them.
Arrange them in straight rows with every flower facing the same direction.
Continue adding rows until the crochet section covers the mattress and reaches the desired distance down each side.
Remember that the final lace border will add additional width and length.
Join the Squares
Place two squares with right sides facing upward.
Using ivory yarn, work a flat slip-stitch join through the inside loops of both squares.
Join all squares into horizontal strips first.
Then join the strips vertically.
First Outer Border
Join ivory yarn at any outer corner of the assembled blanket.
Round 1: Sc evenly around the entire blanket, placing 3 sc in each corner.
Round 2: Ch 3 and dc in every stitch around. Work 5 dc in each corner stitch.
Round 3: Sc around.
Open Lace Border
Round 4: Ch 4, skip 2 stitches, sc in next stitch.
Repeat around.
At each corner make enough additional loops to keep the border lying flat.
Round 5: Into every ch-4 loop work 5 dc.
Decorative Lace Round
Round 6: Ch 1, sc in first stitch.
Skip 2 stitches, work 5 dc in next stitch, skip 2 stitches, sc in next.
Repeat around to create small scallops.
Wide Scalloped Edge
Round 7: Sl st to center of first scallop, ch 5, sc into center of next scallop.
Repeat around.
Round 8: Work 7 dc into each ch-5 loop.
Round 9: Work sc, ch 3, sc into the center stitch of every shell.
Fasten off.
Optional Extra-Wide Bedspread Border
For a more dramatic drop along the sides of the bed, repeat another openwork round before the final scallops:
Ch 5, skip 3 stitches, sc in next stitch.
Then work 7 dc into every ch-5 loop.
Finish with the final picot-style edging.
Matching Pillow Cover – Front
Make one enlarged floral square using the same colors and flower construction.
After completing the normal granny square, continue adding ivory granny rounds until the piece reaches the dimensions of your pillow insert.
For a standard decorative pillow, approximately 45 x 45 cm / 18 x 18 in works well.
Pillow Lace Border
Once the pillow front reaches the correct size, work:
- 1 round ivory sc
- 1 round ivory dc
- 1 openwork round: ch 4, skip 2, sc
- 1 shell round: 5 dc in each loop
- 1 final scalloped or picot edge
Pillow Back
For a simple crochet back, work two rectangular ivory panels in dc.
Each panel should cover slightly more than half of the pillow height so they overlap in the center.
Attach both panels to the floral front using sc around three sides.
The overlapping back allows the pillow insert to be removed for washing.
Make the Second Pillow
Repeat the same construction for the second matching pillow.
Keep the flower colors and border sequence identical so both pillows coordinate with the bedspread.
Finishing the Bedspread
- Weave in every yarn tail securely.
- Check every square join.
- Lightly wet-block the complete bedspread.
- Stretch the outer edges gently into straight lines.
- Shape each lace scallop by hand.
- Allow the bedspread to dry completely while lying flat.
Color Palette
The soft vintage palette shown in this design uses:
- Ivory: square borders, joins and lace edging
- Dusty pink: dimensional flower petals
- Lavender: secondary floral rounds
- Powder blue: outer floral details
- Sage green: small leaf accents
Alternative Color Ideas
- English garden: blush, sage, lavender, cream and dusty blue
- Autumn: rust, mustard, olive, burgundy and warm cream
- Christmas: deep red, forest green, ivory and touches of gold
- Cottage blue: powder blue, navy, cream and soft gray
- Neutral: ivory, oatmeal, beige, taupe and mocha
Frequently Asked Questions
The number depends on your finished square size and bed dimensions. Block one test square first, measure it, then divide the desired blanket width and length by the square measurement.
Yes. The modular construction makes the pattern easy to resize. Simply make fewer floral squares and finish the smaller panel with the same lace border.
Yes. A mixed pastel version works beautifully. Keeping the final ivory rounds identical will still give the finished blanket a coordinated appearance.
Blocking makes the motifs uniform in size, straightens the corners and makes joining a large number of squares much easier.
Yes. Acrylic makes a lighter and often more affordable bedspread. Cotton gives stronger stitch definition and a heavier heirloom-style drape.
Yes. Use the same flower motif and continue the outer rounds until each front panel fits your pillow insert, then add a simple crochet or fabric back.
The finished Floral Granny Square Crochet Bedspread Pattern