Floral Granny Square Crochet Handbag – Free Pattern
Beginner Friendly
Perfect for those just starting their crochet journey, with clear instructions and simple techniques
Single-Day Project
A satisfying project you can complete in a single afternoon or evening.
Handmade Gift
A beautiful keepsake — free forever. Read online or print at home.
About This Floral Granny Square Crochet Handbag – Free Pattern
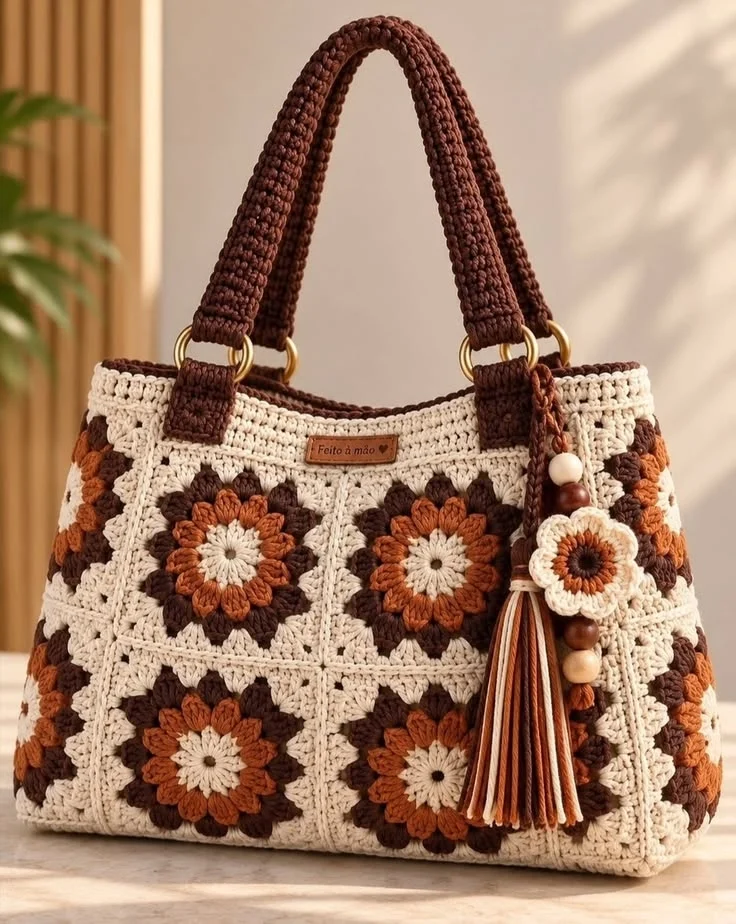
This floral granny square crochet handbag combines warm cream, burnt orange and chocolate brown for a beautiful vintage-inspired look. Large flower granny squares create the body, while dark brown crochet handles, gold-tone rings and a handmade tassel charm give the finished bag a polished boutique-style appearance.
The handbag is made from individual floral squares that are blocked, joined and reinforced with crochet borders. A structured base and optional fabric lining help the bag hold its shape for everyday use.
Materials
- Worsted / Aran #4 cotton yarn – warm cream 350-450 g
- Worsted / Aran #4 cotton yarn – burnt orange / rust 120-150 g
- Worsted / Aran #4 cotton yarn – chocolate brown 150-180 g
- 4 mm crochet hook 1
- Gold-tone metal rings, approximately 30-35 mm 4
- Yarn needle 1
- Scissors 1 pair
- Stitch markers 4-6
- Cotton fabric for lining optional
- Plastic canvas or bag-base insert optional
- Magnetic snap optional
- Wooden beads for charm 3-4
Abbreviations
MRmagic ringchchainsl stslip stitchscsingle crochethdchalf double crochetdcdouble crochettrtreble crochetspspaceststitchstsstitchesYOyarn overreprepeatFOfasten offFinished Measurements
- Width: approximately 34-37 cm / 13.5-14.5 in
- Height: approximately 28-30 cm / 11-12 in
- Depth: approximately 9-11 cm / 3.5-4.25 in
- Handle length: approximately 45-48 cm / 17.5-19 in
- Handle width: approximately 2.5-3 cm / 1-1.25 in
- Granny square: approximately 14-15 cm / 5.5-6 in
Flower Granny Square
Make 8 large squares for the front and back panels. Make additional squares if you want deeper side panels instead of crocheting them separately.
Round 1 – Cream Flower Center
With cream yarn, make a MR.
Ch 3, work 15 dc into MR.
Pull ring closed.
Sl st to top of beginning ch-3.
16 dc total.
Round 2 – Cream Inner Petals
Ch 1.
Work the following in each stitch around:
(YO, insert hook, pull up loop, YO and pull through 2 loops) twice in same st, YO and pull through all remaining loops, ch 1.
Repeat around to form 16 small cream petal clusters.
Sl st to close.
FO cream.
Round 3 – Burnt Orange Petals
Join burnt orange yarn into any ch-1 space.
Ch 2.
In each ch-1 space work a puff stitch:
*YO, insert hook into sp, pull up a loop* 4 times, YO and pull through all loops, ch 1.
Repeat in every space around.
Sl st to close.
You should have a full ring of raised rust-colored petals.
Round 4 – Chocolate Brown Petals
Join chocolate brown yarn into any space between the orange petals.
Work one puff cluster into every space:
*YO, insert hook, pull up a loop* 4 times, YO through all loops, ch 1.
Continue around.
Sl st to close.
FO brown.
Round 5 – Begin Squaring the Flower
Join cream yarn into any space.
Ch 3.
Work 2 dc in same space.
Work 3-dc groups around the flower.
At four evenly spaced points, create the corners with:
(3 dc, ch 2, 3 dc) in the same space.
Continue around until the circular flower has been transformed into a square.
Sl st to beginning ch-3.
Round 6 – Cream Granny Border
Ch 3.
Work 3 dc into each space around.
In every corner ch-2 space work:
(3 dc, ch 2, 3 dc).
Sl st to close.
Round 7 – Structured Edge
Ch 1.
Work 1 sc in every stitch around.
In each corner work:
(sc, ch 1, sc).
Sl st to first sc.
FO and weave in ends.
Front Panel
Arrange 4 granny squares in a 2 × 2 layout.
Position each flower in the same direction.
Join the two upper squares together, then the two lower squares.
Finally join the horizontal center seam.
Your finished panel should contain four large floral motifs.
Back Panel
Repeat the same process using another 4 granny squares.
Make sure the finished back panel matches the front panel exactly.
Joining the Squares
Using cream yarn, place two squares with wrong sides together.
Join using one of the following methods:
- Slip stitch through corresponding stitches
- Single crochet join
- Mattress stitch for a flatter invisible seam
For the slightly raised seams visible in the design, use a single crochet join on the outside.
Side Panels – Make 2
Using cream yarn, ch 25.
Row 1
Sc in 2nd ch from hook and across.
24 sc.
Rows 2-52
Ch 1, turn.
Sc across.
Continue until the strip matches the full height of the granny-square panel.
Optional Floral Side Detail
For a more decorative version like the reference bag, replace the plain side panels with two vertically joined flower granny squares.
Add one or two rounds of cream sc around the joined squares until the side panel reaches approximately 9-11 cm wide.
Bottom Panel
Using cream yarn, ch 61.
Row 1
Sc in 2nd ch from hook and across.
60 sc.
Rows 2-16
Ch 1, turn.
Sc across.
Continue until the bottom measures approximately 9-10 cm deep.
FO.
Assemble the Bag Body
- Attach one side panel to the front panel using cream yarn.
- Attach the second side panel to the opposite edge.
- Join the back panel to both side panels.
- Pin the bottom panel evenly around the lower opening.
- Sc the bottom panel securely to all four sides.
Keep the corners aligned carefully to maintain the structured handbag shape.
Upper Cream Band
Join cream yarn at one side seam.
Round 1
Work sc evenly around the entire upper opening.
Round 2
Ch 1 and sc around.
Round 3
*Sc in next 3 sts, ch 1, skip 1 st.*
Repeat around to create the subtle openwork detail.
Rounds 4-6
Sc evenly around.
Sl st to finish each round.
Chocolate Brown Top Edge
Change to chocolate brown.
Work 2 rounds of tight sc around the opening.
This creates a firm contrasting edge and helps prevent the top of the handbag from stretching.
Crochet Handles – Make 2
Using chocolate brown yarn, ch 86.
Row 1
Sc in 2nd ch from hook and across.
Rows 2-6
Ch 1, turn.
Sc across.
The strip should measure approximately 2.5-3 cm wide.
Reinforce the Handles
For strong rounded handles, cut cotton cord slightly shorter than each crochet strip.
Place the cord along the center of the strip.
Fold the crochet lengthwise around the cord.
Using brown yarn, slip stitch or mattress stitch the long edges together.
This creates the thick structured handles shown in the finished bag.
Attach the Gold Rings
Position two gold rings on the front and two on the back.
Place them approximately 8-10 cm apart.
Insert the end of each crochet handle through a ring.
Fold approximately 4 cm of the handle back onto itself.
Sew securely using matching brown yarn.
Repeat for all four handle ends.
Handle Tabs
Using chocolate brown yarn, ch 11.
Row 1
Sc in 2nd ch from hook and across.
Rows 2-12
Ch 1, turn, sc across.
FO leaving a long sewing tail.
Make 4 tabs.
Fold each tab through a gold ring and sew the lower end securely to the cream upper band.
Flower Bag Charm
Using cream, rust and brown yarn, make one small flower to coordinate with the granny squares.
Center
With brown, make MR and work 10 sc into ring.
Inner Petals
Change to rust.
In each alternate stitch work:
(sl st, ch 2, 3 dc, ch 2, sl st).
Repeat to make 5 petals.
Outer Petals
Join cream behind each rust petal.
Work:
(sl st, ch 2, 4 dc, ch 2, sl st) around each petal.
FO.
Make the Tassel
Cut approximately 25-30 strands of yarn, each about 24 cm long.
Use a mixture of:
- Cream
- Burnt orange
- Chocolate brown
Fold all strands in half.
Tie tightly approximately 2 cm below the fold.
Wrap matching yarn around the neck several times.
Knot securely and trim the bottom evenly.
Assemble the Charm
Cut a strong length of brown yarn or cord.
Thread:
- One cream wooden bead
- One dark wooden bead
- The crochet flower
- One dark wooden bead
- One cream wooden bead
- The finished tassel
Attach the top of the charm securely to one handle ring.
Optional Fabric Lining
A fabric lining gives this bag a much more structured and professional finish.
- Measure the interior width, height and depth.
- Cut two main fabric panels and the required side/base pieces.
- Add approximately 1.5 cm seam allowance.
- Sew the lining pieces together.
- Add an interior pocket if desired.
- Fold the upper raw edge inward.
- Insert the lining into the crochet bag.
- Hand-stitch it just below the brown upper edge.
Optional Magnetic Closure
Install a magnetic snap at the center of the lining approximately 2-3 cm below the upper edge.
Add a small square of interfacing behind each half of the snap for reinforcement.
Color Palette
For the warm vintage appearance shown:
- Main/background: natural cream
- Inner flower: cream
- Middle petals: burnt orange / cinnamon
- Outer petals: dark chocolate brown
- Handles: dark chocolate brown
- Hardware: antique or brushed gold
Alternative Color Combinations
- Cream + olive + chocolate
- Ivory + mustard + rust
- Beige + burgundy + brown
- Cream + sage + dusty rose
- Ivory + navy + camel
- Black + tan + cream
Final Finishing
- Weave in every yarn end securely.
- Check all granny-square seams.
- Reinforce the four handle tabs.
- Check that the metal rings are centered.
- Add the lining and base insert if using them.
- Attach the tassel charm.
- Lightly steam the bag.
- Shape the sides and base while cooling.
Frequently Asked Questions
For the main front and back panels, make 8 large squares: four for the front and four for the back. Additional squares can be used for the side panels if you prefer an all-granny-square construction.
Yes. Add another row or column of granny squares, or add extra cream border rounds to each square before joining.
Use firm cotton yarn, add a fabric lining, reinforce the base and place strong cord inside the crochet handles.
Yes. Crochet the handles directly onto the upper band or sew them securely to reinforced crochet tabs. The rings mainly provide the decorative structured look shown here.
Absolutely. The tassel and flower charm are decorative and can be omitted without changing the handbag construction.
A confident beginner familiar with granny squares can make it, but the joining, shaping, reinforced handles and lining make the complete project more suitable for intermediate crocheters.
The finished Floral Granny Square Crochet Handbag – Free Pattern