Floral Granny Square Crochet Shoulder Bag Pattern
Beginner Friendly
Perfect for those just starting their crochet journey, with clear instructions and simple techniques
Single-Day Project
A satisfying project you can complete in a single afternoon or evening.
Handmade Gift
A beautiful keepsake — free forever. Read online or print at home.
About This Floral Granny Square Crochet Shoulder Bag Pattern
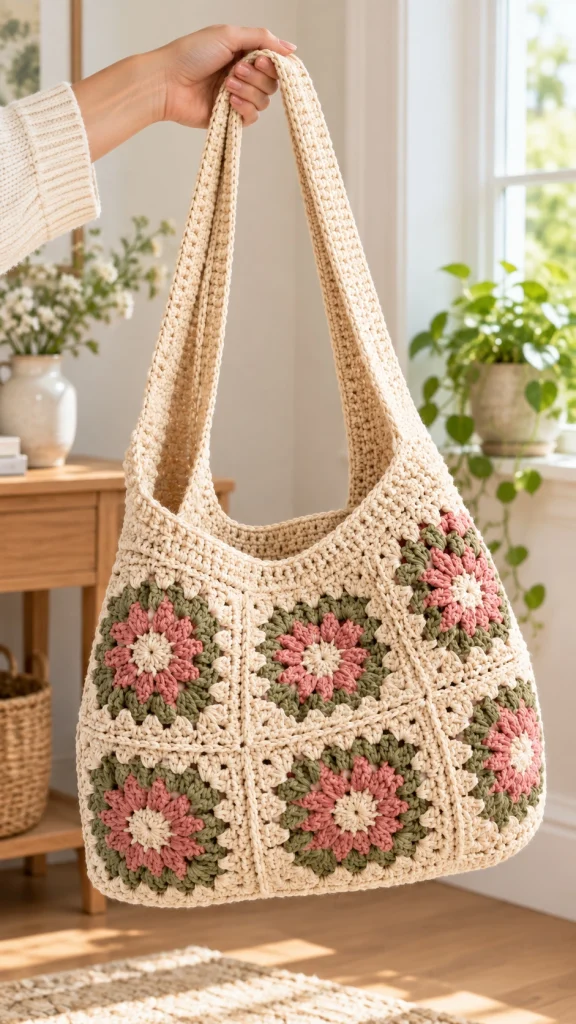
This floral granny square crochet shoulder bag pattern creates a soft, roomy everyday bag with a romantic handmade look. The body is built from floral crochet squares featuring dusty pink petals, muted sage green accents and a warm cream background.
The squares are joined with visible cream seams, while the upper section is worked more densely to give the bag structure. A long integrated crochet strap finishes the design and creates the relaxed shoulder-bag shape.
Materials
- Worsted #4 cotton yarn in warm cream 400-450 g
- Worsted #4 cotton yarn in dusty pink 80-100 g
- Worsted #4 cotton yarn in sage green 80-100 g
- 4.0 mm crochet hook 1
- Yarn needle 1
- Scissors 1 pair
- Stitch markers optional
- Cotton fabric for lining optional
Abbreviations
MRmagic ringchchainsl stslip stitchscsingle crochethdchalf double crochetdcdouble crochetspspaceststitchFOfasten offFinished Measurements
- Bag width: approximately 36 cm / 14 in
- Bag height: approximately 31 cm / 12 in
- Depth: approximately 8-10 cm / 3-4 in
- Strap length: approximately 70-80 cm / 28-31 in
- Square size: approximately 15 cm / 6 in
Floral Granny Square
Make 8 floral squares: 4 for the front and 4 for the back.
Flower Center – Cream
R1: Make MR. Ch 3 (counts as dc), work 11 dc into ring. Join with sl st to top of beginning ch 3. 12 dc.
FO cream.
Dusty Pink Petals
R2: Join dusty pink in any stitch. Ch 3, 2 dc in same st, ch 2, sl st in next st. *Ch 2, 3 dc in next st, ch 2, sl st in next st.* Repeat around until 6 petals are formed.
FO pink.
Sage Green Round
R3: Join sage green behind any petal. Ch 3, work 2 dc into the space between petals, ch 2. *3 dc into next space between petals, ch 2.* Repeat around. Join.
R4: Sl st into next ch-2 sp. Ch 3, 2 dc in same sp, ch 1. In alternating spaces work corner groups of 3 dc, ch 2, 3 dc. Work 3 dc in remaining spaces, separating groups with ch 1.
The motif should now begin forming a square.
FO sage green.
Cream Square Background
R5: Join cream in any corner. Ch 3, 2 dc, ch 2, 3 dc in same corner. Ch 1, work 3 dc into each ch-sp across side, ch 1. Repeat around, working 3 dc, ch 2, 3 dc in each corner.
R6: Repeat the established granny-square pattern. Work 3 dc into every side space and 3 dc, ch 2, 3 dc into every corner.
R7: Ch 1, sc evenly around, working 3 sc into each corner.
FO and weave in ends.
Blocking the Squares
- Lightly dampen each completed square.
- Pin each motif to approximately 15 × 15 cm.
- Make sure all four corners are square.
- Allow the motifs to dry completely.
- Do not assemble until every square is approximately equal in size.
Front Panel Assembly
Arrange four squares in a 2 × 2 layout.
Place two squares wrong sides together.
Using cream yarn, join through both corresponding edge stitches with sc.
Join the second pair in the same way.
Then join the two rows together horizontally.
The visible cream seam becomes part of the decorative design.
Repeat these steps with the remaining four squares to create the back panel.
Side and Bottom Gusset
Using cream yarn, ch 13.
R1: Sc in second ch from hook and across. Turn. 12 sc.
R2: Ch 1, sc across. Turn.
Repeat R2 until the strip is long enough to travel from one upper side of the front panel, around the bottom, and up the opposite side.
Do not stretch the strip while measuring.
FO leaving a long joining tail.
Joining the Bag Body
Place the gusset along one side of the front panel.
Using cream yarn, sc the gusset to the front panel.
Continue around the bottom and up the opposite side.
Repeat with the back panel.
Turn the bag right side out.
The bag should now have a softly structured, roomy shape.
Upper Bag Section
Join cream yarn at one side seam.
R1: Ch 1, sc evenly around the entire upper opening. Join.
R2: Ch 1, hdc in every stitch around. Join.
R3: Ch 1, hdc around.
R4-R6: Repeat R3.
This creates the solid cream band above the floral squares.
Shaping the Shoulder Bag
To create the gentle curved opening, place stitch markers approximately 8-10 cm from each side seam.
On the next round, work sc around while making a few evenly spaced decreases across the front center and back center.
Do not decrease near the side sections where the strap will begin.
Repeat for 1-2 additional rounds if a deeper curved opening is desired.
Long Crochet Shoulder Strap
The strap is worked directly from one side of the bag for extra strength.
Mark approximately 8 stitches at one side of the opening.
R1: Join cream yarn and sc across the 8 marked stitches. Turn.
R2: Ch 1, sc across. Turn.
Repeat R2 until the strap measures approximately 70-80 cm / 28-31 in, or reaches your preferred length.
Without twisting the strap, align the free end with the opposite side of the bag.
Use sl st or whip stitch to attach securely.
Reinforcing the Opening
Join cream yarn at the side seam.
Work one round of sc around the opening and along both edges of the strap.
At the transitions between the bag and strap, place 2 sc together where needed to keep the edge smooth.
Finish with one round of sl st for a neat, firm edge.
FO and weave in ends.
Optional Fabric Lining
A lining is recommended if the bag will carry keys, a phone or other heavier objects.
- Place the finished bag flat and trace its body onto folded cotton fabric.
- Add approximately 1.5 cm seam allowance.
- Cut two fabric pieces.
- Sew around the sides and bottom.
- Fold the top raw edge inward.
- Insert the lining into the crochet bag.
- Hand-sew the lining just below the upper crochet edge.
Optional Inner Pocket
Cut a fabric rectangle approximately 18 × 14 cm.
Fold and stitch the top edge.
Fold the remaining edges inward.
Sew the pocket onto the lining before inserting the lining into the bag.
Final Assembly
- Make and block 8 matching floral granny squares.
- Join 4 squares for the front panel.
- Join 4 squares for the back panel.
- Crochet the cream gusset.
- Join the gusset to both panels.
- Work the solid upper cream section.
- Shape the curved opening.
- Crochet the long shoulder strap.
- Reinforce the strap and upper edge.
- Add the optional fabric lining.
- Weave in all remaining ends.
- Steam or wet block gently into final shape.
Frequently Asked Questions
Yes. Use larger granny squares or create a 3 × 2 square arrangement for each panel. Remember to increase the gusset length accordingly.
Yes, but cotton is recommended because it stretches less and gives the bag better structure. A cotton-acrylic blend is another good option.
Absolutely. Burgundy and olive create an autumn version, while blue and cream give the bag a cooler cottage-style look.
Crochet straps naturally stretch when loaded. Use firm tension, work the strap in single crochet and reinforce both edges with slip stitches. A cotton webbing strip can also be sewn inside the strap.
No, but lining helps prevent stretching and stops small objects from pushing through the crochet stitches.
Yes. Simply stop crocheting the strap when it reaches your preferred length before attaching it to the opposite side.
The finished Floral Granny Square Crochet Shoulder Bag Pattern

