Frankenstein Hooded Crochet Scarf Pattern with Spider Pockets
Beginner Friendly
Perfect for those just starting their crochet journey, with clear instructions and simple techniques
Single-Day Project
A satisfying project you can complete in a single afternoon or evening.
Handmade Gift
A beautiful keepsake — free forever. Read online or print at home.
About This Frankenstein Hooded Crochet Scarf Pattern with Spider Pockets
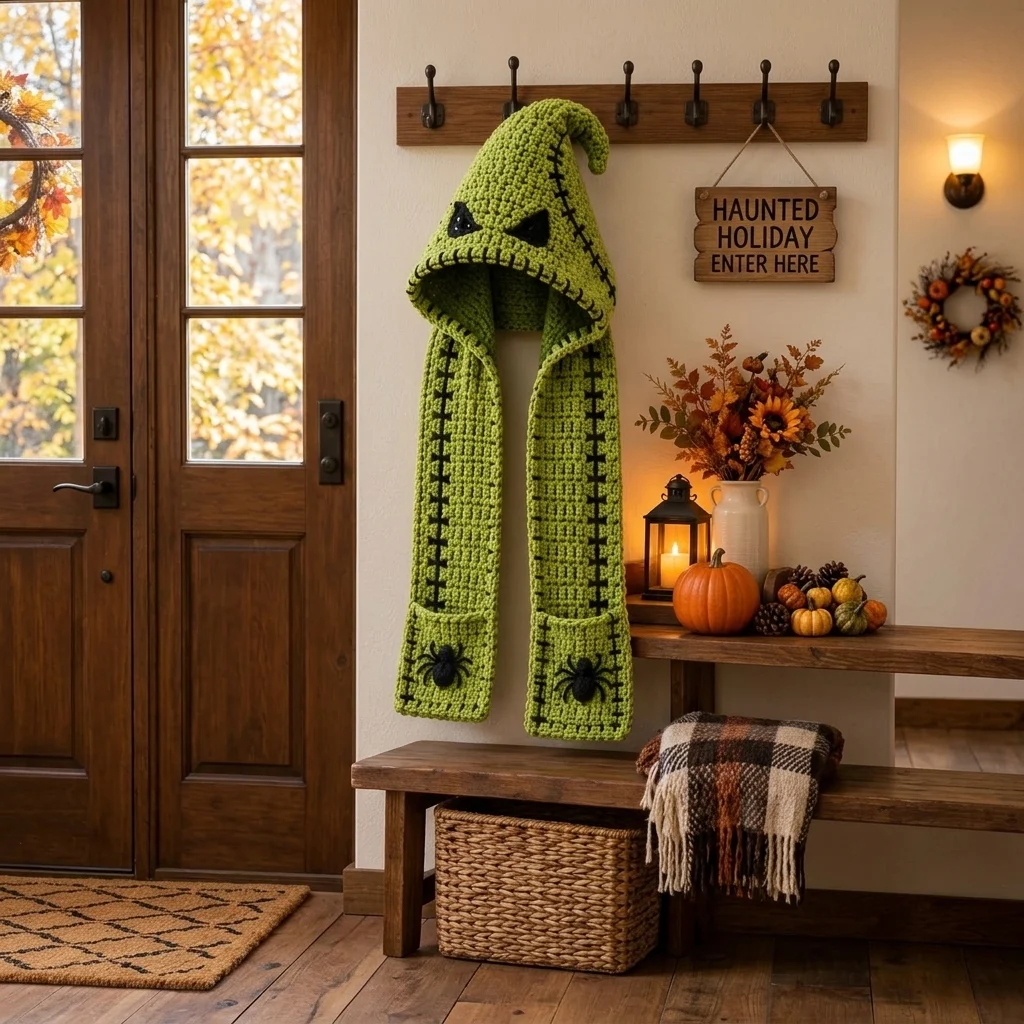
This Frankenstein hooded crochet scarf pattern combines a warm oversized hood, extra-long scarf panels and spooky Halloween details in one wearable project. The bright monster-green yarn is accented with black embroidered stitches, angry eyes and dimensional crochet spiders.
The scarf ends are finished with roomy patch pockets, making this design both decorative and practical for chilly autumn evenings, Halloween parties, trick-or-treating or seasonal photos.
Materials
- Bulky #5 yarn in monster/lime green 550-700 g
- Bulky #5 or worsted yarn in black 80-100 g
- 6.0 mm crochet hook 1
- 5.0 mm crochet hook for eyes and spiders 1
- Yarn needle 1
- Scissors 1 pair
- Stitch markers 4
- Measuring tape 1
Abbreviations
chchainsl stslip stitchscsingle crochethdchalf double crochetdcdouble crochetsc2togsingle crochet 2 togetherBLOback loop onlyststitchFOfasten offFinished Measurements
- Hood height: approximately 40-45 cm / 16-18 in
- Hood depth: approximately 30-34 cm / 12-13.5 in
- Each scarf panel: approximately 65-75 cm / 26-30 in from hood edge
- Scarf width: approximately 18-21 cm / 7-8.25 in
- Pocket: approximately 17 × 20 cm / 6.75 × 8 in
Main Scarf Panel – First Side
Using green yarn and the 6.0 mm hook:
Ch 25.
R1: Hdc in second ch from hook and across. Turn. (24 hdc)
R2: Ch 1, hdc BLO across. Turn. (24)
Repeat R2 until the panel measures approximately 65-75 cm.
Do not fasten off if continuing directly into the hood.
Second Scarf Panel
Make a second panel exactly as the first.
Keep both panels the same width and length so the finished scarf hangs evenly.
Hood – Foundation
Lay both scarf panels vertically with their upper ends facing each other.
Using green yarn, join across the upper edge of the first scarf panel.
R1: Hdc evenly across the first panel, ch 20, then hdc evenly across the upper edge of the second panel.
This creates the foundation for the back and sides of the hood.
Hood – Body
R2: Ch 1, hdc BLO across. Turn.
Continue working even rows until the hood section measures approximately 28-30 cm from the scarf join.
Keep the fabric dense enough to hold the monster shape but soft enough to drape around the head.
Shaping the Pointed Monster Hood
Mark the center of the hood.
Begin decreasing gradually toward the top:
Decrease Row 1: Ch 1, hdc across until 2 sts remain before the center marker, hdc2tog twice around the center, continue hdc across.
Work 2 even rows.
Repeat the decrease sequence every third row until the upper section begins forming a long tapered point.
For the final 6-8 rows, decrease once at each side of the center on every row.
FO, leaving a long sewing tail.
Closing the Hood
Fold the hood with right sides together.
Using the long tail, seam the back/top edge with mattress stitch or whip stitch.
Turn the hood right side out.
Gently curve the long tip forward with your hands to create the crooked Frankenstein-monster silhouette.
Hood Face Edging
Join green yarn at the lower front edge of the hood.
Edging R1: Sc evenly around the entire face opening. Join.
Edging R2: Ch 1, sc BLO around.
FO.
Using black yarn, embroider short vertical stitches around selected sections of the front edge to create a stitched-monster effect.
Frankenstein Side Stitches
Thread a yarn needle with black yarn.
Beginning near the upper side of the hood, embroider a long diagonal or slightly curved line toward the back.
Add short perpendicular stitches approximately 2-3 cm apart.
Repeat on the scarf panels, creating irregular stitched seams.
Do not pull tightly—the black stitches should sit visibly on top of the green crochet.
Monster Eyes – Make 2
Using black yarn and the 5.0 mm hook:
Ch 7.
R1: Sc in second ch from hook, hdc, dc in next 2 sts, hdc, sc. Turn.
R2: Ch 1, sc2tog, hdc, dc, hdc, sc2tog.
FO leaving a long tail.
Stretch each piece slightly into an angled triangular eye shape.
Attaching the Eyes
Place the eyes on the front of the hood approximately 7-9 cm apart.
Angle the inner corners downward to create the grumpy Frankenstein expression.
Sew securely around the outer edge.
For a tiny highlight, embroider one small white stitch near the outer upper corner of each eye.
Pockets – Make 2
Using green yarn:
Ch 22.
R1: Hdc in second ch from hook and across. Turn. (21)
R2-18: Ch 1, hdc BLO across. Turn.
Adjust the number of rows until each pocket measures approximately 17 × 20 cm.
FO leaving a long sewing tail.
Pocket Edging
Join green yarn at the upper corner.
Work 1 row of sc across the pocket opening.
FO.
Using black yarn, embroider small vertical stitches around the outer pocket edges for the Frankenstein seam effect.
Attaching the Pockets
Position one pocket approximately 3-5 cm above the bottom of each scarf panel.
Pin or stitch-marker the pocket into position.
Sew down both sides and across the bottom.
Leave the upper edge completely open.
Crochet Spider Body – Make 2
Using black yarn and the 5.0 mm hook:
R1: Make a MR and work 6 sc into the ring. (6)
R2: 2 sc in each st around. (12)
R3: *Sc, 2 sc in next st.* Repeat around. (18)
R4-6: Sc around. (18)
R7: *Sc, sc2tog.* Repeat around. (12)
Add a tiny amount of stuffing if desired.
R8: Sc2tog around. (6)
FO.
Spider Head – Make 2
Using black yarn:
R1: MR, 6 sc. (6)
R2: 2 sc in each st around. (12)
R3: Sc around.
FO and sew the head to the upper end of the body.
Spider Legs
For each spider, cut 8 lengths of black yarn approximately 15-18 cm long.
For a more structured crochet version:
Ch 10, sl st back along the chain.
Make 8 legs.
Sew four legs to each side of the spider body.
Bend or arrange the legs into a slightly curved shape before attaching the spider to the pocket.
Attaching the Spiders
Center one spider on each pocket.
Sew the body and head firmly to the pocket.
Tack each leg down at one or two points while leaving the middle slightly raised for a dimensional effect.
Additional Black Scar Details
Add several decorative scar lines to both scarf panels.
Use a long vertical or diagonal surface stitch as the main scar.
Cross it with short horizontal stitches at regular intervals.
Vary the placement slightly on each side so the design feels handmade rather than perfectly symmetrical.
Optional Extra Monster Details
- Add small black crochet circles as faux bolts near the lower sides of the hood.
- Embroider a crooked mouth beneath the eyes.
- Add short black stitches around the hood tip.
- Use glow-in-the-dark yarn for selected scar stitches.
- Add a second tiny spider near the hood edge.
Finishing
- Weave in all green yarn ends.
- Secure every black embroidered stitch on the wrong side.
- Check that both pockets are positioned at the same height.
- Shape the hood point gently forward.
- Arrange the spider legs.
- Lightly steam-block the scarf panels without flattening the dimensional spiders.
Frequently Asked Questions
Yes. Shorten both scarf panels and make the hood slightly smaller. For young children, avoid loose buttons, beads or other detachable decorations.
Yes. Use a smaller hook appropriate for the yarn and add stitches or rows as needed to reach the listed measurements.
Work more even rows between decrease rows during the upper hood section. Gradual decreases create a longer, softer curved point.
Yes. The pockets can be decorated only with black Frankenstein-style scar stitches, or you can add pumpkins, bats or small crochet skull appliqués instead.
Yes. When sewn along the sides and bottom only, they remain open at the top and can be used as hand-warmer pockets.
Yes. Bright monster green creates the classic Halloween look, while olive, purple, orange or charcoal can create different spooky variations.
The finished Frankenstein Hooded Crochet Scarf Pattern with Spider Pockets

