Navy Blue Crochet Hobo Bag Pattern with Daisy
Beginner Friendly
Perfect for those just starting their crochet journey, with clear instructions and simple techniques
Single-Day Project
A satisfying project you can complete in a single afternoon or evening.
Handmade Gift
A beautiful keepsake — free forever. Read online or print at home.
About This Navy Blue Crochet Hobo Bag Pattern with Daisy
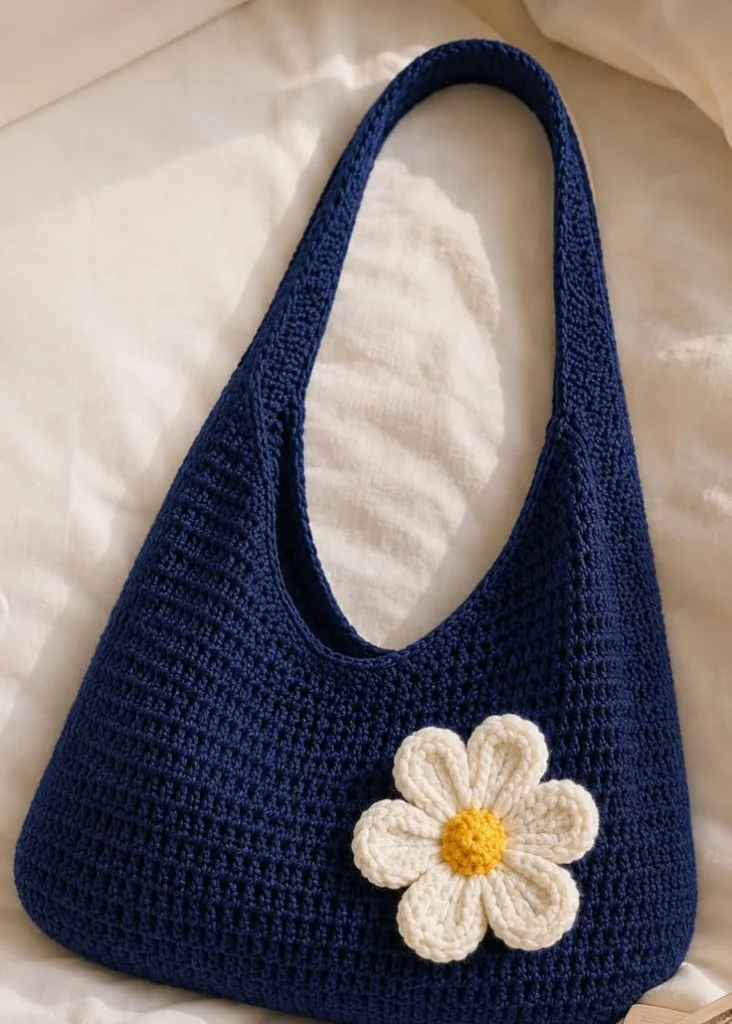
This crochet hobo bag pattern creates a soft, roomy shoulder bag with the beautiful relaxed silhouette shown in the reference. The bag is worked mainly in navy blue with a wide curved shoulder strap that flows naturally from the body, then finished with one large dimensional white daisy and a warm yellow center.
The simple solid body makes this design especially wearable, while the flower gives it a handmade feminine detail without making the bag overly busy. It works beautifully as an everyday shoulder bag, casual market bag or handmade gift.
Materials
- Navy blue cotton or cotton-blend yarn 350–450 g
- White or warm ivory yarn 30–40 g
- Mustard/golden yellow yarn 10–15 g
- 4.0–4.5 mm crochet hook 1
- Yarn needle 1
- Stitch markers 4–6
- Scissors 1 pair
- Optional cotton lining fabric approx. 50 × 80 cm
- Optional magnetic snap 1
Abbreviations – US Terms
chchainsl stslip stitchscsingle crochethdchalf double crochetdcdouble crochettrtreble crochetincincreasedecdecreaseMRmagic ringFOfasten offFinished Size
Approximately 38 cm / 15 in wide at the widest point.
Approximately 30 cm / 12 in high from the base to the beginning of the strap.
Approximate total height with strap: 60–65 cm / 23.5–25.5 in.
Strap width: approximately 5–6 cm / 2–2.5 in.
Part 1 – Crochet the Bag Base
Using navy yarn:
Ch 41.
Round 1
Starting in second ch from hook, sc in next 39 ch.
Work 3 sc in final chain.
Continue along the opposite side of the foundation chain.
Sc in next 38 ch.
Work 2 sc in the final chain.
Join with sl st or continue in a spiral. (82 sts)
Round 2
Sc around, increasing once at each of the four curved-end points. (86 sts)
Round 3
Sc around, working another increase at each curved-end point. (90 sts)
Round 4
Sc around evenly. (90 sts)
Part 2 – Build the Lower Body
Continue using navy yarn.
Rounds 5–12: sc around without increasing.
This creates the firm lower portion of the bag.
Keep the stitches fairly tight and even so the base maintains its shape.
Part 3 – Create the Roomy Hobo Body
The reference bag becomes gradually wider through the middle before narrowing toward the opening.
Round 13
[21 sc, inc] ×4. (94 sts)
Round 14
Sc around. (94)
Round 15
[22 sc, inc] ×4. (98)
Round 16
Sc around. (98)
Round 17
[23 sc, inc] ×4. (102)
Rounds 18–27
Sc evenly around. (102)
The center section should now have the roomy, softly rounded appearance characteristic of a hobo bag.
Part 4 – Begin Narrowing the Upper Bag
Round 28
[23 sc, dec] ×4, sc remaining stitches evenly.
Round 29
Sc around.
Round 30
[22 sc, dec] ×4, sc remaining stitches evenly.
Round 31
Sc around.
Round 32
[21 sc, dec] ×4, sc remaining stitches evenly.
Rounds 33–35
Sc evenly around.
The opening should now begin curving inward slightly rather than remaining completely straight.
Part 5 – Mark the Strap Sections
Lay the bag completely flat.
Place one marker at each side edge.
Now mark approximately 14–16 stitches on each side that will become the beginning of the wide shoulder strap.
The center front and center back stitches between these strap sections will form the deep curved opening.
Part 6 – Shape the Front Opening
Work back and forth across the front upper section.
Decrease one stitch at both ends of every row for approximately 8–10 rows.
This gradually lowers the center of the opening while leaving the side strap sections taller.
FO when the center front reaches the desired depth.
Repeat the same shaping across the back.
Part 7 – Left Strap
Join navy yarn to the marked left-side strap section.
Work in rows using sc.
Rows 1–4
Sc across.
Rows 5–8
Decrease 1 stitch at the inside edge every second row.
Continue working straight until the strap measures approximately 28–32 cm / 11–12.5 in from the top edge of the bag.
FO leaving a long sewing tail.
Part 8 – Right Strap
Repeat the same instructions on the opposite side.
Make sure both strap sections contain the same number of rows.
Lay them beside each other before joining to check that the lengths match.
Part 9 – Join the Shoulder Strap
Place the ends of both strap sections together.
Using the long yarn tail, whip stitch or mattress stitch them securely.
For a flatter join, hold the two ends right sides together and slip stitch through both layers.
Turn the strap right side out.
The seam should sit at approximately the top center of the shoulder.
Part 10 – Smooth the Inner Opening
Join navy yarn anywhere along the inner opening.
Work 1 round of sc evenly around the entire opening and inside edges of the strap.
At tight curves, skip an occasional stitch if necessary to prevent rippling.
Work a second round of sl st for a neat finished edge.
FO and weave in ends.
Part 11 – Finish the Outer Strap Edge
Join navy yarn along the outer edge of the bag and strap.
Work sc evenly around the complete outer contour.
Do not add too many stitches around the shoulder curve.
Finish with one round of sl st if you want the structured edge visible in the reference.
Part 12 – Large White Daisy Center
Using mustard yellow yarn:
R1: 6 sc in MR. (6)
R2: inc around. (12)
R3: [sc, inc] ×6. (18)
R4: sc around. (18)
FO leaving a long tail.
The extra round gives the flower center the raised, dimensional appearance visible on the bag.
Part 13 – Crochet the Daisy Petals
Using warm white or ivory yarn, make 7 petals.
For each petal:
Ch 10.
Starting in second chain from hook:
sl st, sc, hdc, dc, 3 tr, dc, hdc.
Now work along the opposite side of the foundation chain:
hdc, dc, 3 tr, dc, hdc, sc, sl st.
FO leaving a sewing tail.
Each petal should have a long rounded teardrop shape.
Part 14 – Give the Petals Dimension
Before assembling the flower, gently fold each petal lengthwise.
Using the yarn tail, place one or two tiny stitches near the bottom of the petal to hold a subtle raised ridge.
Do not flatten the petals.
The finished daisy should look dimensional and slightly sculpted rather than like a flat applique.
Part 15 – Assemble the Daisy
Arrange all seven white petals in a circle.
Overlap the bases slightly.
Sew the petal bases together securely.
Place the yellow center over the joined bases.
Sew around the yellow center while leaving its middle slightly raised.
The completed flower should measure approximately 13–15 cm / 5–6 in across.
Part 16 – Attach the Daisy to the Bag
Lay the finished bag flat with the front facing upward.
Position the flower toward the lower right side of the front panel, matching the asymmetrical placement shown in the reference.
Do not center the flower.
Pin it temporarily and check the placement while the bag is hanging naturally.
Sew around the yellow center first.
Then secure the lower half of each white petal while leaving the outer tips slightly free.
This preserves the dimensional handmade look.
Part 17 – Optional Magnetic Closure
If desired, sew a magnetic snap inside the center opening.
Place each half approximately 2–3 cm / 1 in below the top edge.
Reinforce the area with a small square of fabric or felt before attaching the snap.
Part 18 – Optional Fabric Lining
Place the finished bag flat on folded lining fabric.
Trace around the bag body, excluding the crochet strap.
Add approximately 1.5 cm / 5/8 in seam allowance.
Cut two identical lining pieces.
Sew around the sides and bottom.
Turn the upper raw edge toward the wrong side and press.
Insert the lining into the crochet bag.
Hand sew it just below the opening using small invisible stitches.
Part 19 – Optional Inner Pocket
Cut a rectangle of lining fabric approximately 18 × 14 cm / 7 × 5.5 in.
Fold and stitch the edges.
Sew the pocket to one lining panel before installing the lining.
This creates a convenient compartment for keys, cards or a phone.
Final Shaping
Lightly dampen the finished bag.
Stuff it with clean towels to establish the rounded body.
Shape the lower corners gently with your hands.
Lay the strap flat without stretching it.
Arrange the daisy petals individually.
Allow the bag to dry completely before removing the towels.
Color Variations
Original Look: deep navy + warm ivory + mustard yellow.
Autumn: chocolate brown + cream + burnt orange flower.
Coastal: dusty blue + white + golden yellow.
Vintage: olive green + cream + muted rust.
Romantic: burgundy + blush pink + warm cream.
Minimal: beige bag + ivory flower + caramel center.
Spring: sage green + white + soft yellow.
Ways to Customize the Bag
- Add two smaller daisies beside the large flower.
- Make the flower removable with a brooch pin.
- Add a zipper instead of a magnetic closure.
- Use contrasting yarn around the inner opening.
- Add an interior phone pocket.
- Make the strap shorter for a closer shoulder fit.
- Extend the strap for a more relaxed drop.
- Use raffia-style yarn for a summer version.
- Add a small handmade leather tag.
- Leave the flower off for a completely minimalist hobo bag.
Care Instructions
Hand wash in cool water using a mild detergent.
Do not wring or twist the bag.
Press excess water gently between clean towels.
Stuff the bag lightly while drying to preserve its shape.
Dry flat away from direct heat.
Reshape the daisy petals while damp.
Store flat or loosely stuffed rather than hanging the bag for long periods, which can stretch the strap.
Frequently Asked Questions
Yes, if you are comfortable with single crochet, increases, decreases and working in rounds. The strap shaping and flower assembly require a little more attention, making it a good confident-beginner project.
Begin with a longer foundation chain and add more rounds to the middle body section. Keep the shaping proportional so the opening remains narrower than the widest part of the bag.
Crochet straps naturally stretch under weight, especially when made with soft yarn. Cotton yarn, tighter stitches and a fabric reinforcement strip inside the strap can reduce stretching.
No. A tightly crocheted bag can be used without lining, but a fabric lining gives it more structure and prevents small items from pushing through the stitches.
Yes. Use fewer chains for each petal or a smaller hook and lighter yarn.
Secure only the center and lower portions of the petals to the bag. Leaving the outer petal tips free creates the raised appearance seen in the finished design.
The finished Navy Blue Crochet Hobo Bag Pattern with Daisy