Navy Flower Granny Square Crochet Bedspread Pattern
Beginner Friendly
Perfect for those just starting their crochet journey, with clear instructions and simple techniques
Single-Day Project
A satisfying project you can complete in a single afternoon or evening.
Handmade Gift
A beautiful keepsake — free forever. Read online or print at home.
About This Navy Flower Granny Square Crochet Bedspread Pattern
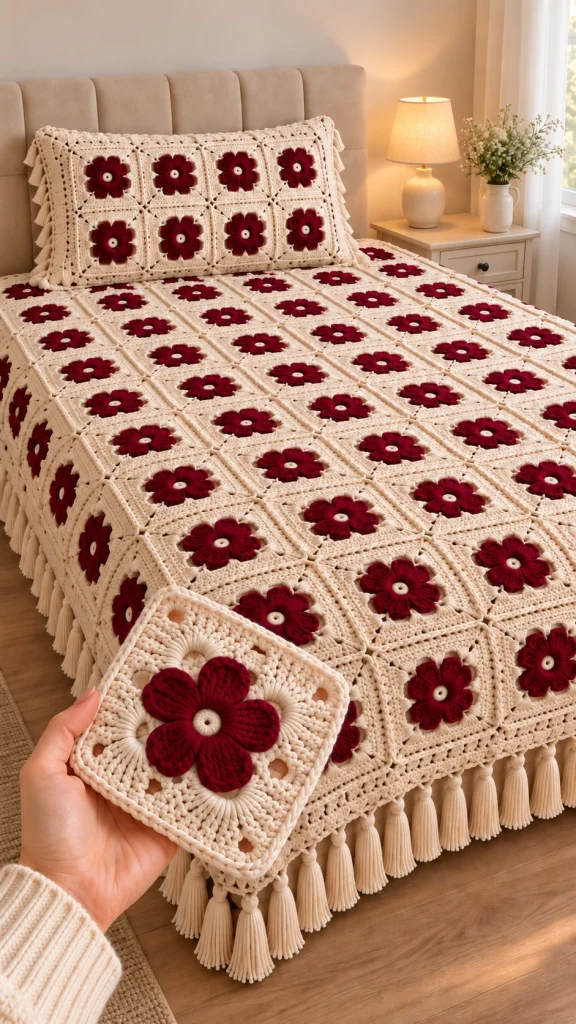
This flower granny square crochet bedspread pattern creates an elegant handmade cover using individual cream squares with raised navy-blue flowers in the center. The repeated floral motifs give the finished piece a beautiful vintage look, while the neutral cream background keeps it soft and timeless.
The bedspread is made one square at a time and then joined into a large rectangle. A decorative crochet border and long cream tassels finish the lower edge. You can also use the same squares to make the matching pillow shown with the blanket.
Materials
- Worsted #4 cotton or cotton-blend yarn – warm cream 2500-3000 g
- Worsted #4 yarn – deep navy blue 700-900 g
- 4.0 mm crochet hook 1
- 3.5 mm crochet hook optional for firmer flowers
- Large yarn needle 1
- Stitch markers several
- Scissors 1 pair
- Cardboard approximately 15 cm long for tassels
Abbreviations
MRmagic ringchchainsl stslip stitchscsingle crochethdchalf double crochetdcdouble crochettrtreble crochetststitchstsstitchesspspacereprepeatFOfasten offFinished Size
- One square: approximately 15 x 15 cm
- Bedspread: approximately 180 x 210 cm before tassels
- Tassels: approximately 12-14 cm long
- Matching pillow: approximately 45 x 70 cm
Navy Flower Center
Each square begins with the raised navy flower. The petals are intentionally thick and rounded so they stand above the cream background.
Round 1
- With navy yarn, make a MR.
- Ch 1.
- Work 8 sc into the ring.
- Pull the ring closed.
- Join with sl st to the first sc. (8 sts)
Round 2 – Petal Bases
- Ch 1.
- Work 2 sc into each st around.
- Join with sl st. (16 sts)
Raised Flower Petals
The flower is formed with eight thick petals.
- *Sl st into next st.
- Ch 3.
- Work 3 tr into the next st, leaving the final loop of each tr on the hook.
- Yarn over and pull through all remaining loops to form a thick cluster.
- Ch 3.
- Sl st into the next st.*
- Repeat from * to * around until you have 8 petals.
- Join and FO.
Gently shape each petal outward with your fingers. The flower should remain dimensional rather than lying completely flat.
Cream Background – Round 1
Join cream yarn behind the navy flower.
- Join cream yarn between two navy petals.
- Ch 3.
- Work 3 dc into the same space.
- Ch 2.
- Work 4 dc into the next space between petals.
- Continue around, placing groups of dc between the flower petals.
- Join with sl st.
The cream stitches should sit behind the navy petals so the flower remains raised on the surface.
Turning the Flower Into a Square
Round 2
- Ch 3.
- Dc into the next stitches until you reach the first corner position.
- Into the corner work: 2 dc, ch 2, 2 dc.
- Continue working dc along the next side.
- Repeat the corner sequence at all four corners.
- Join with sl st.
Round 3
- Ch 3.
- Dc across each side.
- Into every ch-2 corner space work: 2 dc, ch 2, 2 dc.
- Join with sl st.
Openwork Detail Round
This round gives the square the delicate lacy appearance visible around each flower.
- Ch 4.
- Skip 1 st, dc in next st.
- *Ch 1, skip 1 st, dc in next st.*
- Repeat across each side.
- At every corner work: dc, ch 2, dc.
- Continue around and join.
Final Square Round
- Ch 1.
- Sc into each dc and each ch-1 space along the side.
- Work sc, ch 2, sc into each corner.
- Continue around.
- Join with sl st.
- FO and weave in the ends.
Block the square gently to approximately 15 x 15 cm.
How Many Squares?
For a bedspread approximately 180 x 210 cm, arrange the motifs in a grid of approximately:
- 12 squares across
- 14 squares down
- Total: 168 floral squares
You can easily reduce or increase the number of motifs to fit your mattress.
Joining the Squares
For the clean raised seams visible between the motifs, use cream yarn.
- Place two squares side by side with the RS facing upward.
- Insert the hook through the corresponding edge stitches of both squares.
- Join yarn and work sl st evenly along the entire edge.
- Add another square and repeat.
- Join all squares into horizontal strips first.
- Join the completed strips together vertically.
Keep the joining tension relaxed so the blanket remains flat.
Outer Bedspread Border
Round 1
- Join cream yarn in any corner.
- Ch 1 and sc evenly around the entire blanket.
- Work 3 sc into each corner.
- Join with sl st.
Round 2
- Ch 3.
- Dc around.
- Work 2 dc, ch 2, 2 dc into each corner.
- Join.
Round 3 – Lace
- Ch 4.
- Skip 1 st, dc in next.
- Repeat ch 1, skip 1, dc around.
- Maintain the corners with dc, ch 2, dc.
- Join.
Decorative Scalloped Edge
- Join cream yarn.
- *Skip 1 st.
- Work 5 dc into the next st.
- Skip 1 st.
- Sl st into the next st.*
- Repeat around the desired edges.
You may use the scalloped edging around all four sides or reserve the tassel edge for the foot of the bed.
Long Tassel Border
The long cream tassels give the finished bedspread its soft vintage appearance.
- Cut a piece of cardboard approximately 15 cm long.
- Wrap cream yarn around the cardboard 20-25 times.
- Slide a separate strand under the wrapped yarn and tie securely at the top.
- Cut through the loops at the opposite end.
- Wrap another strand approximately 2 cm below the top knot.
- Tie tightly and hide the ends.
- Trim the tassel evenly to approximately 12-14 cm.
Make enough tassels to place one approximately every 8-10 cm along the lower edge.
Matching Floral Pillow
The pillow uses exactly the same flower granny squares as the bedspread.
- Make 8 floral squares.
- Arrange them in 2 rows of 4 squares.
- Join them using cream yarn.
- Create a matching back panel using solid cream crochet or fabric.
- Place front and back together.
- Sc around three sides.
- Insert the pillow form.
- Close the final side with sc or add buttons for a removable cover.
Pillow Tassel Edge
For the soft decorative look shown with the bedspread, attach small cream tassels along the short sides of the pillow.
- Finished tassel length: approximately 5-7 cm
- Spacing: approximately 4-5 cm
- Use fewer yarn wraps than for the bedspread tassels.
Color Alternatives
- Classic: cream + navy blue
- Romantic: ivory + dusty rose
- Country: oatmeal + sage green
- Vintage: cream + burgundy
- Coastal: white + denim blue
- Autumn: cream + burnt orange
- Christmas: ivory + deep red or forest green
Size Guide
- Baby blanket: 5 x 6 squares
- Lap blanket: 6 x 8 squares
- Throw: 8 x 10 squares
- Twin bed: approximately 10 x 13 squares
- Full/Double bed: approximately 12 x 14 squares
- Queen bed: approximately 14 x 16 squares
These are approximate layouts. Always measure your finished square and mattress before deciding on the final motif count.
Finishing
- Weave in every yarn end securely.
- Check all joining seams.
- Gently steam or wet block the completed bedspread according to your yarn fiber.
- Shape the navy petals while damp.
- Lay the blanket flat until completely dry.
- Attach and trim the tassels last.
Care Instructions
For a large handmade bedspread, gentle washing is recommended. Use cool water and a mild detergent. Avoid high heat, which may distort the floral motifs or tassels.
Air drying flat is ideal. If the blanket is too large to lay completely flat, support its weight carefully while drying so the joined squares do not stretch.
Frequently Asked Questions
Yes. Keep the background cream and change only the center flowers for an easy way to create a completely different version of the bedspread.
No. The motif count depends on your finished square size and the dimensions of your bed. Make one sample square, measure it, then calculate the number required for your preferred coverage.
Yes. An experienced crocheter can use a join-as-you-go technique on the final cream round instead of sewing or slip-stitching all the squares afterward.
Use the same yarn, hook and tension throughout the project, count every round carefully and block the motifs to one consistent measurement before joining.
Yes. Finish with the scalloped crochet border for a simpler version. The floral square design is decorative enough to work beautifully without fringe.
Yes. The same floral motif works well for cushion covers, tote bags, table runners, smaller throws and decorative panels.
The finished Navy Flower Granny Square Crochet Bedspread Pattern

