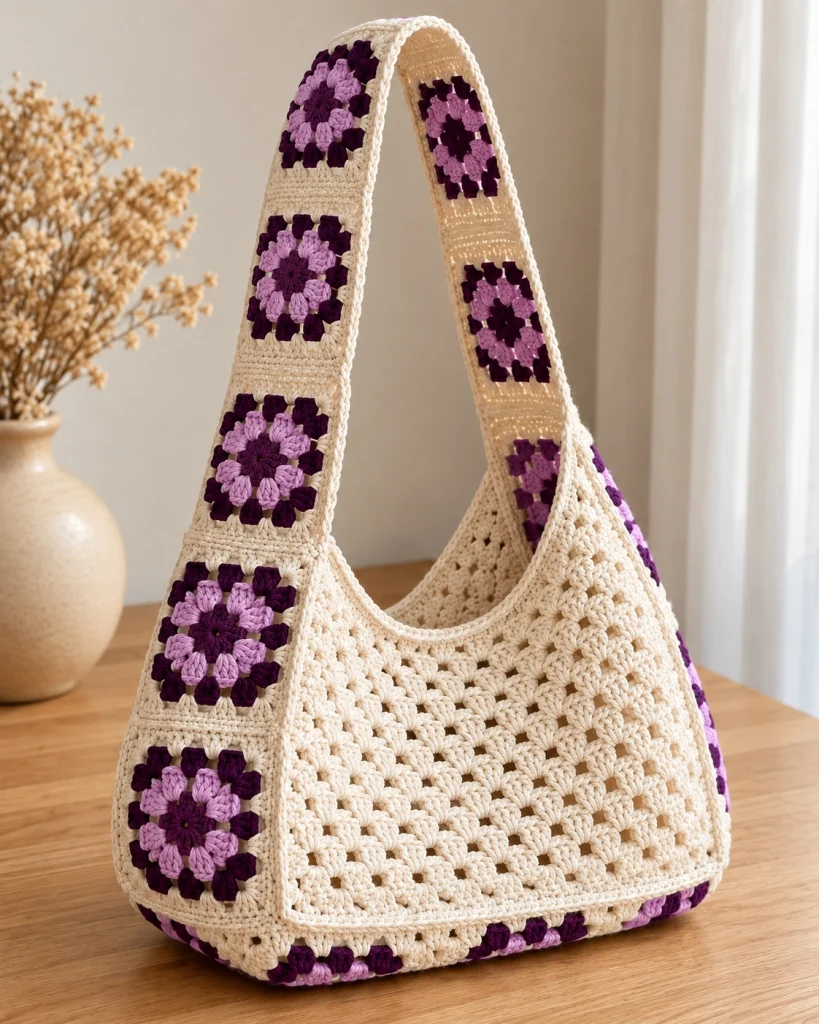
Purple Flower Granny Square Crochet Hobo Bag
Beginner Friendly
Perfect for those just starting their crochet journey, with clear instructions and simple techniques
Single-Day Project
A satisfying project you can complete in a single afternoon or evening.
Handmade Gift
A beautiful keepsake — free forever. Read online or print at home.
About This Purple Flower Granny Square Crochet Hobo Bag
This crochet flower granny square hobo bag combines a soft cream textured body with a statement shoulder strap made from purple floral granny squares. The wide integrated strap gives the bag its relaxed hobo silhouette, while the flower motifs add a beautiful vintage handmade detail.
The pattern is worked in separate sections: two textured body panels, floral granny squares, connecting strap sections and a reinforced bottom. Everything is then joined and finished with a neat crochet border.
Materials
- Worsted / Aran #4 cotton yarn – cream 450-550 g
- Worsted / Aran #4 cotton yarn – dark plum 80-100 g
- Worsted / Aran #4 cotton yarn – lavender 60-80 g
- 4 mm crochet hook 1
- Yarn needle 1
- Scissors 1 pair
- Stitch markers 4-6
- Cotton fabric for lining optional
- Magnetic snap optional
Abbreviations
chchainsl stslip stitchscsingle crochethdchalf double crochetdcdouble crochettrtreble crochetspspaceststitchstsstitchesYOyarn overreprepeatFOfasten offFinished Measurements
- Bag width: approximately 34-37 cm / 13.5-14.5 in
- Bag height: approximately 28-31 cm / 11-12 in
- Bottom depth: approximately 8-10 cm / 3-4 in
- Strap width: approximately 9-10 cm / 3.5-4 in
- Strap drop: approximately 38-42 cm / 15-16.5 in
Purple Flower Granny Square
Make approximately 10-12 flower squares, depending on your desired strap length and bag size.
Round 1 – Flower Center
Using dark plum, make a magic ring.
Ch 2, work 12 dc into the ring.
Pull the ring closed and sl st to the first dc.
12 sts.
Round 2 – Lavender Petals
Join lavender yarn in any stitch.
Ch 2.
In the same stitch work:
YO, insert hook, pull up loop, YO and pull through 2 loops twice, leaving the final loops on the hook.
YO and pull through all loops to create a small cluster.
Ch 1.
Repeat one cluster in every stitch around.
Sl st to close.
You should have 12 lavender petal clusters.
Round 3 – Dark Plum Petal Border
Join dark plum in any ch-1 space.
Work:
(3 dc, ch 1) in each ch-1 space around.
Sl st to the first dc.
This creates the dark outer portion of the flower and begins transforming the circular motif into a square.
Round 4 – Square the Motif
Change to cream.
Join in any space.
Work:
Ch 3, 2 dc in same space.
In the next two spaces work 3 dc.
For each corner work:
(3 dc, ch 2, 3 dc) in the same space.
Continue around, placing three 3-dc groups between each corner.
Sl st to the beginning ch-3.
Round 5 – Cream Border
Ch 1.
Work 1 sc in each dc.
In each ch-2 corner work:
(sc, ch 2, sc).
Continue around and sl st to the first sc.
FO and weave in the ends.
Bag Body – Make 2
Using cream yarn, ch 57.
Row 1
Work 1 sc in 2nd ch from hook and across.
56 sc.
Row 2
Ch 3, turn.
Skip 2 sts, work 3 dc in next st.
*Skip 2 sts, 3 dc in next st.*
Repeat across.
Row 3
Ch 3, turn.
Work 3 dc into each space between the 3-dc groups.
Continue across.
Rows 4-22
Repeat Row 3.
The fabric should develop the soft clustered texture visible on the body of the bag.
Shape the Upper Bag
The top of the bag curves slightly upward toward the strap.
Row 23
Sl st across the first 6 sts.
Continue the established cluster pattern until 6 sts remain.
Leave remaining sts unworked.
Row 24
Decrease one cluster at both ends.
Rows 25-28
Continue decreasing gradually at both edges until the top opening measures approximately 22-24 cm.
FO.
Repeat for the second panel.
Bottom Panel
Using cream yarn, ch 13.
Row 1
Sc in 2nd ch from hook and across.
12 sc.
Rows 2-56
Ch 1, turn.
Sc across.
Continue until the strip matches the width around the lower edge of the bag.
FO.
Granny Square Strap Sections
Arrange the finished flower squares vertically.
For the front left strap section, join approximately 5-6 squares.
For the back/right strap section, join another 5-6 squares.
The exact number depends on your preferred strap drop.
Join the Granny Squares
Place two squares with right sides facing.
Using cream yarn, join through the corresponding edge stitches with slip stitches.
Alternatively, use a mattress stitch for a nearly invisible seam.
Repeat until you have two long granny-square strips.
Add Cream Sections Between Squares
To reproduce the wider cream spacing visible between the floral motifs, work a narrow crochet section between selected squares.
Join cream yarn to the top edge of a square.
Row 1
Sc evenly across.
Rows 2-4
Ch 1, turn.
Sc across.
Attach the next flower square to the final row.
This creates the cream separators between the purple motifs.
Attach the Strap to the Bag
Position one granny-square strip along the upper left side of the front panel.
The bottom flower square should begin near the lower side of the bag, creating the long decorative vertical strip visible in the design.
Pin or mark the position.
Using cream yarn, sc the square strip securely to the bag edge.
Repeat on the opposite side and on the back panel.
Create the Continuous Shoulder Strap
Bring the two granny-square strap sections upward.
Join them at the top using cream yarn.
For extra strength, work:
1 row sc around both outer edges of the complete strap.
Then work a second row of sc if you want a firmer strap.
Assemble the Bag
Place the front and back panels with wrong sides together.
Position the bottom strip between them.
Beginning at one upper side:
- Sc down the first side.
- Continue through the bottom panel and front panel together.
- Work across the bottom.
- Continue up the opposite side.
- Repeat for the back panel.
Keep the stitches evenly spaced so the bag remains symmetrical.
Decorative Bottom Border
Using cream yarn, work one round of sc around the bottom seam.
For a slightly scalloped texture, work:
*Skip 1 st, 5 dc in next st, skip 1 st, sl st in next st.*
Repeat around.
For the purple accent visible near the bottom, work a narrow round using alternating dark plum and lavender sections before completing the cream edging.
Finish the Bag Opening
Join cream yarn at one side of the opening.
Round 1
Work sc evenly around the entire opening.
Round 2
Work another round of sc.
Round 3
Work sl st loosely around for a clean, structured edge.
FO and weave in the ends.
Optional Fabric Lining
A lining is recommended if you plan to use the bag regularly.
- Measure the finished bag interior.
- Cut two fabric pieces approximately 1.5 cm larger than the measurements.
- Sew the sides and bottom together.
- Fold the upper raw edge inward.
- Place the lining inside the crochet bag.
- Hand-sew it just below the crochet opening.
You can also add an interior pocket before inserting the lining.
Optional Magnetic Closure
Install a magnetic snap in the lining before sewing the lining into the bag.
Position it approximately 2-3 cm below the center of the opening.
Reinforce the fabric behind the snap with a small square of interfacing.
Color Combination
For the same soft vintage-inspired look:
- Main body: warm ivory / natural cream
- Flower centers: deep plum
- Petals: dusty lavender
- Outer flower details: dark wine purple
- Borders: warm cream
The neutral body keeps the bag wearable while allowing the purple floral motifs to become the focal point.
Alternative Color Ideas
- Cream + sage + dusty rose
- Beige + rust + olive
- Ivory + navy + powder blue
- Natural cotton + mustard + brown
- Black + cream + burgundy
- White + lilac + deep violet
Final Assembly Check
- Check that both body panels are the same size.
- Block all flower granny squares.
- Join the squares into two strap sections.
- Attach the decorative straps symmetrically.
- Join the front, back and bottom.
- Reinforce the shoulder strap.
- Finish the bag opening.
- Add the optional lining and closure.
- Weave in every yarn tail securely.
- Lightly steam and shape the finished bag.
Frequently Asked Questions
The body uses relatively simple stitches, but shaping, granny-square joining and strap construction make this pattern best suited to an adventurous beginner or intermediate crocheter.
Approximately 10-12 squares are suitable for the proportions shown. Make fewer for a shorter strap or additional squares for a longer shoulder drop.
Yes. Reduce the starting chain of the body panels and use smaller granny squares. Keep both panels identical and adjust the bottom strip to match.
Yes, although cotton is recommended because it stretches less and gives the bag better structure. If using acrylic, adding a fabric lining and reinforced strap is especially helpful.
Use firm cotton yarn, crochet the strap borders tightly and reinforce the inside with cotton webbing or fabric tape.
Absolutely. Keep the cream body neutral and change the flower colors to create seasonal or personalized versions of the same bag.
The finished Purple Flower Granny Square Crochet Hobo Bag

