Purple & Pink Granny Square Crochet Bag Pattern
Beginner Friendly
Perfect for those just starting their crochet journey, with clear instructions and simple techniques
Single-Day Project
A satisfying project you can complete in a single afternoon or evening.
Handmade Gift
A beautiful keepsake — free forever. Read online or print at home.
About This Purple & Pink Granny Square Crochet Bag Pattern
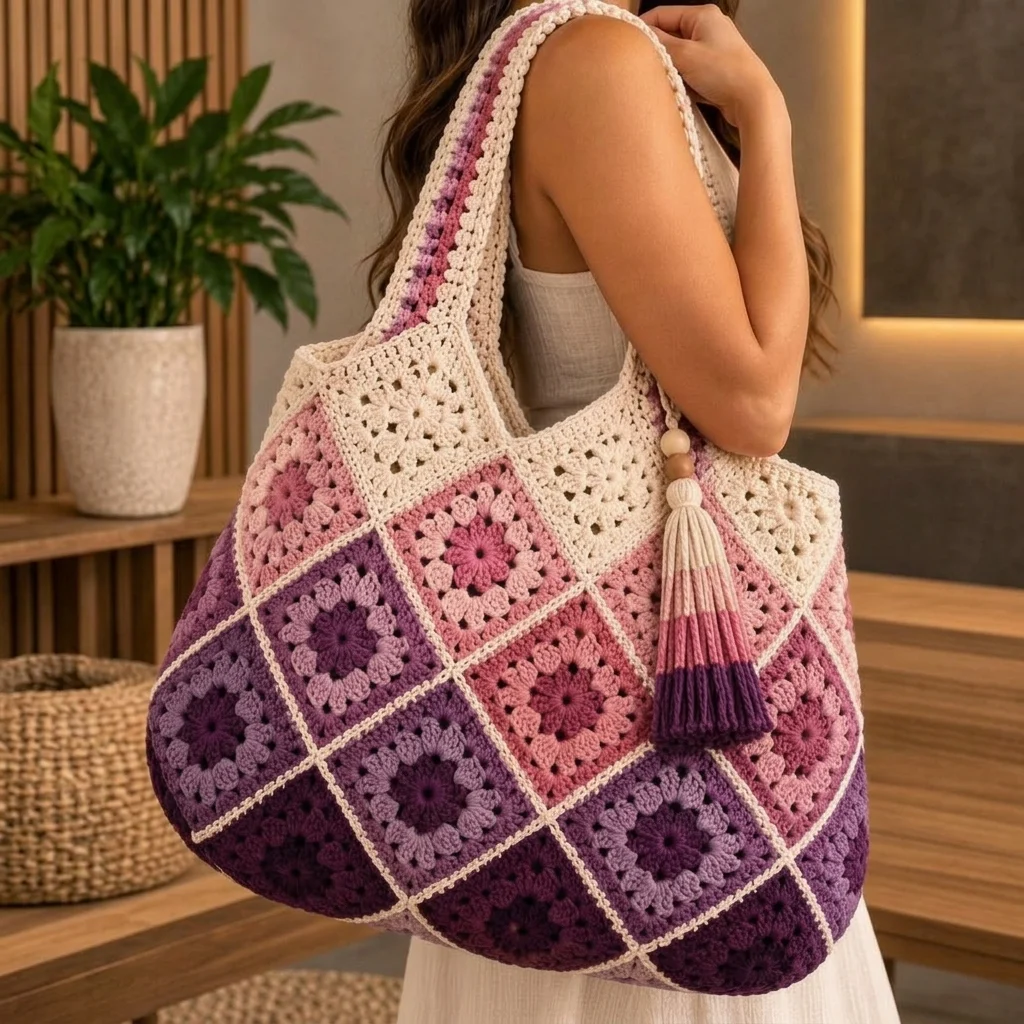
This granny square crochet bag pattern creates a beautiful oversized shoulder bag inspired by the reference, with dimensional flower granny squares arranged in a soft gradient from cream and blush pink at the top to rich plum purple at the bottom.
The bag has a roomy rounded shape, a wide comfortable crochet shoulder strap and a coordinating three-color tassel. It is perfect as an everyday tote, market bag, project bag or statement handmade accessory.
Materials
- Worsted #4 cotton yarn – natural cream 350-400 g
- Worsted #4 cotton yarn – blush pink 180-220 g
- Worsted #4 cotton yarn – dusty rose 180-220 g
- Worsted #4 cotton yarn – light mauve 150-180 g
- Worsted #4 cotton yarn – medium purple 150-180 g
- Worsted #4 cotton yarn – deep plum 200-250 g
- 4.5 mm crochet hook 1
- Yarn needle 1
- Scissors 1 pair
- Stitch markers 4-6
- Large wooden beads 2 optional
- Cotton lining fabric optional
Abbreviations
chchainsl stslip stitchscsingle crochethdchalf double crochetdcdouble crochettrtreble crochetspspaceststitchFOfasten offFinished Size
Approximately 48 cm / 19 in wide and 42 cm / 16.5 in tall, excluding the shoulder strap.
The finished shoulder drop is approximately 32-36 cm / 12.5-14 in.
Each finished granny square should measure approximately 11-12 cm / 4.25-4.75 in.
Construction
The bag is constructed from individual flower granny squares.
The squares are arranged diagonally to create the diamond-style layout visible in the reference. Lighter squares are concentrated near the opening, pink and mauve squares fill the middle, and darker plum squares form the lower section.
The squares are joined with cream yarn, then the upper opening is shaped and finished before adding the long shoulder strap.
Flower Granny Square – Round 1
Begin with the flower-center color.
Make a magic ring.
R1: Ch 3 (counts as dc), work 11 dc into ring.
Pull the ring closed and join with sl st to top of beginning ch-3. (12 dc)
Fasten off if changing color.
Flower Petals – Round 2
Join the second flower color into any stitch.
R2: Ch 1.
In the same stitch work:
(hdc, 2 dc, hdc).
Sl st into next stitch.
Repeat around to form six dimensional petals:
*Petal in next st, sl st in next st.*
Join and fasten off.
Build the Flower Background
Join the background color between two petals.
R3: Ch 3.
Work 3 dc into each space between petals.
Ch 1 between each 3-dc group.
Join with sl st.
This round begins transforming the flower into a granny-style motif.
Square the Motif
R4: Sl st to the next ch-1 space.
Ch 3, 2 dc, ch 1.
In the next space work 3 dc, ch 1.
For each corner work:
3 dc, ch 2, 3 dc.
Continue around until four clear corners have formed.
Join with sl st.
Final Square Round
Join cream yarn.
R5: Ch 3 and work dc evenly around the square.
In every corner ch-2 space work:
2 dc, ch 2, 2 dc.
Join with sl st and fasten off.
Block each square to approximately 11-12 cm / 4.25-4.75 in.
Color Combination 1 – Cream Top Squares
For the lightest squares near the opening:
- Center: cream
- Petals: cream
- Background: cream
- Final round: cream
These create the soft neutral top section seen in the reference.
Color Combination 2 – Blush Flower Squares
- Center: dusty rose
- Petals: blush pink
- Background: blush or pale pink
- Final round: cream
Use these squares throughout the upper-middle portion of the bag.
Color Combination 3 – Mauve Squares
- Center: deep plum
- Petals: light mauve
- Background: medium purple
- Final round: cream
These squares create the transition from pink to the darker bottom section.
Color Combination 4 – Deep Plum Squares
- Center: deep plum
- Petals: medium purple or plum
- Background: deep plum
- Final round: cream
Use these predominantly along the bottom edge to reproduce the rich gradient effect.
Suggested Square Count
For a large bag similar to the reference, make approximately 28-32 granny squares.
A good starting combination is:
- 6 cream/light squares
- 8 blush and dusty rose squares
- 8 mauve/purple squares
- 8 deep plum squares
You can adjust the exact number depending on the size of your motifs and desired bag width.
Arrange the Squares
Lay all finished squares on a large flat surface before joining.
Rotate each square approximately 45 degrees so it appears as a diamond.
Arrange the colors from light to dark:
Cream → blush pink → dusty rose → mauve → purple → deep plum.
Avoid placing too many identical squares directly beside one another. The gradient should feel blended rather than striped.
Joining the Squares
Use cream yarn for all joins.
Place two squares with wrong sides together.
Insert hook through corresponding stitches of both squares.
Join with sc across the entire edge.
Fasten off or continue directly into the next pair of squares.
The visible cream seam is intentional and creates the beautiful outlined grid seen in the reference.
Forming the Bag Body
Once the front arrangement is joined, create a matching back arrangement.
Place the front and back panels together with wrong sides facing.
Join around the sides and bottom using cream sc.
Leave the upper section open.
At the bottom corners, join the motifs carefully so the bag forms a soft rounded shape rather than a sharp rectangular box.
Creating the Rounded Bottom
To give the bag the full curved shape shown in the reference, work one reinforcing round along the lower interior edge.
Attach matching purple yarn inside the bag.
Sc evenly across the bottom seam.
At each lower corner work sc2tog several times across the corner area.
This gently pulls the lower edges inward and creates the rounded silhouette.
Upper Opening
Join cream yarn at one side of the bag opening.
Opening R1: Sc evenly around the entire opening.
R2: Ch 1, sc in every stitch around.
R3: Repeat R2.
Fasten off.
These rounds stabilize the top edge and prevent the granny squares from stretching excessively.
Shoulder Strap
The strap is worked directly from one upper side of the bag.
Join cream yarn approximately 8-10 cm / 3-4 in from the side seam.
Work approximately 10-12 sc across the top edge.
Turn.
Row 1: Ch 1, sc across.
Repeat until the strap measures approximately 65-75 cm / 25.5-29.5 in.
Do not fasten off yet.
Pink & Purple Strap Detail
To reproduce the colored center stripe visible on the reference strap, work the strap in three narrow sections.
Use cream along both outer edges.
Work a narrow stripe of blush pink through the center, followed by a small mauve or purple accent stripe.
Alternatively, surface crochet one pink and one purple line along the finished cream strap.
This method keeps the strap strong while adding the same decorative color detail.
Attach the Strap
Position the free end symmetrically on the opposite side of the bag.
Use cream yarn and a yarn needle to sew the strap securely through several rows of the upper granny squares.
Reinforce the attachment by stitching through the same area twice.
Weave the tail deeply into the bag.
Decorative Tassel
Cut approximately 30 strands of yarn, each about 30 cm / 12 in long.
Use a mixture of:
- Cream
- Blush pink
- Dusty rose
- Deep purple
Arrange the colors in layers so the tassel changes from cream at the top to purple at the bottom.
Fold the strands in half and tie firmly near the fold.
Wrap yarn around the tassel approximately 2 cm below the top.
Trim the ends evenly.
Beaded Tassel Attachment
Create a crochet cord approximately 15 cm / 6 in long.
Thread one or two large natural wooden beads onto the cord.
Attach the tassel beneath the beads.
Tie the completed decoration to the side of the shoulder strap near the bag opening.
Optional Fabric Lining
A lining is recommended if you plan to carry small or heavy items.
- Lay the finished bag flat and trace the body shape onto cotton fabric.
- Add approximately 1.5 cm / 5/8 in seam allowance.
- Cut two identical fabric pieces.
- Sew the side and bottom seams.
- Fold the upper raw edge inward.
- Insert the lining into the crochet bag.
- Hand-sew it to the inside of the opening using small invisible stitches.
Finishing
- Weave in all remaining yarn ends securely.
- Check every granny-square join.
- Reinforce any loose intersections.
- Lightly steam or wet block the finished bag.
- Shape the bottom into a soft curve.
- Straighten the shoulder strap while drying.
- Comb and trim the tassel evenly.
Color Ideas
- Reference palette: cream + blush + dusty rose + mauve + plum
- Autumn: cream + mustard + rust + burgundy + brown
- Coastal: ivory + pale blue + denim + navy
- Vintage: cream + sage + dusty pink + burgundy
- Neutral: ivory + oatmeal + taupe + mocha
- Spring: cream + peach + lavender + soft green
How to Make a Smaller Bag
For a medium shoulder bag, make the granny squares approximately 9 cm / 3.5 in instead of 11-12 cm.
You can also reduce the total motif count to approximately 20-24 squares.
Keep the same diagonal layout and gradient color placement.
How to Make the Bag More Structured
For a firmer shape, use tightly twisted cotton yarn and go down approximately 0.5 mm in hook size.
You can also add a fabric lining and a thin flexible bag-base insert between the crochet exterior and lining.
This helps the oversized bag maintain its rounded shape when filled.
Frequently Asked Questions
For a large bag similar to the reference, approximately 28-32 squares is a practical starting point. The exact number depends on your square size and final layout.
Cotton or a cotton-blend worsted yarn works especially well because it provides clear flower definition and creates a durable bag with less stretching than many soft acrylic yarns.
If you already know basic granny-square construction, the individual motifs are manageable. The diagonal assembly, shaping and reinforced shoulder strap make the complete project better suited to an adventurous beginner or intermediate crocheter.
No, but lining is useful for an everyday bag. It prevents small objects from slipping through the crochet openings and helps reduce stretching.
Yes. The same construction works beautifully in one color. However, using several shades from light to dark creates the gradient effect that gives this particular design its distinctive appearance.
Use cotton yarn, keep your tension firm and add slip-stitch reinforcement along both edges. For a heavily used bag, a narrow cotton webbing strip can also be sewn discreetly to the underside of the crochet strap.
The finished Purple & Pink Granny Square Crochet Bag Pattern