Red Bow Crochet Coaster Pattern
Beginner Friendly
Perfect for those just starting their crochet journey, with clear instructions and simple techniques
Single-Day Project
A satisfying project you can complete in a single afternoon or evening.
Handmade Gift
A beautiful keepsake — free forever. Read online or print at home.
About This Red Bow Crochet Coaster Pattern
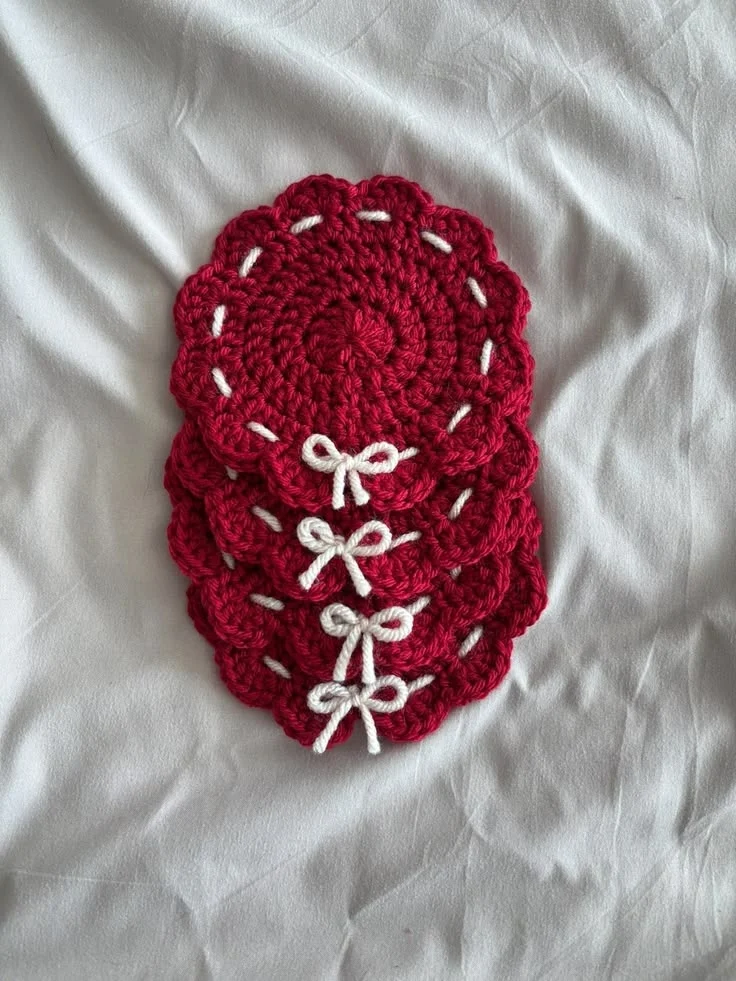
This red crochet coaster pattern is a sweet little project with a cozy handmade look. Each coaster has a thick round center, a pretty scalloped border, contrasting white running-stitch details and a tiny white bow at the bottom.
Make one for a quick afternoon project or crochet a complete stack for Christmas, Valentine’s Day, a handmade gift set or a cozy coffee table.
Materials
- Worsted weight cotton yarn – deep red 15-20 g per coaster
- Worsted or DK cotton yarn – white/cream small amount
- 4.0 mm crochet hook 1
- Yarn needle 1
- Scissors 1 pair
- Stitch marker optional
Abbreviations
MRmagic ringchchainsl stslip stitchscsingle crochethdchalf double crochetdcdouble crochetststitchinc2 stitches in same stitchFOfasten offFinished Size
Approximately 10-11 cm / 4-4.5 inches across after blocking.
Use a slightly smaller hook for a compact coaster or a larger hook for a softer, slightly bigger result.
Round Crochet Center
Using red yarn, begin with a magic ring.
R1: Ch 2, work 12 dc into MR. Pull ring closed. Join with sl st to first dc. (12 sts)
R2: Ch 2, 2 dc in every stitch around. Join. (24 sts)
R3: Ch 2, *dc in next st, 2 dc in next st.* Repeat around. Join. (36 sts)
R4: Ch 2, *dc in next 2 sts, 2 dc in next st.* Repeat around. Join. (48 sts)
Decorative Openwork Round
R5: Ch 1, sc in same stitch.
*Ch 2, skip 1 st, sc in next 2 sts.*
Repeat around, adjusting the final repeat if necessary so the openings remain evenly spaced.
Join with sl st.
These little openings will later hold the white decorative running stitch.
Scalloped Border
Sl st into the nearest ch-2 space.
R6: In each ch-2 space work:
(sc, hdc, 3 dc, hdc, sc)
Move directly into the next ch-2 space and repeat.
Continue around the entire coaster.
Join with sl st and FO.
White Running-Stitch Detail
Thread a yarn needle with white or cream yarn.
- Bring the needle from the back through one opening from R5.
- Pass the yarn over a short section of red crochet.
- Insert it into the next opening.
- Bring it back up through the following opening.
- Continue around the coaster to create evenly spaced white dashes.
- Keep the yarn relaxed so the coaster remains perfectly flat.
- Secure both ends neatly on the back.
Tiny White Crochet Bow
Using white yarn, ch 5.
Sl st into the first chain to create a small ring.
Into the ring work:
Ch 3, 3 dc, ch 3, sl st.
This creates the first bow loop.
Repeat:
Ch 3, 3 dc, ch 3, sl st.
This creates the second loop.
FO, leaving a long tail.
Shape the Bow
Wrap the yarn tail around the center of the two loops 3-4 times.
Tie securely at the back.
Cut two short pieces of white yarn approximately 4-5 cm / 1.5-2 in long.
Attach them behind the center of the bow to create the two tiny tails.
Trim both tails evenly.
Attach the Bow
Position the bow near the lower edge of the coaster, just inside the scalloped border.
Using the remaining yarn tail, stitch only through the center knot of the bow.
Make several small stitches from the back so the bow stays securely in place while the loops remain raised and dimensional.
Make a Matching Set
For the stacked handmade look, crochet 4-6 identical coasters.
Keep the same:
- Red yarn shade
- Hook size
- Number of rounds
- White running-stitch placement
- Bow size and position
When stacked together, the scalloped edges create a beautiful layered flower-like appearance.
Optional Color Ideas
The design can easily be adapted for different seasons:
- Christmas: deep red + warm cream
- Valentine’s Day: dusty pink + white
- Cottage style: sage green + cream
- Autumn: burnt orange + beige
- Vintage neutral: mocha + ivory
Blocking & Finishing
- Weave in all remaining ends.
- Lightly dampen each coaster.
- Lay it flat on a blocking mat.
- Gently shape the center into a circle.
- Arrange every scallop evenly.
- Make sure the bow sits straight.
- Allow the coaster to dry completely.
Frequently Asked Questions
Yes. The main coaster uses basic chains, single crochet and double crochet. The decorative embroidery and tiny bow are added after the main crochet is finished.
Yes. Add another increase round before beginning the decorative openwork section. A typical next round would repeat *dc in next 3 stitches, 2 dc in next stitch* around.
No. The scalloped coaster and white running-stitch detail also look beautiful without the bow.
You can, but cotton is usually more practical for coasters because it absorbs moisture and tolerates warm cups better.
A set of four is perfect for a small handmade gift, while six creates a fuller table set.
Yes. Add a small hanging loop to the top and the same design can become a flat crochet ornament or gift decoration.
The finished Red Bow Crochet Coaster Pattern