🧶 Beautiful ✨ Detailed 💝 Adorable

2 in 1 Ladybug Amigurumi Pattern

2 in 1 Ladybug Amigurumi Pattern
4.5★ Rating
4-5 Hours Time Needed
1.8K Made This
✂️

Intermediate Level

Ideal for those with basic knitting experience, featuring slightly more advanced stitches and techniques to expand your skills.

⏱️

Weekend Treat

Takes 5-7 hours, making it an enjoyable project to finish over a couple of days.

🐥

Charming Critter

Delightful animal designs with sweet details that capture the essence of your favorite woodland and farmyard friends.

About This 2 in 1 Ladybug Amigurumi Pattern

2 in 1 Ladybug Amigurumi Pattern crochet pattern - detailed view of completed project

The six individual legs are flattened at the ends for realistic insect anatomy, while the white eye bases and black bead pupils create an expressive, personality-filled face. Customizable spot placement allows each ladybug to have unique markings.

Why You'll Love This 2 in 1 Ladybug Amigurumi Pattern

I'm completely enchanted by this ladybug pattern because it combines adorable aesthetics with genuinely interesting construction techniques that keep you engaged throughout! The muzzle worked in rows is such a clever detail that creates dimensional facial features you don't often see in simple round amigurumi designs. I love how the pattern includes extensive photo references for every single step—it's like having a patient instructor guiding you through each technique, which gives you confidence to try new skills. The reversible nature means you get two looks in one project, and there's something delightful about being able to flip your ladybug to show off both the classic spotted back and the detailed belly side. The small size means it works up relatively quickly despite the detail work, and the tight stitch requirement creates such a satisfying, smooth texture. Plus, customizing the number and placement of spots makes each ladybug feel like your own unique creation—like capturing your very own garden friend!

2 in 1 Ladybug Amigurumi Pattern step 1 - construction progress 2 in 1 Ladybug Amigurumi Pattern step 2 - assembly progress 2 in 1 Ladybug Amigurumi Pattern step 3 - details and accessories 2 in 1 Ladybug Amigurumi Pattern step 4 - final assembly and finishing

Switch Things Up

I love experimenting with this ladybug pattern by creating different beetle species using alternative color combinations! Try bright yellow with black spots for a adorable bumblebee-inspired variant, or swap to orange with black for a Halloween-themed pumpkin bug. You could even create a rainbow collection with pink, purple, blue, or green backs for whimsical fantasy ladybugs that look like they belong in a fairy garden.

For added personality, consider embroidering a tiny smile or surprised expression on the muzzle using black thread, or add blush cheeks with pink embroidery for an extra sweet touch. Some crafters add tiny antennae by chaining a few stitches and attaching them to the top of the head, or create dimensional wing details by surface crocheting a line down the center of the back instead of using a sewn chain.

Don't be afraid to play with spot patterns either—try creating heart-shaped spots for Valentine's Day ladybugs, or arrange spots in specific numbers for teaching young children to count. I've seen gorgeous versions where makers use metallic or sparkle yarn for the spots to add shimmer, or gradient the spots from large to small for artistic effect. You could even make seasonal versions: red and green for Christmas, pastel colors for Easter, or orange and black for Halloween. The small size makes these perfect for creating entire colonies of ladybugs in different colors to display together as a cheerful garden scene!

Common Mistakes & How to Fix Them

✗ Not crocheting with tight enough stitches creates visible gaps where stuffing shows through the red back and gray belly fabric ✗ Misaligning the back and belly pieces when joining them together results in uneven edges and a lopsided body shape ✗ Forgetting to stuff the body gradually as you crochet around the joined edge makes it impossible to fill properly at the end ✗ Sewing the muzzle onto the body at the wrong angle or position disrupts the ladybug's facial proportions and sweet expression

2 in 1 Ladybug Amigurumi Pattern

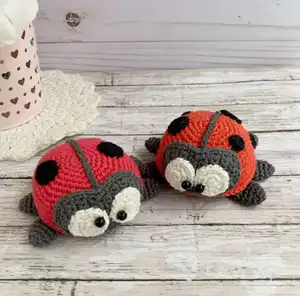
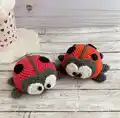
Bring spring magic to life with this adorable reversible ladybug crochet pattern! This charming design creates a delightful two-sided creature that transforms from a classic red-backed ladybug to reveal its sweet gray belly and detailed muzzle. Perfect for nature lovers and amigurumi enthusiasts, this pattern features intricate shaping techniques including a distinctive worked-in-rows muzzle, six poseable legs, and customizable black spots. The clever construction joins the back and belly pieces together while stuffing, creating a plump, huggable bug that's approximately 7cm in size. With its endearing beaded eyes and optional embroidered details, this ladybug makes a perfect springtime gift or whimsical home décor accent!

Intermediate 4-5 Hours

Materials Needed for 2 in 1 Ladybug Amigurumi Pattern

— Main Fabric

  • 01
    100% cotton DK weight yarn in red (approximately 25-30g for back)
  • 02
    100% cotton DK weight yarn in dark gray/granite gray (approximately 25-30g for belly, muzzle, and paws)
  • 03
    Small amount of white cotton yarn for eye bases
  • 04
    Small amount of black cotton yarn for spots

— Tools Required

  • 01
    2.0mm crochet hook (Clover or similar)
  • 02
    Yarn needle with large eye for sewing
  • 03
    Sewing pins for positioning pieces
  • 04
    Scissors
  • 05
    Black beads 6mm diameter for pupils (2 pieces)
  • 06
    Hollow fiber or polyfil stuffing
  • 07
    Embroidery thread (optional, if not using beads for eyes)

Progress Tracker

0% Complete

— Back (Red) :

Info:

With red yarn, use 2.0mm hook. Crochet in a spiral

Row 1:

6 sc in magic ring (6)

Row 2:

2 sc in each sc (12)

Row 3:

(1 sc, sc inc)* 6 (18)

Row 4:

(2 sc, sc inc)* 6 (24)

Row 5:

(3 sc, sc inc)* 6 (30)

Row 6:

(4 sc, sc inc)* 6 (36)

Row 7:

(5 sc, sc inc)* 6 (42)

Row 8:

42 sc (42)

Row 9:

(6 sc, sc inc)* 6 (48)

Row 10:

48 sc (48)

Row 11:

(7 sc, sc inc)* 6 (54)

Row 12:

54 sc (54)

Row 13:

(8 sc, sc inc)* 6 (60)

Row 14:

60 sc (60)

Info:

Don't cut the work thread

— Belly (Dark Gray) :

Info:

With dark gray yarn, use 2.0mm hook. Crochet in a spiral

Row 1:

6 sc in magic ring (6)

Row 2:

2 sc in each sc (12)

Row 3:

(1 sc, sc inc)* 6 (18)

Row 4:

(2 sc, sc inc)* 6 (24)

Row 5:

(3 sc, sc inc)* 6 (30)

Row 6:

(4 sc, sc inc)* 6 (36)

Row 7:

(5 sc, sc inc)* 6 (42)

Row 8:

(6 sc, sc inc)* 6 (48)

Row 9:

(7 sc, sc inc)* 6 (54)

Row 10:

(8 sc, sc inc)* 6, sl.st (60)

Info:

Tie off thread and cut

— Joining Back and Belly :

Info:

Put wrong sides of pieces together, insert hook through loops of both pieces and crochet sc around the edge. Stuff the body as you go around. Finish with sl.st, tie off and hide thread inside

— Muzzle (Dark Gray) :

Info:

With dark gray yarn, use 2.0mm hook. Crocheted in rows

Setup:

Crochet 5 ch

Row 1:

Start in second loop from hook: 1 sc inc, 2 sc, 1 sc inc, 1 ch, turn (6)

Row 2:

1 sc inc, 4 sc, 1 sc inc, 1 ch, turn (8)

Row 3-6:

4 rows of 8 sc, 1 ch, turn (8)

Row 7:

6 sc, 1 sc dec, 1 ch, turn (7)

Row 8:

1 sc dec, 5 sc, 1 ch, turn (6)

Row 9:

5 sc, 1 sc inc, 1 ch, turn (7)

Row 10:

1 sc inc, 6 sc, 1 ch, turn (8)

Row 11-14:

4 rows of 8 sc, 1 ch, turn (8)

Row 15:

1 sc dec, 4 sc, 1 sc dec, 1 ch, turn (6)

Row 16:

1 sc dec, 2 sc, 1 sc dec, 1 ch (4)

Info:

Don't cut thread. Work sc around the edge of the muzzle. Finish with sl.st. Tie off and leave enough thread for sewing

— Eyes (White) :

Info:

Make 2 pieces. With white yarn, use 2.0mm hook. Crochet in a spiral

Row 1:

6 sc in magic ring (6)

Row 2:

2 sc in each sc (12)

Row 3:

(1 sc, sc inc) *6 (18)

Info:

Finish with sl.st. Tie off and leave enough thread for sewing

— Paws (Dark Gray) :

Info:

Make 6 pieces. With dark gray yarn, use 2.0mm hook. Crochet in a spiral

Row 1:

5 sc in magic ring (5)

Row 2:

2 sc in each sc (10)

Row 3-5:

3 rows of 10 sc (10)

Info:

Fold two edges of paw together and work 4 sc across. Finish with 1 ch. Tie off and leave enough thread for sewing. Paws don't need stuffing

— Spots (Black) :

Big Spot:

With black yarn, use 2.0mm hook. Row 1: 6 sc in magic ring (6). Row 2: 2 sc in each sc, sl.st (12). Tie off and leave thread for sewing

Small Spot:

With black yarn, use 2.0mm hook. Row 1: 6 sc in magic ring (6). Finish with sl.st. Tie off and leave thread for sewing

Info:

Make as many spots as desired for custom placement

Assembly Instructions

  • Crochet 27 chains with dark gray yarn and sew the chain onto the body as a center dividing line down the back
  • Position and sew the muzzle onto the gray belly side of the body using photo references for proper placement and angle
  • Sew black beads (6mm) onto the center of white eye bases to create pupils, or embroider eyes if beads unavailable
  • Attach completed eyes onto the muzzle, positioning them symmetrically using pins before final sewing
  • Sew six paws onto the body, spacing three on each side evenly around the lower portion of the belly
  • Arrange and sew black spots onto the red back in desired pattern, varying sizes for natural ladybug appearance
  • Weave in all remaining yarn ends and trim excess thread for clean finish

Important Notes

  • 💡Crochet with very tight stitches throughout to prevent stuffing from showing through—use smaller hook if needed
  • 💡The muzzle is worked in rows not rounds, creating unique dimensional shaping that requires careful attention to turning chains
  • 💡Don't stuff the body until you're joining the back and belly pieces together—stuff gradually as you sc around the edge
  • 💡Paws are intentionally left unstuffed and flattened at the ends to create realistic insect leg appearance
  • 💡Use plenty of sewing pins when positioning pieces before final attachment to ensure symmetrical, balanced placement
  • 💡The 27-chain center line is optional but adds authentic ladybug wing division detail to the back
  • 💡Final size is approximately 7cm (2.7 inches) with recommended DK weight cotton and 2.0mm hook

This enchanting 2-in-1 ladybug pattern combines adorable design with sophisticated construction techniques to create a reversible amigurumi treasure! The distinctive muzzle worked in rows creates dimensional facial features, while the clever joining method produces a plump, huggable body with both red-spotted back and detailed gray belly. With customizable spot placement and expressive beaded eyes, each ladybug becomes a unique garden companion. Perfect for spring décor, nature-themed collections, or as a charming gift that showcases your advanced crochet skills! 🐞❤️✨

You ask,

we answer.

FAQs

Why is my stuffing showing through the stitches?

This happens when stitches aren't tight enough. Try using a smaller hook (1.75mm or 1.5mm) and pull your working yarn firmly after each stitch. The pattern specifically requires tight tension to create a smooth, professional finish without visible stuffing.

How do I work the muzzle in rows instead of rounds?

Unlike typical amigurumi worked in spirals, the muzzle uses turning chains at the end of each row. After completing stitches in a row, chain 1 and literally turn your work around to crochet back across. This creates flat, dimensional shaping with distinct edges.

Can I make the ladybug larger or smaller?

Yes! Use bulkier yarn with a larger hook for a bigger ladybug, or finer thread with a smaller hook for miniature versions. Just maintain the same stitch counts—the size will scale naturally with your yarn weight choice.

Do I have to use beads for the eyes?

No, the pattern notes that you can embroider eyes instead if you don't have 6mm beads or if making this for young children who might be a choking hazard concern. Use black embroidery thread or yarn to create pupils on the white eye bases.

How many spots should I make?

The pattern leaves this to your creativity! Real ladybugs typically have 2-7 spots per wing (4-14 total), but you can make as many or few as you like. Mix big and small spots for variety and authentic appearance.