🧢 Beautiful ✨ Detailed πŸ’ Adorable

Cactus Frog with Removable Pot Amigurumi Pattern

Cactus Frog with Removable Pot Amigurumi Pattern
4.3β˜… Rating
3-4 Hours Time Needed
3.3K Made This
βœ‚οΈ

Intermediate Level

Ideal for those with basic knitting experience, featuring slightly more advanced stitches and techniques to expand your skills.

⏱️

Bite-Sized Project

Complete in under 2 hoursβ€”quick, fun, and perfect for a little creative escape.

🐸

Charming Critter

Delightful animal designs with sweet details that capture the essence of your favorite woodland and farmyard friends.

About This Cactus Frog with Removable Pot Amigurumi Pattern

Cactus Frog with Removable Pot Amigurumi Pattern crochet pattern - detailed view of completed project

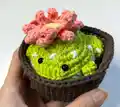
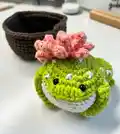
Measuring approximately 2.5 inches in height and width, this compact amigurumi is perfect for displaying on desks, shelves, or gifting to plant-loving friends. The combination of bright green, soft white, warm brown, and pink-red colors creates an eye-catching design.

Why You'll Love This Cactus Frog with Removable Pot Amigurumi Pattern

I absolutely love how this pattern brings together two of my favorite things: cute amphibians and succulent-inspired designs. The removable pot feature makes it incredibly versatile, allowing you to change up the display or even create multiple frogs for the same pot. The layered flower with its 16 delicate petals adds such a beautiful touch of elegance to the playful frog design. What really makes this pattern special is the attention to detail in the frog's anatomy, from the three-toed feet to the white belly embroidery that mimics a real frog's markings. It's one of those projects that looks impressive but is surprisingly achievable with intermediate crochet skills.

Cactus Frog with Removable Pot Amigurumi Pattern step 1 - construction progress Cactus Frog with Removable Pot Amigurumi Pattern step 2 - assembly progress Cactus Frog with Removable Pot Amigurumi Pattern step 3 - details and accessories Cactus Frog with Removable Pot Amigurumi Pattern step 4 - final assembly and finishing

Switch Things Up

I love experimenting with color variations to give this cactus frog pattern a completely different personality. Instead of the traditional bright green, try using a soft pastel mint or even a bold turquoise for a tropical vibe. You could switch out the pink flower for purple, orange, or blue petals to match your home dΓ©cor or create seasonal versions.

For a more realistic approach, consider using variegated yarn for the frog's body to create natural-looking color variations, or add tiny embroidered spots using darker green yarn. The flower pot offers endless customization possibilities tooβ€”try adding stripes, color blocking, or even a two-tone effect by changing colors every few rounds.

I've also found that varying the flower size creates interesting effects. Make a smaller flower with fewer petals for a delicate look, or create an oversized bloom that covers more of the frog's head for maximum impact. You could even make multiple flowers in different colors and swap them out.

Another fun modification is adjusting the frog's expression by positioning the safety eyes differently or adding embroidered details like eyelashes, rosy cheeks, or a smiling mouth. Some crocheters love adding a small tongue peeking out for extra character. The white 'X' embroidery pattern can also be modifiedβ€”try dots, hearts, or even tiny flowers instead for a completely unique look that makes this pattern truly your own.

Common Mistakes & How to Fix Them

βœ— Forgetting to place safety eyes between rounds 5 and 6 before stuffing the head completely, making it difficult to position them correctly afterward. βœ— Not using stitch markers to track rounds during color changes, which can lead to misaligned patterns and uneven shaping throughout the body. βœ— Stuffing the frog too firmly or too loosely, resulting in either a distorted shape or a floppy finished product that won't hold its form. βœ— Skipping the back loop only and front loop only instructions, which are essential for creating the textured details on the belly and pot rim. βœ— Not leaving long enough yarn tails when fastening off pieces, making it challenging to securely attach legs, toes, and flowers to the body.

Cactus Frog with Removable Pot Amigurumi Pattern

Create this charming cactus frog amigurumi that sits perfectly in its own removable flower pot. This delightful pattern combines a bright green frog adorned with a beautiful layered flower on its head, complete with a sturdy brown pot base. The frog features adorable details including safety eyes, white belly embroidery, and three-toed feet that capture the essence of a real frog. Perfect for plant lovers and amigurumi enthusiasts alike, this unique design brings together nature and whimsy in one adorable package.

Intermediate 3-4 Hours

Materials Needed for Cactus Frog with Removable Pot Amigurumi Pattern

β€” Main Fabric

  • 01
    Cotton or acrylic yarn in green (hot green)
  • 02
    Cotton or acrylic yarn in white
  • 03
    Cotton or acrylic yarn in brown (warm brown)
  • 04
    Cotton or acrylic yarn in yellow
  • 05
    Cotton or acrylic yarn in red/light red (tea rose)
  • 06
    Sugar and cream cotton yarn recommended

β€” Tools Required

  • 01
    Crochet hook 3.5mm
  • 02
    Safety eyes 6mm (Not for children under 3)
  • 03
    Poly-fil fiber for stuffing
  • 04
    Yarn needle
  • 05
    Scissors
  • 06
    Stitch marker or piece of yarn to mark rounds

Progress Tracker

0% Complete

β€” Head and Body :

Info :

Start with green yarn

Round 1 :

8sc in a MR (8)

Round 2 :

8inc (16)

Round 3 :

(sc, inc) x8 (24)

Round 4 :

(2sc, inc) x8 (32)

Round 5 :

(3sc, inc) x8 (40)

Round 6 :

16sc, inc, 5hdc-inc, inc, 17x (47)

Info :

Change to white yarn

Round 7 BLO :

21sc, 3dec, 20sc (44)

Round 8 :

(3sc, inc) x2, 12sc, 2dec, 12sc, (3sc, inc) x2 (46)

Round 9-10 :

46sc (46)

Round 11 :

(3sc, dec) x2, 10sc, dec, 2sc, dec, 10sc, (3sc, dec) x2 (40)

Round 12 :

(2sc, dec) x10 (30)

Round 13 :

30sc (30)

Info :

Insert the safety eyes between round 5 and 6, 4 stitches apart. Make sure the nose is in the middle of the eyes. Stuff the piece.

Round 14 :

(sc, dec) x10 (20)

Round 15 :

10dec (10)

Round 16 :

3 dec. F.O You don't have to finish this round.

Info :

Close the body by using needle and cut the yarn. Hide the end inside the body.

β€” Back Legs :

Info :

Make 2 pieces. Start with green yarn

Round 1 :

6sc in a MR (6)

Round 2 :

6inc (12)

Round 3 :

(sc, inc) x6 (18)

Round 4 :

18sc (18) F.O

Info :

Leave long end to connect with the body

β€” Toes :

Info :

Make 2 pieces. Start with green yarn

Round 1 :

8sc in a MR (8)

Round 2 :

Do not break the working yarn, continue to work the toes with it: chain 3, turn work, start from the second chain from the hook, hdc, 1 slst in the chain, 1 slst on the MR) x3, 4sc, slst on the last stitch. (8) F.O

Info :

Leave long end to connect with the back legs

β€” Front Legs :

Info :

Make 2 pieces. Start with green yarn

Round 1 :

5sc in a MR (5)

Round 2 :

inc, 2sc, inc, sc (7)

Round 3-10 :

7sc (7) F.O

Infos :

Do not close the piece. Do not stuff the piece. Leave long end to connect with the body.

β€” Flower :

Info :

Start with yellow yarn

Round 1 BLO :

6sc in a MR (6)

Round 2 BLO :

6inc (12)

Round 3 BLO :

(sc, inc) x6 (18)

Info :

Change to light red yarn

Round 4 BLO :

slst, (chain 5, start from the 2nd chain from the hook, 4hdc along the chain, skip 1 stitch, slst on the next stitch of the base) x 8

Info :

After you finished all the petals in the back loop (8 petals), change to the front loop and do the same step (8 petals). F.O the last stitch. At the end you should have 16 petals. Leave long end to sew into the frog's body.

β€” Flower Pot :

Info :

Start with brown yarn

Round 1 :

8sc in a MR (8)

Round 2 :

8inc (16)

Round 3 :

(sc, inc) x8 (24)

Round 4 :

(2sc, inc) x8 (32)

Round 5 :

(3sc, inc) x8 (40)

Round 6 :

(4sc, inc) x8 (48)

Round 7 :

(5sc, inc) x8 (56)

Round 8 BLO :

56sc (56)

Round 9-14 :

56sc (56)

Round 15 FLO :

56hdc (56), slst to the first stitch. F.O

Info :

Leave long end and sew around the pot to secure and hide the end. Cut off the yarn.

Assembly Instructions

  • Sew the back legs onto two sides of the frog's thighs, making sure to stuff them firmly before closing all the way.
  • Attach the toes to the bottom of each back leg, ensuring all 3 toes are pointed outward for a realistic frog appearance.
  • Sew the front legs two stitches away from the back legs, making them 3 stitches long, then sew the tip of each leg into the belly.
  • Using white yarn, embroider decorative 'X' patterns around the frog's body to create texture and visual interest.
  • Attach the layered flower to one side of the frog's head or on top, securing it firmly with the long yarn tail.
  • Place the completed frog into the flower pot, ensuring it sits properly and can be removed easily for play or display.

Important Notes

  • πŸ’‘Work in continuous spiral rounds and use a stitch marker to track your progress through each round
  • πŸ’‘Pay special attention to BLO (back loop only) and FLO (front loop only) instructions as they create important texture details
  • πŸ’‘Safety eyes are not suitable for children under 3 years old due to choking hazard
  • πŸ’‘Leave long yarn tails when fastening off pieces to make assembly easier and more secure
  • πŸ’‘Stuff the frog body firmly but not too tightly to maintain the proper rounded shape
  • πŸ’‘The flower pot and frog are separate pieces, allowing the frog to be removable from its pot
  • πŸ’‘Hand wash gently when cleaning to preserve the shape and details of your finished piece

This delightful Cactus Frog with Removable Pot pattern brings together the best of nature-inspired amigurumi design. The charming combination of a bright green frog adorned with a multi-layered pink flower creates a unique decorative piece that doubles as a playful toy. The removable feature adds versatility, allowing you to display your frog in or out of its textured brown pot. Perfect for plant lovers, frog enthusiasts, or anyone who appreciates whimsical handmade décor. 🧢 Happy crocheting! 🐸✨

You ask,

we answer.

FAQs

Can I use different yarn colors for this pattern?

Absolutely! While the pattern suggests green, white, brown, yellow, and pink/red, you can customize the colors to create your own unique frog. Just make sure all yarns are the same weight for consistent sizing.

Is the frog permanently attached to the pot?

No, the frog and pot are worked as separate pieces and are not sewn together, making the frog removable. This allows for versatile display options and makes the piece more interactive.

What size will the finished amigurumi be?

The finished cactus frog measures approximately 2.5 inches in height and 2.5 inches in width, making it a perfect desk or shelf decoration.

Can I make this pattern child-safe?

The pattern includes safety eyes which are not recommended for children under 3. For a child-safe version, embroider the eyes instead using black yarn.

How many petals should the flower have?

The flower should have 16 petals total - 8 petals in the back loop and 8 petals in the front loop, creating a full, layered flower appearance.

Do I need to know how to work in continuous rounds?

Yes, this pattern requires working in continuous spiral rounds. Using a stitch marker will help you keep track of where each round begins and ends.