🧢 Beautiful ✨ Detailed πŸ’ Adorable

Dory Blue Tang Fish Amigurumi Pattern

Dory Blue Tang Fish Amigurumi Pattern
4.6β˜… Rating
2.5-3.5 Hours Time Needed
1.3K Made This
βœ‚οΈ

Intermediate Level

Ideal for those with basic knitting experience, featuring slightly more advanced stitches and techniques to expand your skills.

⏱️

Bite-Sized Project

Complete in under 2 hoursβ€”quick, fun, and perfect for a little creative escape.

🐰

Whimsical Buddy

Playful characters full of personality, designed to spark imagination and become cherished playtime favorites.

About This Dory Blue Tang Fish Amigurumi Pattern

Dory Blue Tang Fish Amigurumi Pattern crochet pattern - detailed view of completed project

The careful balance of blue and black sections throughout the body creates dimensional depth and authentic character recognition. Combined with the bright yellow tail accent, this pattern results in a stunning finished piece that captures Dory's cheerful spirit perfectly.

Why You'll Love This Dory Blue Tang Fish Amigurumi Pattern

I'm absolutely smitten with this Dory pattern because the intricate black detailing makes it feel like a true artistic accomplishment while still being achievable and fun! There's something magical about watching Dory's distinctive markings emerge as you follow the bold and underlined color change instructionsβ€”it's like painting with yarn. I love how the pattern challenges you just enough with the colorwork to keep things interesting without becoming frustrating or overwhelming. The satisfaction of completing those precise black sections and seeing Dory's face take shape is incredibly rewarding. Plus, pairing this finished Dory with a handmade Nemo creates the most adorable Finding Nemo duo that instantly brings those heartwarming movie moments flooding back. The quick work-up time with super bulky yarn means you can complete both fish in a weekend and have an entire ocean scene ready to gift or display!

Dory Blue Tang Fish Amigurumi Pattern step 1 - construction progress Dory Blue Tang Fish Amigurumi Pattern step 2 - assembly progress Dory Blue Tang Fish Amigurumi Pattern step 3 - details and accessories Dory Blue Tang Fish Amigurumi Pattern step 4 - final assembly and finishing

Switch Things Up

I love experimenting with this Dory pattern by adjusting the black marking placement to create different blue tang variations or even entirely new tropical fish species! Try repositioning the black stripes into horizontal bands instead of Dory's specific pattern for a zebra fish look, or use purple instead of blue with pink accents for a fantasy reef dweller that looks like it belongs in a coral kingdom.

For a more realistic approach, you could add additional fin details by picking up stitches to create small pectoral fins on the sides of the body near the face. Some crafters embroider subtle gill lines using black thread for extra anatomical detail that makes the fish look even more lifelike. You might also consider adding a tiny smile using black embroidery floss to capture Dory's perpetually optimistic expression.

Create an entire Finding Nemo scene by making Dory, Nemo, and even attempting other characters like a orange and white striped Marlin or adding sea turtle friends with brown and green yarn. I've seen beautiful underwater dioramas where makers create the fish in various sizes using different yarn weightsβ€”imagine a whole school of mini Dorys in fingering weight yarn as keychains! Don't forget you can also adapt the color scheme to make Bailey the beluga whale by using white yarn with gray accents, or Destiny the whale shark with gray and white spotted patterns. The construction technique is versatile enough to create an entire aquarium of possibilities!

Common Mistakes & How to Fix Them

βœ— Losing track of color changes between blue and black sections creates misaligned markings that disrupt Dory's distinctive facial pattern βœ— Not maintaining consistent tension when switching between colors causes puckering and uneven texture throughout the striped body sections βœ— Forgetting to stuff before row 20 when crocheting sides together leaves the body flat and impossible to fill properly βœ— Misplacing the dorsal fins or making them uneven disrupts the balanced silhouette and makes the fish look lopsided from above

Dory Blue Tang Fish Amigurumi Pattern

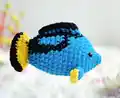
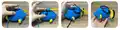
Bring Disney Pixar's lovable blue tang fish Dory to life with this enchanting crochet pattern! This delightful amigurumi captures Dory's iconic royal blue body with distinctive black markings and cheerful yellow tail. Perfect for Finding Nemo and Finding Dory fans, this pattern features the same innovative no-sew construction technique that creates the body and tail in one continuous piece. The vibrant color combinations and strategic shaping create an instantly recognizable character that will make everyone smile and remember to 'just keep swimming!' Whether you're creating a companion for your Nemo or starting a complete underwater collection, this Dory pattern is sure to delight.

Intermediate 2.5-3.5 Hours

Materials Needed for Dory Blue Tang Fish Amigurumi Pattern

β€” Main Fabric

  • 01
    Super bulky yarn (Category 6) in royal blue for main body and fins
  • 02
    Super bulky yarn (Category 6) in black for distinctive markings and details
  • 03
    Super bulky yarn (Category 6) in bright yellow for tail accent

β€” Tools Required

  • 01
    3.5mm (E) crochet hook
  • 02
    Stitch markers for tracking color changes and placement
  • 03
    Sewing needle for weaving ends
  • 04
    Scissors
  • 05
    8mm plastic safety eyes
  • 06
    Hot glue gun for securing eyes
  • 07
    Fiberfill stuffing

Progress Tracker

0% Complete

β€” Body to Tail (No Sew Construction) :

Info:

Begin with Blue yarn. When text is bold and underlined, switch to BLACK yarn

Row 1:

5 SC in an MR (5)

Row 2:

2SC, INC, 2SC (6)

Row 3:

INC, SC, 2INC, SC, INC (10)

Row 4:

SC, 7INC, 2SC (17)

Row 5:

4SC, (INC, SC) 4 times, INC, 4SC (22)

Row 6:

5SC, (INC, SC) 6 times, 5SC (28)

Row 7:

8SC, INC, 10SC, INC, 8SC (30)

Row 8:

14SC in blue, 2SC in black, 14SC in blue (30)

Row 9-10:

13SC in blue, 4SC in black, 13SC in blue (30)

Row 11:

10SC in blue, 10SC in black, 10SC in blue (30)

Row 12:

9SC in blue, 2SC in black, 2SC in blue, 4SC in black, 2SC in blue, 2SC in black, 9SC in blue (30)

Row 13:

9SC in blue, SC in black, 3SC in blue, 4SC in black, 3SC in blue, SC in black, 9SC in blue (30)

Row 14:

3SC, DEC, 3SC in blue, DEC in black, 3SC in blue, DEC in black, 2SC in blue, SC in black, DEC in blue, SC in black, 2SC in blue, DEC in black, 3SC in blue, DEC in black (24)

Row 15-16:

6SC in blue, 2SC in black, 3SC in blue, 3SC in black, 2SC in blue, 2SC in black, 6SC in blue (24)

Row 17:

2SC, DEC, 2SC in blue, (DEC, 2SC) 3 times in black, DEC in blue, 2SC in black, DEC in blue (18)

Row 18:

5SC in blue, 9SC in black, 4SC in blue (18)

Row 19:

(SC, DEC) 2 times in blue, (SC, DEC) 3 times in black, SC, DEC in blue (12)

Info:

Stuff the body firmly before continuing. Cut the Black and Blue yarn

Info:

Change to Yellow yarn

Row 20:

Crochet 2 sides together with 6SC (6)

Row 21:

Turn, 2CH, DC-INC 6 times (12)

Info:

Change to Black yarn

Row 22:

Turn, CH, 12SC (12)

Info:

Weave in the yarn end and cut

β€” Dorsal Fins :

Part 1 (Make 2):

Begin with Blue yarn. Pick up the yarn from row 7, spaced 8 stitches apart

Row 1:

(Chains 1, HDC, 3DC, HDC) in one stitch (5)

Info:

Change to Yellow yarn

Row 2:

Turn, CH, 5SC (5)

Info:

Weave in the yarn end and cut

Part 2:

Begin with Blue yarn. Pick up the yarn from R8 to R16, in the vertical line from head to tail

Row 1:

(Chains 1, SC, 7DC, SC) in one stitch (9)

Info:

Change to Black yarn

Row 2:

Turn, CH, 9SC (9)

Info:

Weave in the yarn end and cut

β€” Eyes :

Eye Placement:

Attach the eyes at R5-R6, spaced 8 stitches apart

Assembly Instructions

  • Position and secure 8mm safety eyes between rows 5-6, spacing them 8 stitches apart for Dory's characteristic wide-eyed expression
  • Use hot glue gun to permanently secure safety eye backs for extra durability with bulky yarn
  • Pick up stitches for Part 1 dorsal fins from row 7, ensuring symmetrical placement 8 stitches apart on each side
  • Create Part 2 dorsal fin by picking up stitches vertically from row 8 to row 16 along the spine centerline
  • Weave in all yarn ends securely, paying special attention to color change points where multiple tails meet

Important Notes

  • πŸ’‘Follow the bold and underlined text carefully to switch to black yarn at precise points for Dory's distinctive markings
  • πŸ’‘Maintain detailed notes or use multiple stitch markers to track complex color changes throughout the body pattern
  • πŸ’‘Remember to stuff firmly before row 20 as the opening will be sealed when crocheting sides together
  • πŸ’‘Keep consistent tension especially during frequent color changes to prevent gaps or puckering between blue and black sections
  • πŸ’‘Consider carrying yarn along the inside when switching between blue and black to reduce the number of ends to weave
  • πŸ’‘The yellow tail provides cheerful contrast and represents Dory's pectoral fins in simplified form
  • πŸ’‘Super bulky yarn makes this a quick project but requires careful attention to the detailed colorwork instructions

This delightful Dory blue tang fish pattern brings Finding Nemo's most memorable character to life with stunning colorwork detail! The intricate black markings combined with vibrant blue and yellow create an instantly recognizable companion that captures Dory's cheerful, optimistic personality. Using the clever no-sew construction method and super bulky yarn, you'll complete this charming fish quickly while enjoying the satisfying challenge of precise color changes. Just keep crocheting, and soon you'll have your very own forgetful friend! πŸŸπŸ’™βœ¨

You ask,

we answer.

FAQs

How do I keep track of all the color changes in this pattern?

Use multiple stitch markers in different colors to mark where color changes occur, or highlight the pattern with different colored markers. Some crocheters find it helpful to write out each row on separate index cards they can check off as they complete them.

Can I carry the yarn along the inside instead of cutting and rejoining?

Yes! For short color changes, you can carry the unused color along the inside of your work. This reduces the number of ends to weave in later. Just be careful not to pull the carried yarn too tightly or it will distort your stitches.

What's the difference between this pattern and the Nemo pattern?

While both use similar no-sew construction techniques, Dory's pattern features much more complex colorwork with strategic black placement creating her distinctive facial markings. Dory also has a yellow tail instead of Nemo's orange and black striped tail.

Why does Dory start with only 5 stitches instead of 6 like Nemo?

The slightly asymmetrical start helps create Dory's more elongated face shape compared to Nemo's rounder profile. This subtle difference in the foundation helps distinguish between the two fish species even though they're similar sizes.

Can I make Dory and Nemo as a matching set?

Absolutely! These patterns are designed as companions and work up to similar sizes, making them perfect for creating the iconic Finding Nemo duo. They use the same construction techniques, so once you've made one, the second will be even easier.