๐Ÿงถ Beautiful โœจ Detailed ๐Ÿ’ Adorable

Mr. Pistachio the Dinosaur Amigurumi Pattern

Mr. Pistachio the Dinosaur Amigurumi Pattern
4.3โ˜… Rating
4-5 Hours Time Needed
3.6K Made This
โœ‚๏ธ

Intermediate Level

Ideal for those with basic knitting experience, featuring slightly more advanced stitches and techniques to expand your skills.

โฑ๏ธ

Weekend Treat

Takes 5-7 hours, making it an enjoyable project to finish over a couple of days.

๐Ÿงธ

Cute Companion

An adorable friend to cherish, handcrafted with love to bring comfort and joy for years to come.

About This Mr. Pistachio the Dinosaur Amigurumi Pattern

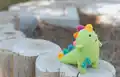
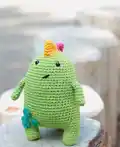
Mr. Pistachio is a delightfully different dinosaur who discovered he doesn't quite look like the others. With his giant pistachio-shaped body and vibrant colorful spikes, he's embarking on a journey to find his own kind. This endearing character teaches us that being different is what makes us special, and his quirky design will bring smiles to anyone who sees him.

Mr. Pistachio the Dinosaur Amigurumi Pattern crochet pattern - detailed view of completed project

This pattern features a unique construction method where the legs connect to form the body, creating a sturdy base for your dinosaur. The gradual shaping of the tail and playful spike placement add dimensional charm to this whimsical character.

Why You'll Love This Mr. Pistachio the Dinosaur Amigurumi Pattern

I absolutely love this pattern because it celebrates individuality and creates such a memorable character! The construction is straightforward enough to be relaxing, yet the color-changing spikes and embroidered details keep things interesting. I'm fascinated by how the simple body shape transforms into something so full of personality. The story behind Mr. Pistachio adds an emotional connection that makes every stitch meaningful, and I can't wait to see where his adventures take him in future patterns!

Mr. Pistachio the Dinosaur Amigurumi Pattern step 1 - construction progress Mr. Pistachio the Dinosaur Amigurumi Pattern step 2 - assembly progress Mr. Pistachio the Dinosaur Amigurumi Pattern step 3 - details and accessories Mr. Pistachio the Dinosaur Amigurumi Pattern step 4 - final assembly and finishing

Switch Things Up

I love how versatile Mr. Pistachio is for customization! You could experiment with making him in different color combinations - imagine a pastel version for a nursery or bold neon colors for a modern twist. I've thought about adding small wings to transform him into a dragon-like creature, which would be adorable.

The spike pattern is perfect for practicing color changes, and you could even make some spikes taller than others for a more organic look. I'm excited about trying different facial expressions by adjusting the eye placement slightly - higher eyes make him look surprised while lower eyes create a sleepier appearance.

For those who want extra details, consider adding felt claws to his feet or creating a little backpack accessory for his adventures. I think embroidering scales or patterns onto his body would add wonderful texture too. The possibilities truly are endless with this charming character!

Common Mistakes & How to Fix Them

โœ— Forgetting to stuff the legs before joining them together, which makes it difficult to fill them properly later on โœ— Not maintaining consistent tension when working the body rounds, causing the pistachio shape to become uneven or lumpy โœ— Placing the safety eyes too high or too low, which dramatically changes the character's expression and personality โœ— Sewing the spikes in random positions instead of following the photo reference, disrupting the balanced visual flow across the back

Mr. Pistachio the Dinosaur Amigurumi Pattern

Meet Mr. Pistachio, the most unique dinosaur you'll ever create! This charming amigurumi features a plump pistachio-shaped body adorned with colorful spikes that make him truly one-of-a-kind. Perfect for crafters who love whimsical characters with personality, this pattern combines simple techniques to bring this adorable misfit dinosaur to life. Follow along as Mr. Pistachio embarks on his journey to find where he truly belongs, and create your own companion for new adventures!

Intermediate 4-5 Hours

Materials Needed for Mr. Pistachio the Dinosaur Amigurumi Pattern

โ€” Main Fabric

  • 01
    Paintbox DK cotton lime green 429 (50g)
  • 02
    Paintbox DK cotton seville orange 419 (small amount, approximately 2g)
  • 03
    Paintbox DK cotton bubblegum pink 451 (small amount)
  • 04
    Paintbox DK cotton slate green 427 (small amount)
  • 05
    Paintbox DK cotton raspberry pink 444 (small amount)
  • 06
    Paintbox DK cotton dolphin blue 437 (small amount)
  • 07
    Paintbox DK cotton mustard yellow 424 (small amount)

โ€” Tools Required

  • 01
    Crochet hook 3.00mm
  • 02
    Safety eyes 7mm
  • 03
    Fiberfill stuffing
  • 04
    Tapestry needle
  • 05
    Scissors
  • 06
    Embroidery thread for face details

Progress Tracker

0% Complete

โ€” LEGS, BODY AND HEAD

First Leg :

Info :

Start with lime green colour and make a magic ring

Rnd 1 :

6 sc

Rnd 2 :

inc in all stitches (12)

Rnd 3-7 :

sc in all stitches (12)

Info :

Fasten off, leaving a long tail for sewing

Second leg and body :

Info :

Start with a magic ring

Rnd 1 :

6 sc

Rnd 2 :

inc all stitches (12)

Rnd 3-7 :

sc in all stitches (12)

Info :

Don't cut the yarn, we will join the legs

Rnd 8 :

after finishing the last sc of second leg, crochet 12 chains and connect another leg with slip stitch. Make a sc in same stitch and continue crocheting around two legs and chain. 12 sc second leg, 12 sc over the 12 ch, 12 sc first leg, 12 sc back side of the 12 ch = so you will have 48 sc

Rnd 9-31 :

48 sc (23 rnds)

Info :

Start stuffing legs and continue stuffing while you go

Rnd 32 :

6 sc, dec (42)

Rnd 33-34 :

sc in all stitches (42)

Rnd 35 :

5 sc, dec (36)

Rnd 36 :

sc in all stitches (36)

Info :

Place safety eyes between 34.-35. rounds and continue to stuffing. Embroider the cheeks and the mouth (see the photo)

Rnd 37 :

4 sc, dec (30)

Rnd 38 :

3 sc, dec (24)

Rnd 39 :

2 sc, dec (18)

Rnd 40 :

1 sc, dec (12)

Rnd 41 :

dec (6)

Info :

Leave a long tail, cut the yarn, weave the end

โ€” TAIL :

Info :

Start with lime green colour and make a magic ring

Rnd 1 :

6 sc

Rnd 2 :

sc in all stitches (6)

Rnd 3 :

inc, 1 sc (9)

Rnd 4 :

sc in all stitches (9)

Rnd 5 :

inc, 2 sc (12)

Rnd 6 :

sc in all stitches (12)

Rnd 7 :

inc, 3 sc (15)

Rnd 8 :

sc in all stitches (15)

Rnd 9 :

inc, 4 sc (18)

Rnd 10 :

sc in all stitches (18)

Rnd 11 :

inc, 5 sc (21)

Rnd 12 :

sc in all stitches (21)

Rnd 13 :

inc, 6 sc (24)

Rnd 14 :

sc in all stitches (24)

Rnd 15 :

inc, 7 sc (27)

Rnd 16 :

sc in all stitches (27)

Rnd 17 :

inc, 8 sc (30)

Rnd 18 :

sc in all stitches (30)

Rnd 19 :

inc, 9 sc (33)

Rnd 20 :

sc in all stitches (33)

Rnd 21 :

inc, 10 sc (36)

Rnd 22 :

sc in all stitches (36)

Rnd 23 :

inc, 11 sc (39)

Rnd 24 :

sc in all stitches (39)

Rnd 25 :

inc, 12 sc (42)

Rnd 26 :

inc, 13 sc (45)

Info :

Leave a long tail, cut the yarn, weave the end

โ€” ARMS : (make 2)

Info :

Start with a magic circle

Rnd 1 :

8 sc

Rnd 2-8 :

sc in all stitches (8)

Info :

Leave a long tail, cut the yarn, weave the end

โ€” SPIKES (make 7)

Info :

Start with a magic ring

Rnd 1 :

5 sc

Rnd 2 :

sc in all stitches (5)

Rnd 3 :

inc (10)

Rnd 4 :

sc in all stitches (10)

Rnd 5 :

1 sc, inc (15)

Rnd 6 :

sc in all stitches (15)

Info :

Leave a long tail, cut the yarn, weave the end

โ€” DINOSAUR DOTS :

Info :

With slate green colour make a magic ring

1. dot :

6 sc in magic ring

2. dot :

8 hdc in magic ring

3. dot :

10 hdc in magic ring

Assembly Instructions

  • Sew the arms to the body between rounds 25-26 using the long tail left from each arm
  • Attach the tail to the back of the body between the legs using the long tail, positioning it centered
  • Sew the seven spikes along the back of the body as shown in the reference photo, spacing them evenly
  • Attach the dinosaur dots randomly on the body using the slate green pieces of varying sizes
  • Embroider the cheeks and mouth details on the face using the reference photo as a guide
  • Weave in all remaining yarn ends securely to finish

Important Notes

  • ๐Ÿ’กMake sure to stuff the legs firmly before joining them to create a stable base for the body
  • ๐Ÿ’กPlace the safety eyes between rounds 34-35 before closing the head completely
  • ๐Ÿ’กThe tail gradually increases in size, so count your stitches carefully to maintain the proper shape
  • ๐Ÿ’กUse different colors for each spike to create the vibrant rainbow effect shown in the pattern
  • ๐Ÿ’กLeave long tails on all pieces for easier assembly and more secure attachment
  • ๐Ÿ’กRefer to the photo frequently when positioning spikes and dots for the best visual balance

This charming Mr. Pistachio pattern celebrates being wonderfully different! The unique pistachio shape combined with playful colorful spikes creates a character bursting with personality. This is the first in an ongoing series following Mr. Pistachio's adventures, so you're creating the start of something special. The pattern uses straightforward techniques with creative details that make assembly fun and rewarding. Happy crocheting your own unique dinosaur friend! ๐Ÿฆ•โœจ

You ask,

we answer.

FAQs

Can I use different yarn weights for this pattern?

While the pattern calls for DK weight cotton, you can use other weights as long as you adjust your hook size accordingly. Using lighter yarn will create a smaller dinosaur, while heavier yarn will make him larger. Just make sure your stitches are tight enough that stuffing doesn't show through.

Do I need to make all seven spikes in different colors?

No, you can customize the spike colors however you like! Use the suggested rainbow colors, make them all one color, or match your own color scheme. The pattern is very flexible for personalization.

How do I join the legs without creating a gap?

Work carefully when chaining between the legs and make sure your slip stitch connection is snug. When working the first round around both legs, maintain even tension and stuff as you go to help fill any small gaps that might appear.

What size will the finished dinosaur be?

Using DK weight yarn and a 3.00mm hook, Mr. Pistachio will be approximately 20-25cm tall depending on your tension. The plump body shape makes him wonderfully huggable!

Can I make the tail shorter or longer?

Absolutely! The tail uses a gradual increase pattern, so you can add or remove rounds while maintaining the tapered shape. Just remember to adjust the final increases if you significantly change the length.